Configuring ThreatGate
This recipe covers the basic configuration of ThreatGate and the use of its feeds.
See also
Recipe Scenario
In this scenario, a company in North America only does business domestically and would like to prevent employees from reaching sites known to serve malware.
Additionally, some employees, but not all, should be prevented from reaching social media sites.
Prerequisites
The following items are required to fully configure ThreatGate.
Nexus
ThreatGate is only available through the Netgate Nexus GUI. To use that GUI, Netgate Nexus must be enabled and configured.
Before proceeding:
Follow Netgate Nexus Options in the pfSense Plus GUI to enable Netgate Nexus
Follow Netgate Nexus Controller Setup to configure Netgate Nexus
After following those procedures, access the GUI as described in Access the Netgate Nexus GUI.
CoreDNS
ThreatGate requires CoreDNS to handle feeds containing domain names or expressions.
Before starting this recipe, enable and configure CoreDNS as described in the recipe Configuring the CoreDNS Service.
Warning
This recipe assumes CoreDNS is active and configured exactly as described in that recipe. Do not proceed without following all the steps in Configuring the CoreDNS Service.
MaxMind
A MaxMind account is required to use feeds which include geographic-based Country threat classes (GeoIP). A free account is typically sufficient for many use cases, but check their account and licensing restrictions for details.
Before proceeding, register for an account with MaxMind, login, and generate a license key.
Note
This can be skipped if this environment does not require feeds with Country content.
Configure ThreatGate
Starting from within the Nexus instance configuration GUI, configure the service as follows:
Navigate to Services > ThreatGate
Set the Enable slider to On
Enter the MaxMind credentials if using Country feeds
Click
 to save
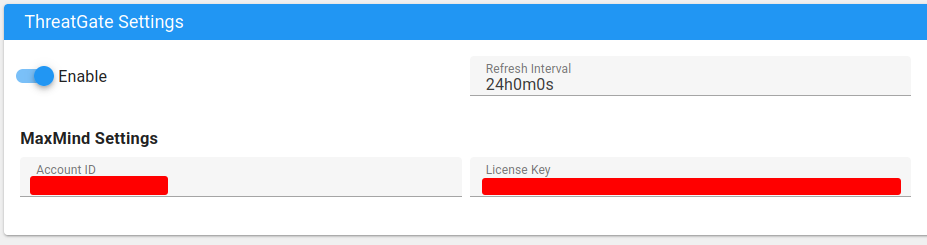
ThreatGate Settings
Create Feeds
This recipe scenario calls for a country-based ThreatGate Feed to block some countries where this company does not operate and which may be a source of problematic traffic.
Note
While one feed can contain many types of content, it is a good practice to create separate feeds for different roles to allow for more fine-grained control. If it’s all content that will be blocked for everyone, however, it can be sufficient to create a single feed.
This example sets up an alias to selectively block communication with certain countries:
Locate the Feeds section of the ThreatGate configuration
Click
 Add Item
Set the Enable Feed slider to On
Enter a Name such as
BlockCountriesSet Mode to Managed Alias
Click the Countries drop-down
Select countries from the list to block, e.g. China and Russian Federation
Click OK
The feed entry should resemble the following:
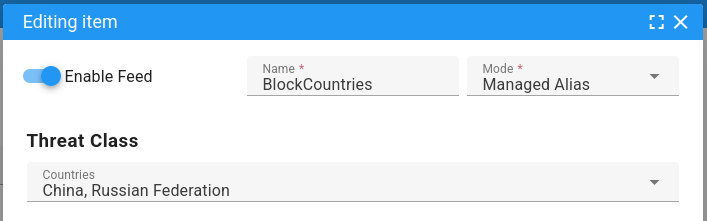
ThreatGate Feed with Country entries
Warning
Adding a feed with country content will cause ThreatGate to synchronize data from MaxMind. This can take some time to complete and consumes large amounts of CPU and memory while synchronizing.
Create Remote Feeds
There are two more aspects of the recipe scenario to cover: Malware blocking and selective social media blocking. This recipe uses ThreatGate Remote Feeds to handle these tasks.
There are many sources of block lists around the Internet which can be used for these purposes. This recipe uses lists from https://github.com/hagezi/dns-blocklists which are actively maintained. CoreDNS can accept feeds containing pattern expressions, so wildcard lists are typically the optimal choice.
Tip
Should one of these feeds unintentionally include a site that users must reach, administrators can bypass the block by adding the good site to one of the Suppress lists in the feed depending on the feed type and content.
Threat Blocking
Next, create a feed to block Malware and other threats:
Locate the Remote Feeds section of the ThreatGate configuration
Click
Add ItemSet the Enable Remote slider to On
Enter a Name such as
ThreatsSet Mode to Always Block
Set the URL to
https://raw.githubusercontent.com/hagezi/dns-blocklists/main/wildcard/tif.txtClick OK
The remote feed entry should resemble the following:
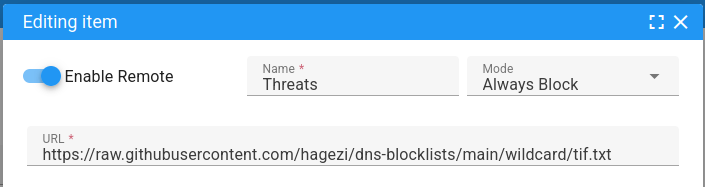
ThreatGate Remote Feed for Threats
Tip
If the feed unintentionally includes a legitimate site that local clients must reach, add an expression to the Suppress List which matches that site, and ThreatGate will exclude it from blocking.
Review Configuration
Take a moment to review the ThreatGate configuration to ensure it is complete, as shown in ThreatGate Complete Configuration:
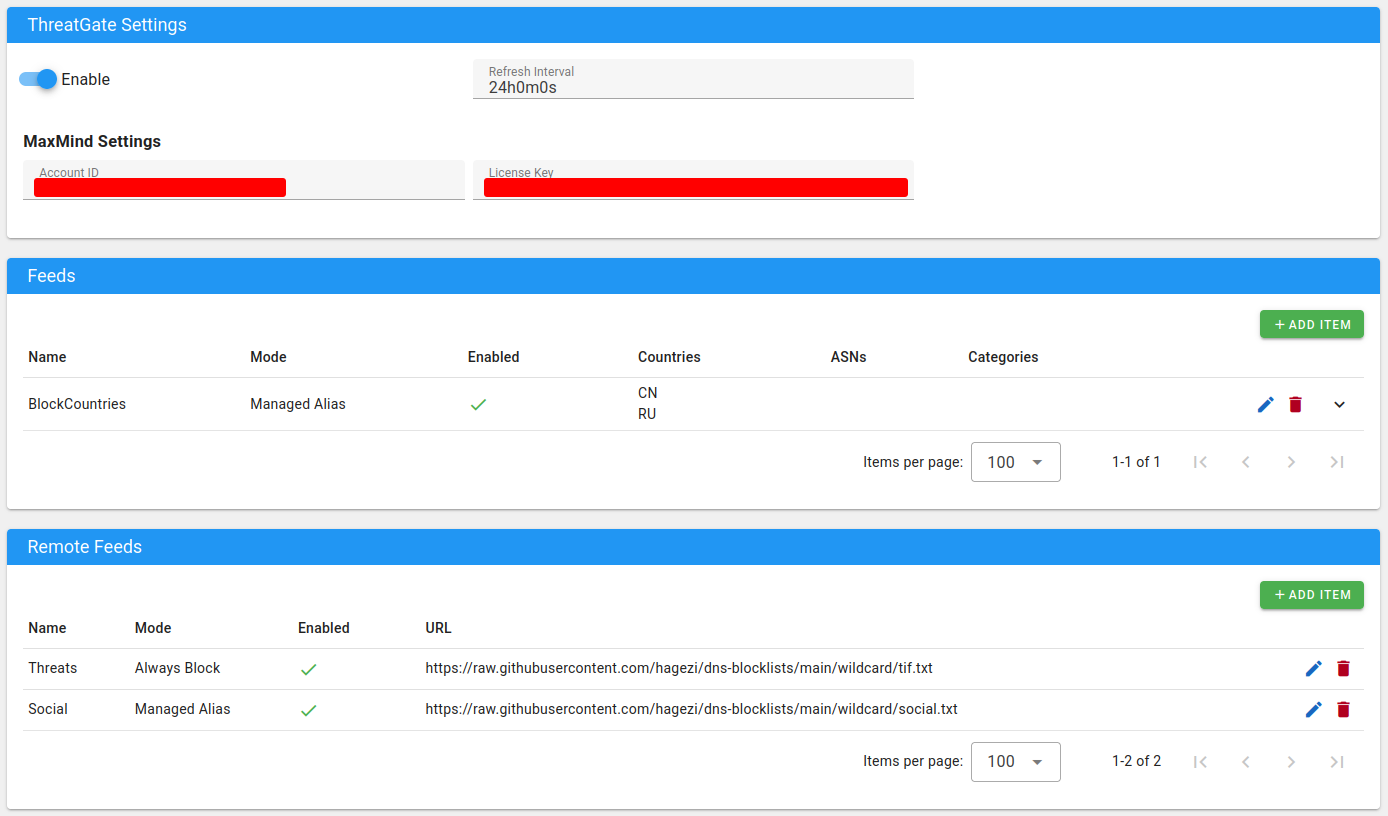
ThreatGate Complete Configuration
Click to save to ensure the settings are all saved and fully
activated. After a few moments, the GUI will display a status dialog and
notices as components finish applying settings.
Configure Firewall Rules
The recipe calls for firewall rules to manage selectively blocking the
BlockCountries feed.
Note
The Threats and Socials feeds only contain domain patterns, which are
only used with CoreDNS, so they do not apply to the firewall.
After ThreatGate finishes processing the feeds, a firewall alias will be
available for use in firewall rules. These aliases have a prefix of TG_, so
the alias for the BlockCountries feed is TG_BlockCountries.
First, create a new alias to contain local client addresses allowed to reach these countries, such as IT/Network Staff:
Open the pfSense Plus GUI
Navigate to Firewall > Aliases
Click
 Add
AddConfigure the alias as follows:
- Name
AllCountriesAllowed- Description
Local clients allowed to reach all countries- Type
Host(s)
Fill in the Host(s) section at the bottom as needed with static addresses assigned to the appropriate clients.
This could be subnets in a Network(s) alias instead.
Click Save
Create the required rules as follows:
Open the pfSense Plus GUI
Navigate to Firewall > Rules, LAN tab
Click
 to add a new rule at the top of the list
Configure the rule as follows:
- Action
Reject
- Protocol
Any
- Source
LAN subnets
- Destination
Address or Alias,
TG_BlockCountries- Description
Block countries
Click Save
Finally, add a rule to pass the special clients:
Click
to add another new rule at the top of the listThis places the rule above the previous block rule.
Configure the rule as follows:
- Action
Pass
- Protocol
Any
- Source
Address or Alias,
AllCountriesAllowed- Destination
Address or Alias,
TG_BlockCountries- Description
Allow some clients to reach all countries
Click Save
Click Apply Changes
When complete, the rules should look similar to the following:

ThreatGate Managed Alias Example Firewall Rules
Configure CoreDNS Blocklists
There are multiple ways to accomplish selective blocking with CoreDNS blocklists:
Block by default and have a CoreDNS Group that omits the blocklist
Allow by default and have a CoreDNS Group that blocks
Note
CoreDNS Groups allow by prefix, so ensure the clients are either in their own subnet/interface or in a contiguous block of addresses which can be CIDR summarized.
This example blocks by default and allows a few clients to bypass restrictions.
Starting from within the Nexus instance configuration GUI, configure the service as follows:
Navigate to Services > CoreDNS
Click the Default Group
Add
Socialsto the Blocklists selectionClick
to save
The Default Group configuration should now resemble this figure:
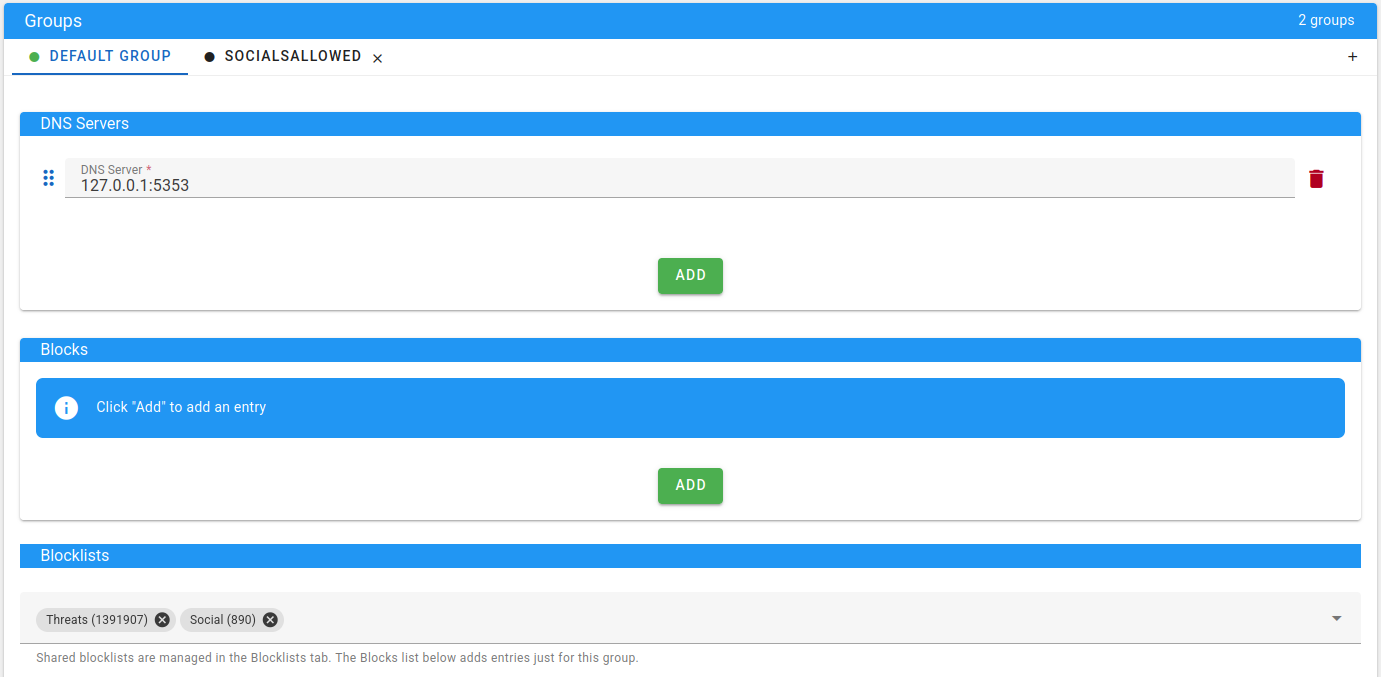
CoreDNS Default Group Configuration
Click
to the right of the group tabs to create a new groupConfigure the group as follows:
- Group Name
SocialsAllowed- Group Prefix
The CIDR masked group of addresses to allow, e.g.
10.23.0.8/29
Do not set Allow Fallback, it must remain Off so this group is not bound by the restrictions on the Default Group
Add DNS Servers to match the Default Group, e.g.
127.0.0.1:5353Check the Blocklists section and ensure that
Socialsis not presentClick
to save
The SocialsAllowed Group configuration should now resemble this figure:
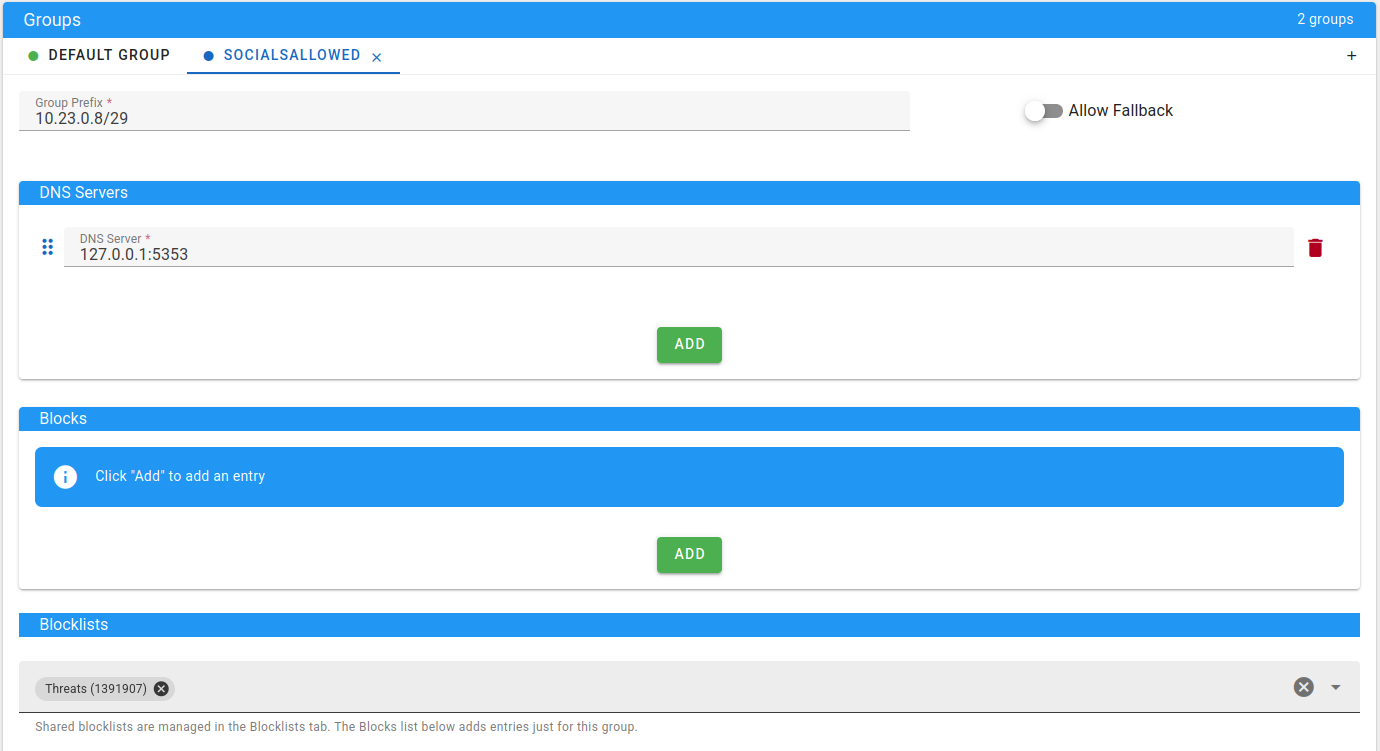
CoreDNS SocialsAllowed Group Configuration
The configuration is now complete!
Test Clients
At this point, the best practice is to ensure clients are experiencing the appropriate restrictions, or lack thereof.
For each Always Block feed, spot check a few clients and ensure they cannot reach sites in the list.
For each Managed Alias feed, check clients inside and outside restricted groups to ensure they either can or cannot reach sites from the feeds as appropriate for their location.
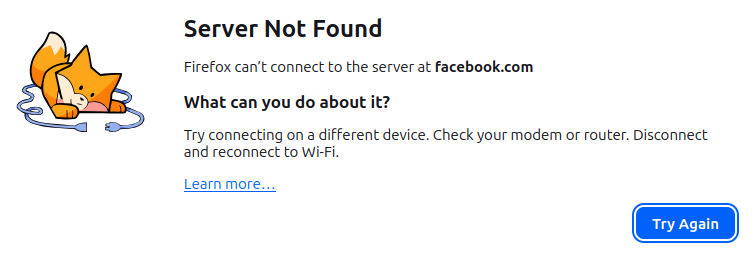
Browser test showing a blocked social media site
Browser tests may be sufficient, but other tests such as ICMP ping and DNS resolution tests are also helpful.
Social Media Blocking
Now create a managed alias remote feed that can be used as a CoreDNS Blocklist to selectively block social media.
Locate the Remote Feeds section of the ThreatGate configuration
Click Add Item
Set the Enable Remote slider to On
Enter a Name such as
SocialSet Mode to Managed Alias
Set the URL to
https://raw.githubusercontent.com/hagezi/dns-blocklists/main/wildcard/social.txtClick OK
The remote feed entry should resemble the following:
ThreatGate Remote Feed for Social Media