Using the Shaper Wizard to Configure ALTQ Traffic Shaping
The easiest way to get started with traffic shaping is by using the wizard for the first time, which guides administrators through the shaper configuration process.
Tip
Due to the complexity of the shaper queues and rules, starting from scratch is quite complicated. If a firewall needs custom rules, step through the wizard and approximate the requirements, then make custom rules afterward.
Each step of the wizard sets up unique queues and rules that control what traffic is assigned into those queues. To configure everything manually, specify the WAN speed at the first screen, then click Next through all the remaining steps. The wizard requires options to be enabled on at least one step, but it does not matter which step.
Note
Completing the wizard and clicking Finish at the end will replace all existing shaper queues and floating rules created by the wizard, including those cloned from wizard rules, with the queues and rules from the new wizard configuration.
Choosing a Wizard
To get started with the Traffic Shaping Wizard, navigate to Firewall > Traffic Shaper and click the Wizards tab. This page displays a list of available traffic shaper wizards, including:
- Multiple LAN/WAN:
Used when the firewall has one or more WANs and one or more LANs. This is the most common wizard and it covers almost every scenario.
- Dedicated Links:
Used when specific LAN+WAN pairings should be accounted for in the shaper configuration.
Starting the Wizard
Each wizard name is followed by the filename of the wizard, which is a link.
Click the link to start the wizard. This example uses the Multiple LAN/WAN
wizard, so click traffic_shaper_wizard_multi_all.xml.
Next, the wizard starts and the first step prompts for the number of WAN and LAN type connections on the firewall, as in Figure Entering the Interface Count.
Enter the number of WAN-type connections on the firewall. These are connections with a gateway configured on the interface, or dynamic WAN type interfaces such as DHCP or PPPoE
Enter the number of LAN type connections. These are local network interfaces without a gateway on the interface
Click Next to proceed with the next step
In this example the firewall only has one WAN and one LAN interface.

Entering the Interface Count
Networks and Speeds
This step, shown in Figure Shaper Configuration, defines the network interfaces that will be the inside and outside from the point of view of the shaper, along with the Download and Upload speeds for a given WAN. When the firewall has more than one interface of a given type, the wizard displays multiple sections on the page to handle each one individually.
In addition to the interfaces and their speeds, select an ALTQ Scheduler (ALTQ Scheduler Types) for the WAN(s) and LAN(s). Use the same scheduler on every interface.
Depending on the connection type, the true link speed may not be the actual
usable speed. In the case of PPPoE, the circuit has not only PPPoE overhead, but
also overhead from the underlying ATM network link being used in most PPPoE
deployments. By some calculations, between the overhead from ATM, PPPoE, IP, and
TCP, the circuit may lose as much as 13% of the advertised link speed. When in
doubt of what to set the speed to, be conservative. Reduce by 10-13% and work it
back up to larger values. If the firewall has a 3Mbit/s line, set it for about
2.7 Mbit/s and then test. The speed on the resulting parent queue can be
edited later to adjust the bandwidth. If it has a low value, the connection will
be maxed out at exactly the defined speed. Nudge it up higher until the firewall
no longer sees any performance gains.
Interface speeds can be specified in Kbit/s, Mbit/s, or Gbit/s, but use the same units on every page.
Choose an Interface and Scheduler for each LAN-type interface (e.g. LAN, PRIQ)
Choose an Interface and Scheduler for each WAN-type interface (e.g. WAN, PRIQ)
Define the Upload speed and units for each WAN-type interface (e.g.
1, Mbit/s)Define the Download speed and units for each WAN-type interface (e.g.
10, Mbit/s)Click Next to proceed with the next step
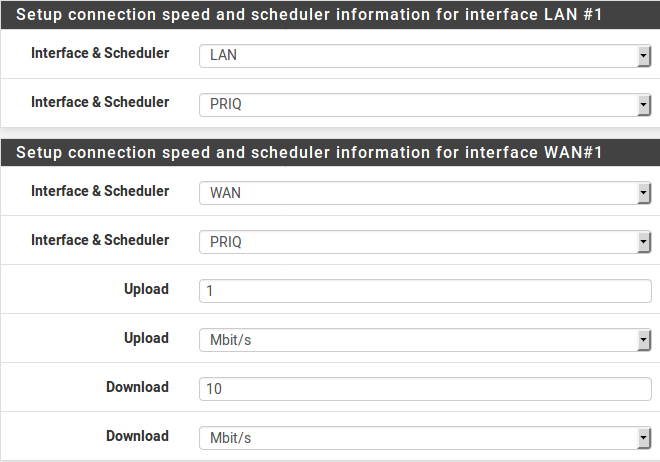
Shaper Configuration
Voice over IP
The wizard contains several options for handling VoIP call traffic, shown in Figure Voice over IP. Prioritizing Voice over IP traffic sets up queues and rules to give priority to VoIP calls and related traffic. This behavior can be fine-tuned by the other settings on this step of the wizard.
- Enable:
A checkbox to enable the VoIP settings on this step. When unchecked, the options are disabled and these queues and rules will not be added by the wizard.
- Provider:
There are a few well-known providers including Vonage, Voicepulse, PanasonicTDA, and Asterisk servers. If the VoIP provider for this site is not in the list, choose Generic. This choice sets up rules based on the ports and protocols known to be used by these providers, rather than matching by address.
Note
This choice matches based on SIP and RTP ports, among others, therefore it can match traffic from other sources as well if they use the same ports as the selected service.
- Upstream SIP Server:
The IP of the upstream PBX or SIP trunk, or an alias containing the IP addresses or networks for the SIP trunk(s). When set, this overrides the Provider field and will instead match traffic based on these addresses.
Note
This choice matches all UDP traffic to and from the specified address(es). In most cases this is OK, but if there are other Non-VoIP UDP-based services on the same remote address, it could match that traffic as well. Such cases are rare, however, so this option tends to be more reliable than matching by port.
- WAN Connection Upload:
The amount of upload bandwidth to guarantee for VoIP devices. This will vary based on how many VoIP devices are on the network and how much bandwidth each session requires. This setting is used by HFSC and CBQ, and should be left blank for PRIQ.
Note
The bandwidth reservation for a service such as VoIP cannot exceed 30% of the available bandwidth on the link. For example, on a 10Mbit/s link, the shaper cannot reserve more than 3Mbit/s.
- LAN Connection Download:
The amount of download bandwidth to guarantee for VoIP devices. This setting is used by HFSC and CBQ, and should be left blank for PRIQ.
Note
The best practice is to use the remote SIP trunk or PBX address because otherwise the shaper may not be able to match traffic properly. For example, using the IP addresses of phones the shaper may only match traffic in one direction, or not at all. This is due to the way the shaper matches traffic with floating rules in an outbound direction. NAT applies before traffic is matched when exiting a WAN, so the shaper rules cannot match outbound connections based on local private IP addresses.
To use these options:
Check Prioritize Voice over IP traffic
Pick ONE of the following:
Choose a Provider from the list OR
Enter an Upstream SIP Server address or alias containing a remote SIP trunk or PBX
Leave Upload and Download blank if using PRIQ, otherwise enter an appropriate Upload or Download value for each connection
Click Next to proceed with the next step
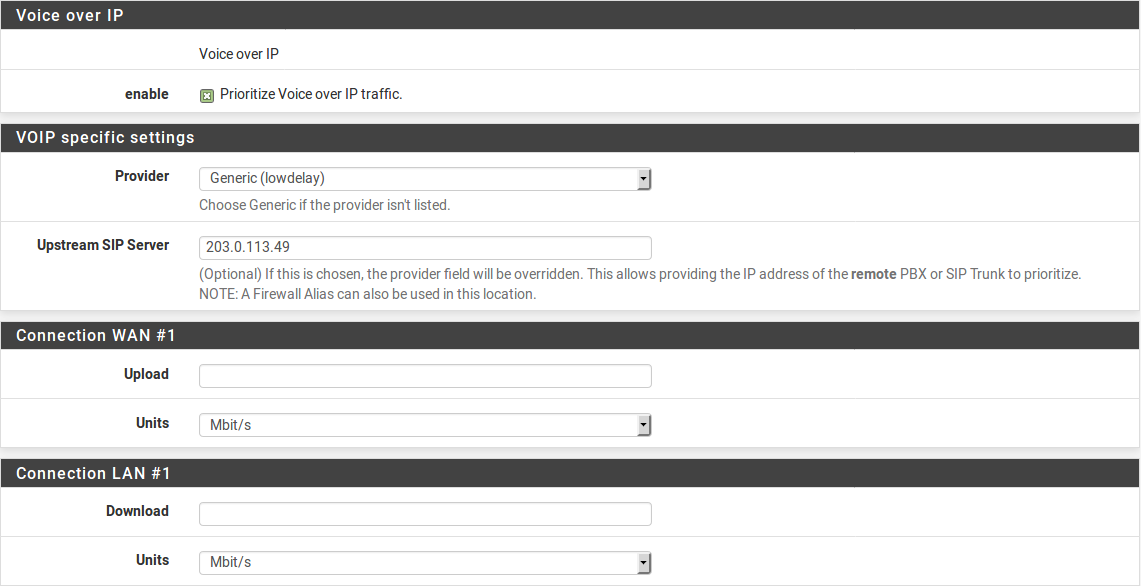
Voice over IP
Penalty Box
The penalty box, depicted in Figure Penalty Box, is a place to relegate misbehaving users or devices that would otherwise consume undesirable amounts of bandwidth. These devices are assigned a hard bandwidth cap which they cannot exceed.
- Enable:
A checkbox to enable the Penalty Box settings on this step. When unchecked, the options are disabled and these queues and rules will not be added by the wizard.
- Address:
The IP address to penalize, or an alias containing multiple addresses to penalize.
- Bandwidth:
The amount of bandwidth that Address can consume, at most.
To use these options:
Check Penalize IP or Alias
Enter an IP address or Alias in the Address box
Enter the Bandwidth limit
Choose the correct units for the Bandwidth limit
Click Next to proceed with the next step

Penalty Box
Peer-to-Peer Networking
The next step, shown in Figure Peer-to-Peer Networking, sets controls for many Peer-to-Peer (P2P) networking protocols. By design, P2P protocols will utilize all available bandwidth unless limits are put in place. If P2P traffic will be present on a network, the best practice is to ensure it will not degrade other traffic.
Note
P2P protocols deliberately attempt to avoid detection. BitTorrent is especially guilty of this behavior. It often utilizes non-standard or random ports, or ports associated with other protocols. Identifying all P2P traffic can be difficult or impossible.
- Enable:
A checkbox to enable the P2P traffic settings on this step. When unchecked, the options are disabled and these queues and rules will not be added by the wizard.
- Peer-to-Peer Catch All:
Causes any unrecognized traffic to be assumed as P2P traffic, and such traffic will have its priority lowered accordingly.
- Bandwidth:
The amount of bandwidth that unclassified traffic can consume, at most, when P2P Catch All is active.
Warning
This option effectively takes over the Default traffic shaping queue and lowers its priority. When this option is active, it is critical for all legitimate traffic to be matched by rules that set a priority higher than the priority of the P2P catch all queue.
The Raise / Lower Other Applications step of the wizard can help here, but ultimately accomplishing this task frequently requires additional manual rules.
- Enable/Disable specific P2P protocols:
These options identify various known P2P protocols. The firewall will assign ports and protocols associated with each enabled option as P2P traffic.
To use the options in this step:
Check Lower priority of Peer-to-Peer traffic
Optionally enable the p2p Catch All feature
Enter the Bandwidth limit for p2p Catch all, if enabled
Choose the correct units for the Bandwidth limit
Select protocols for the firewall to classify as P2P traffic
Click Next to proceed with the next step
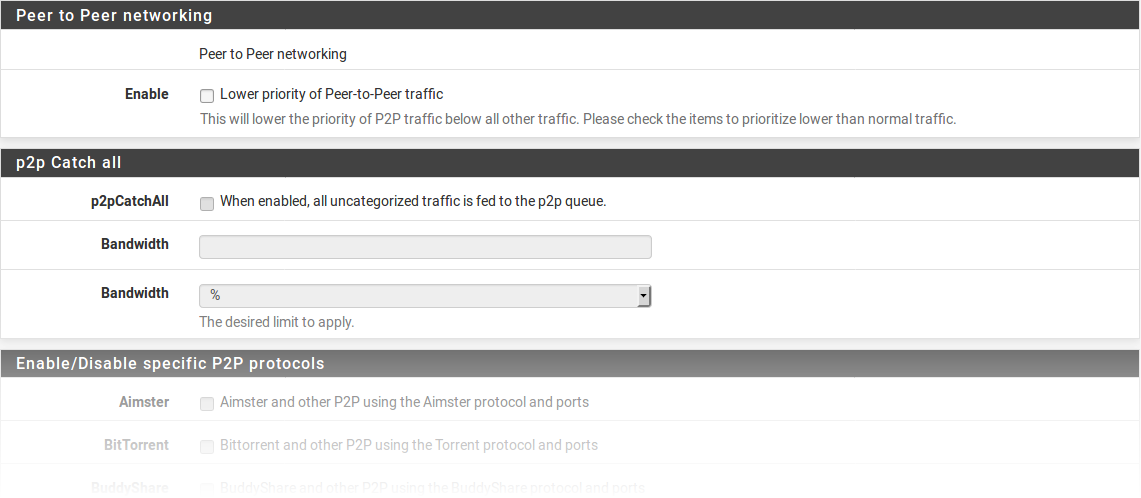
Peer-to-Peer Networking
Network Games
Online games typically rely on low latency for acceptable player experiences. If a user on the network attempts to download large files or game patches while playing, that traffic can easily drown out the packets associated with the game itself and cause lag or disconnections. If the firewall gives gaming traffic priority, it can ensure that traffic will be delivered first and fastest.
- Enable:
A checkbox to enable the gaming traffic settings on this step. When unchecked, the options are disabled and these queues and rules will not be added by the wizard.
- Enable/Disable specific game consoles and services:
These options match traffic for entire game consoles or online services which use common ports and protocols across all, or at least a majority, of their games.
- Enable/Disable specific games:
These options match traffic for specific games which deviate from the general categories in the previous section.
Tip
To prioritize a game that is not listed, check any other game from the list so that the wizard will create the queues and rules to use as a reference base. After completing the wizard, edit the resulting rules to match the unlisted game.
To use the options in this step:
Check Prioritize network gaming traffic
Select any games consoles on the network from the list in Enable/Disable specific game consoles and services
Select any games on the network from the list in Enable/Disable specific games
Click Next to proceed with the next step
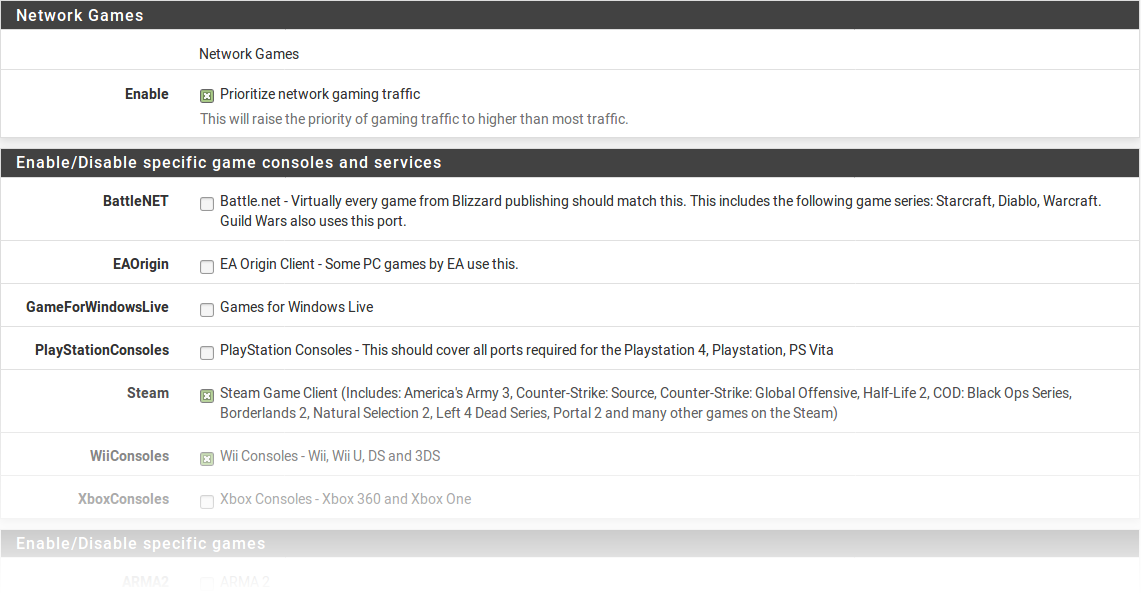
Network Games
Raising or Lowering Other Applications
The last configuration screen of the shaper wizard, seen in Figure Raise or Lower Other Applications, lists a number of other commonly available applications and protocols.
The needs of a particular network dictate how the firewall should handle each protocol. For example, in a corporate environment management may want to lower the priority of non-interactive traffic such as e-mail where a reduction in speed is not usually noticed by users, and they may also want to raise the priority of interactive services like RDP where poor performance is an impediment for employees. In a home, multimedia streaming may be more important, and other services can have their priority lowered by the shaper.
Tip
As with other steps of this shaper wizard, if a protocol is not listed, select a similar protocol and then adjust the rules after completing the wizard.
- Enable:
A checkbox to enable the settings on this step. When unchecked, the options are disabled and these queues and rules will not be added by the wizard.
- Protocol Categories:
Each section contains well-known protocols, grouped by their general function.
There are more than 40 protocols to choose from, and each can be given a Higher priority, Lower priority, or left at the Default priority.
Tip
If p2pCatchAll is active, the best practice is to use this step to ensure that these other protocols are recognized and treated normally, rather than penalized by the default p2pCatchAll rule.
To use the options in this step:
Check Other networking protocols
Locate specific protocols in the list to alter priority.
For each protocol, choose one of Higher priority, Lower priority, or leave it at the Default priority.
Click Next to proceed with the next step
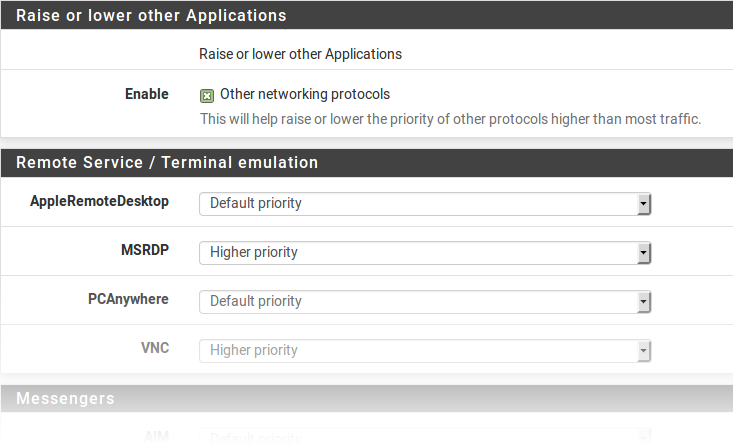
Raise or Lower Other Applications
Finishing the Wizard
Click Finish to complete the wizard. The firewall will then create all the rules and queues for enabled options, and then it will reload the ruleset to activate the new traffic shaper settings.
Due to the firewall operating in a stateful manner, the firewall can only apply changes in traffic shaping to new connections. In order for the new traffic shaping settings to be fully active on all connections, clear the states.
To reset the state table contents:
Navigate to Diagnostics > States
Click the Reset States tab
Check Reset the firewall state table
Click Reset
Shaper Wizard and IPv6
The shaper wizard creates rules for IPv4 traffic only. Rules can be manually adjusted or cloned and set for IPv6.