IPsec Remote Access VPN Example Using IKEv2 with EAP-MSCHAPv2
IKEv2 Server Configuration
There are several components to the server configuration for mobile clients:
Creating a certificate structure for the VPN
Configuring the IPsec Mobile Client settings
Creating the phase 1 and phase 2 for the client connection
Adding IPsec firewall rules.
Create user credentials for the VPN
IKEv2 Certificate Structure
Tip
A certificate created by the ACME package (ACME package) will be natively trusted by many clients and can be used in place of a manually created private CA and server certificate.
Windows clients may not accept an ACME certificate as it may lack a property for IKE in the extended key usage attributes. This check can be disabled, however. See Disable EKU Check.
Create a Certificate Authority
If a suitable Certificate Authority (CA) is not present in the certificate manager, creating one is the first task:
Navigate to System > Certificates
Click
 Add to create a new certificate authority
Set the options as follows:
- Descriptive Name:
Mobile IPsec CA- Method:
Create an internal Certificate Authority
- Randomize Serial:
Checked
- Common Name:
mobile-ipsec-ca
Leave the rest of the fields at their default values or adjust to suit local preferences
Click Save
Create a Server Certificate
Warning
Follow these directions exactly, paying close attention to how the server certificate is created at each step. If any one part is incorrect, some or all clients may fail to connect.
Navigate to System > Certificates, Certificates tab
Click
Add to create a new certificateSet the options as follows:
- Method:
Create an internal Certificate
- Descriptive Name:
IKEv2 Server- Certificate Authority:
Mobile IPsec CA
- Common Name:
The hostname of the firewall as it exists in DNS, e.g.
vpn.example.com.If clients connect by IP address, place the IP address here instead.
- Certificate Type:
Server Certificate
- Alternative Names:
- Type:
IP Address
- Value:
The WAN IP address of the firewall, e.g.
198.51.100.3
Add more Alternative Names as needed for additional hostnames or IP addresses on the firewall that clients may use to connect.
Click Save
Mobile Client Settings
The next step is to choose an IP address range to use for mobile clients. Ensure that IP addresses do not overlap any existing network.
Warning
The IP addresses used by mobile clients must differ from those in use at the site hosting the mobile tunnel as well as the LAN from which the client will be connecting.
This example uses 10.3.200.0/24, but it can be any unused subnet.
Navigate to VPN > IPsec, Mobile Clients tab
Enable IPsec:
- Enable IPsec Mobile Client Support:
Checked

Enable Mobile IPsec Clients
Set the authentication options as follows:
- User Authentication:
Local Database as seen in Figure Mobile Clients Authentication.
This setting is not needed for EAP-MSCHAPv2, but it must have something selected.
Tip
RADIUS servers defined in the User Manager (User Management and Authentication) can be selected here for authenticating users when using EAP-RADIUS.
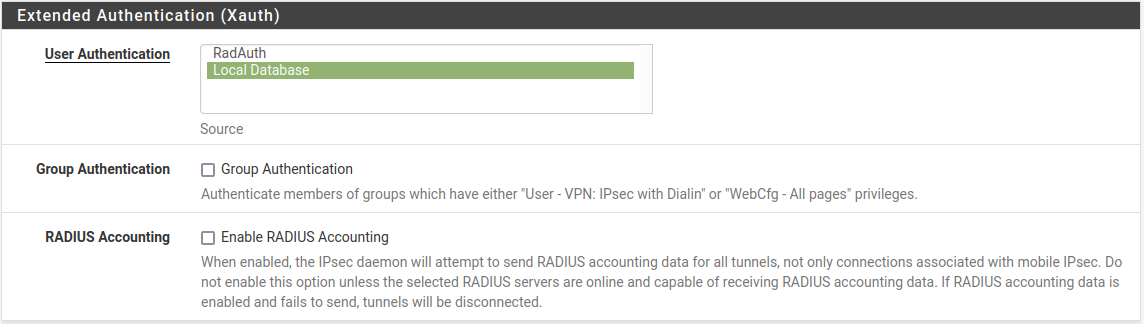
Mobile Clients Authentication
Set the Client Configuration options
These settings may be pushed to the client, such as the client IP address and DNS servers. These options are shown in Figure Mobile Clients Pushed Settings. Compatibility with these options varies between clients, but is common in most current operating systems.
- Virtual Address Pool:
Checked,
10.3.200.0/24- Virtual IPv6 Address Pool:
Checked,
2001:db8:1:df01::/64- Network List:
Checked
- DNS Default Domain:
Checked,
example.com- Split DNS:
Checked,
example.com example.org- DNS Servers:
Checked,
10.3.0.1
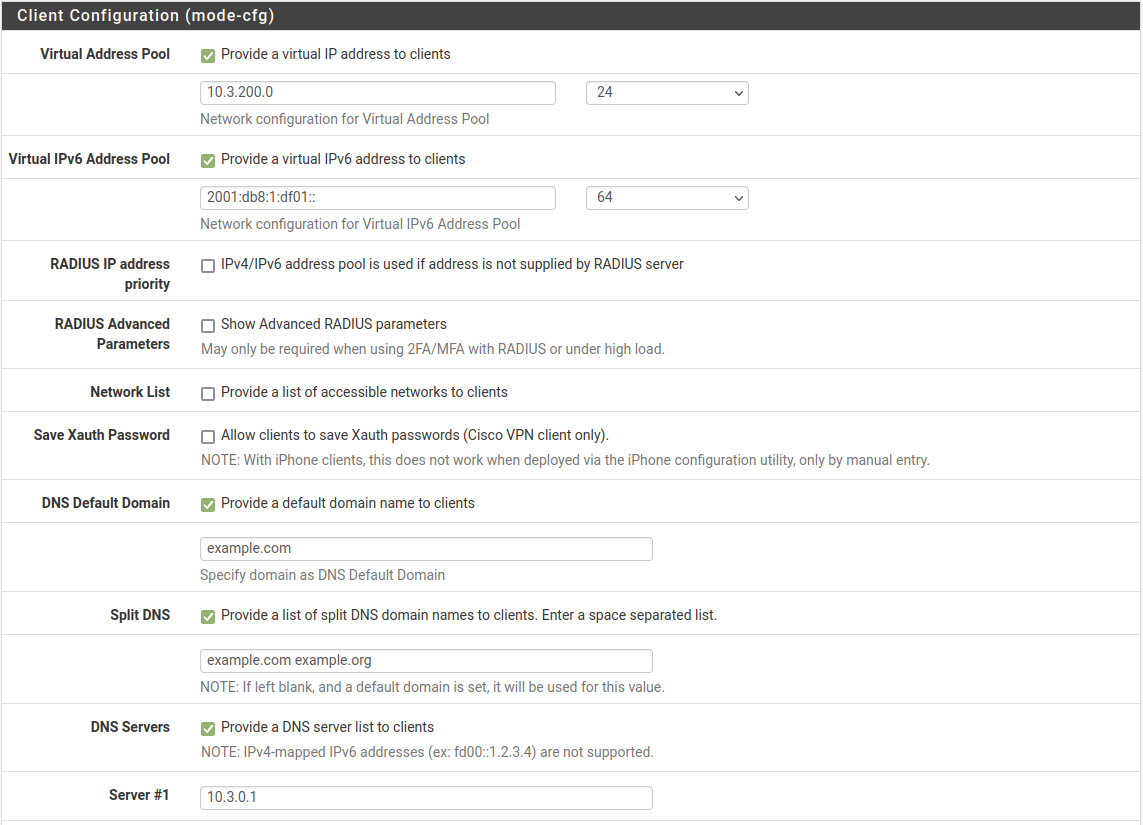
Mobile Clients Pushed Settings
See also
For additional information these options work, see Client Configuration.
Click Save
Click
Create Phase 1 at the top of the screen if it appears
Mobile Clients Phase 1 Creation Prompt
Phase 1
The phase 1 configuration for mobile clients must be configured as follows:
- Description:
Mobile IPsecor another suitable description- Key Exchange Version:
IKEv2
- Internet Protocol:
IPv4 for this example as it only uses an IPv4 WAN
- Interface:
WAN
- Authentication Method:
EAP-MSCHAPv2
- My identifier:
- Choose Fully Qualified Domain Name from the drop-down list and then
enter the hostname of the firewall,
vpn.example.com.Warning
This must match the value in the server certificate.
- Peer Identifier:
Any
- My Certificate:
Choose the IPsec server certificate created earlier
- Encryption Algorithm:
Add multiple combinations of encryption, hash, and DH options to accommodate various clients with different requirements. Click
Add Algorithm
to add more entries. They should be added with the most secure and preferred
options first.A good starting set of options is:
Algorithm AES256-GCM, Hash SHA256, DH Group 16
Algorithm AES256-GCM, Hash SHA256, DH Group 2
Algorithm AES 256, Hash SHA256, DH Group 14
Algorithm AES 256, Hash SHA1, DH Group 14
- Life Time:
28800- MOBIKE:
Set to Enable to allow clients to roam between IP addresses, otherwise set to Disable.
Click Save
Phase 2
Click
 Show Phase 2 Entries to expand the list of mobile
phase 2 entries
Show Phase 2 Entries to expand the list of mobile
phase 2 entriesClick
Add P2 to add a new mobile phase 2.- Description:
Mobile IPv4- Mode:
Tunnel IPv4
- Local Network:
Set to LAN subnet or another local network.
Tip
To tunnel all traffic over the VPN, use Network and enter
0.0.0.0with a mask of 0- Protocol:
ESP
- Encryption algorithms:
Set to combinations of options which will be accepted by all possible clients. A good starting set is:
AES, 128
AES128-GCM, 128
AES256-GCM, 128
- Hash algorithms:
Similar to the algorithm, select all options required by clients:
SHA256, SHA384, SHA512
- PFS:
14 (2048 bit)
Warning
When configuring a VPN on Apple iOS manually, it is not compatible with PFS in phase 2 as demonstrated in Configuring IPsec IKEv2 Remote Access VPN Clients on iOS. Most other clients require PFS. Rather than creating a VPN connection on iOS manually, the best practice is to use a VPN profile from the Apple Configurator or IPsec Export Package which allows the use of PFS.
- Lifetime:
3600
Add another phase 2 entry but this time for IPv6. The settings are identical to the previous entry with the following changes:
- Description:
Mobile IPv6- Mode:
Tunnel IPv6
- Local Network:
LAN subnet as before or use the network value
::with a mask of 0 to tunnel all traffic.
Click Save
Click Apply changes
The tunnel setup for mobile clients is complete.
Mobile IPsec User Creation
The next step is to add users for use by EAP-MSCHAPv2.
Navigate to VPN > IPsec, Pre-Shared Keys tab
Click
Add to add a new keyConfigure the options as follows:
- Identifier:
The username for the client.
This can be expressed in multiple ways, such as an e-mail address like
jimp@example.com- Secret Type:
EAP
- Pre-Shared Key:
The password for the client, for example
abc123
Click Save
Repeat as many times as needed for additional VPN users.
A complete user is shown in Figure Mobile IPsec User.

Mobile IPsec User
Firewall Rules
As with the static site-to-site tunnels, mobile tunnels also require firewall rules at Firewall > Rules on the IPsec tab. In this instance the source of the traffic would be the subnet chosen for the mobile clients and the destination will be the LAN network, or any if tunneling all traffic.
See also
For more details, IPsec and firewall rules.
Client Configuration
Each mobile client device needs a VPN instance or client configured. In some cases a third-party IPsec client may be required. There are many different IPsec clients available for use, some free, and some commercial applications. With IKEv2, as used in this example, many operating systems have native VPN clients and do not need extra software.
Common clients are covered at Configuring IPsec IKEv2 Remote Access VPN Clients.