OpenVPN Site-to-Site Configuration Example with SSL/TLS
A site-to-site connection using SSL/TLS in client/server mode works for connecting one or more remote sites and is especially convenient for managing numerous remote sites connecting back to a central site in a hub-and-spoke fashion.
Example Configuration Overview
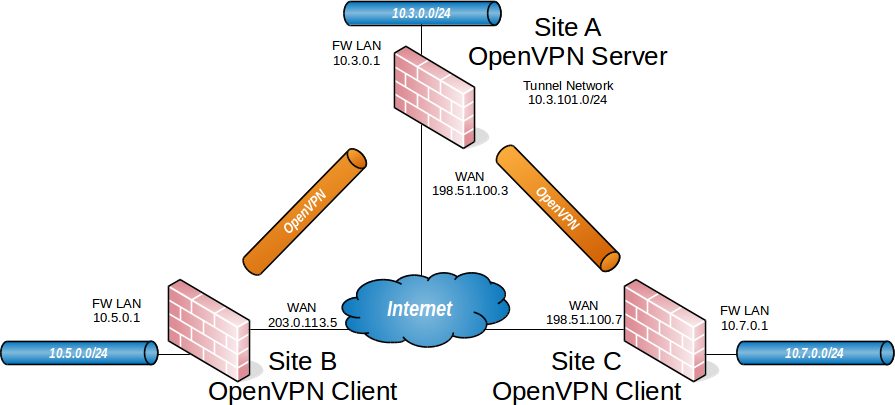
OpenVPN Example Site-to-Site SSL/TLS Network
When configuring a site-to-site OpenVPN connection using SSL/TLS one firewall will be the server and the others will be clients.
Tip
Usually the main location will be the server and the remote offices will act as clients, though if one location has a static IP address and more bandwidth than the main office that may be a more desirable location for the server.
This style of VPN requires a dedicated subnet for the OpenVPN interconnection
between networks in addition to the subnets on both ends. Figure
OpenVPN Example Site-to-Site SSL/TLS Network shows a depiction of this layout,
using 10.3.101.0/24 as the IPv4 Tunnel Network for the VPN. This can be any
valid IPv4 subnet so long as it does not overlap another subnet currently in use
on any of the connected networks.
OpenVPN allocates IP addresses the same way it does for remote access clients. When using a Topology style of subnet, each client obtains one IP address in a common subnet. When using a Topology style of net30, each connecting client gets a /30 subnet to interconnect itself with the server.
See also
The subnet topology style uses address space efficiently and has very few quirks with its behavior compared to the alternatives. See Topology for more details.
The following sections describe how to configure the server and client sides of the connection.
Summary of Requirements
This style of VPN requires several items, all of which are covered in this recipe:
On the Server at the main site:
A certificate structure including a Certificate authority, server certificate, and one or more client certificate(s)
An OpenVPN Server instance
OpenVPN Client Specific Override entries for all clients
On each remote site:
Imported CA and client certificate
OpenVPN Client instance
Example Configuration Settings
Site A - Server |
|
|---|---|
Name |
Austin Office |
WAN Address |
198.51.100.3 |
LAN Subnet |
10.3.0.0/24 |
LAN Address |
10.3.0.1 |
CA Name |
S2SCA |
Cert CN |
serverA |
Tunnel Net |
10.3.101.0/24 |
Site B - Client |
|
|---|---|
Name |
London Office |
Cert CN |
clientB |
WAN Address |
203.0.113.5 |
LAN Subnet |
10.5.0.0/24 |
LAN Address |
10.5.0.1 |
Site C - Client |
|
|---|---|
Name |
Colorado Office |
Cert CN |
clientC |
WAN Address |
198.51.100.7 |
LAN Subnet |
10.7.0.0/24 |
LAN Address |
10.7.0.1 |
Configuring SSL/TLS Server Side
The server requires two items for each network reachable through an OpenVPN client:
An entry in the IPv4 Remote network(s) field on the server instance.
This configures a
routeto tell the operating system that OpenVPN knows about a remote network. This makes the OS hand packets for the destination network over to OpenVPN.An entry in the IPv4 Remote network(s) field of an OpenVPN Client Specific Override.
This configures an internal route (
iroute) to tell OpenVPN how to route a subnet to a specific client certificate. This allows OpenVPN to deliver packets for the destination network to the appropriate connected client without hardcoding its address anywhere.
More detail on these will follow in the example.
Warning
This setup assumes the server will not be using DCO, as that requires a different routing configuration. For a similar recipe that works with DCO, see OpenVPN Site-to-Site Configuration Example with SSL/TLS and DCO.
See also
Create Certificate Structure
The first step is to create a certificate structure for this VPN.
This example uses the names listed in
Example Configuration Settings – The CA is named S2SCA, the
Server CN is named serverA, and the clients are clientB and clientC.
See also
Create a Certificate Authority
Create a CA unique to this VPN:
Navigate to System > Certificates, Authorities tab
Click
 Add to create a new a CA
Enter the settings as follows:
- Descriptive Name:
S2SCA- Method:
Create an internal Certificate Authority
- Randomize Serial:
Checked
- Key Type:
RSA, 2048 (or higher)
- Digest Algorithm:
sha256 (or higher)
- Lifetime (days):
3650- Common Name:
S2SCA- Subject Component Fields:
The remaining fields are optional, but can be set to reflect the location of the CA.
Click Save
Create a Server Certificate
Create a server certificate signed by the VPN CA:
Navigate to System > Certificates, Certificates tab
Click
Add/Sign to create a new certificateEnter the settings as follows:
- Method:
Create an internal Certificate
- Descriptive Name:
serverA- Certificate Authority:
S2SCA
- Key Type:
RSA, 2048 (or higher)
- Digest Algorithm:
sha256 (or higher)
- Lifetime (days):
200Note
Some current operating systems and software limit server certificates to a maximum lifetime of
200days for security reasons. Clients on these platforms may reject a server certificate with a longer lifetime.- Common Name:
serverA- Subject Component Fields:
The fields contain data copied from the CA and are optional, but can be set to reflect the location of the server.
- Certificate Type:
Server Certificate
Warning
This setting is critical, do not forget to set this value!
- Alternative Names:
Optional extra entries, if needed, which specify alternate ways to identify the server. This can be left blank if the certificate will only be used by OpenVPN. Otherwise, add fields with additional information such as alternate hostnames, static IP addresses, and so on which are relevant to this server.
Click Save
Create User Certificates
Create user certificates for each remote site signed by the VPN CA.
Navigate to System > Certificates, Certificates tab
Click
Add/Sign to create a new certificateEnter the settings as follows:
- Method:
Create an internal Certificate
- Descriptive Name:
clientB- Certificate Authority:
S2SCA
- Key Type:
RSA, 2048 (or higher)
- Digest Algorithm:
sha256 (or higher)
- Lifetime (days):
3650- Common Name:
clientB- Subject Component Fields:
The fields contain data copied from the CA and are optional, but can be set to reflect the location of the client.
- Certificate Type:
User Certificate
Warning
This setting is critical, do not forget to set this value!
- Alternative Names:
Optional extra entries which specify alternate ways to identify the client. These can be left blank if the certificate will only be used by OpenVPN. Otherwise, add fields with additional information such as alternate hostnames, static IP addresses, and so on which are relevant to this client.
Click Save
Repeat this process for every client (e.g. clientC and any future clients).
Export Certificates
The next task is to export the certificates and keys which the client requires when connecting to the OpenVPN server.
Navigate to System > Certificates, Authorities tab
Click
 on the row for the CA to export its certificate
Navigate to System > Certificates, Certificates tab
Click
on the row for each client certificate to export the
certificatesClick
 on the row for each client certificate to export the private
key for the client certificates.
on the row for each client certificate to export the private
key for the client certificates.
Warning
Do not export the CA key, server certificate, or server key! The client does not need these files and copying them unnecessarily significantly weakens the security of the VPN.
Configure the OpenVPN Server Instance
Navigate to VPN > OpenVPN, Servers tab
Click
Add to create a new serverFill in the fields as described below, with everything else left at defaults.
Use values appropriate for this network, or the defaults if unsure.
See also
See Server Configuration Options for details on each of these options.
- Description:
Enter text to describe the connection, e.g.
Site-to-Site VPN.- Server Mode:
Peer to Peer (SSL/TLS)
- DCO (Plus Only):
This example uses routing that only functions when DCO is disabled. To use DCO on the server, check this box to activate the feature and read the DCO section of the documentation for specifics on how routing differs.
See also
For additional information on DCO in general, see OpenVPN Data Channel Offload (DCO).
For a similar recipe that works with DCO, see OpenVPN Site-to-Site Configuration Example with SSL/TLS and DCO.
- Device Mode:
tun
- Protocol:
UDP on IPv4 only
- Interface:
WAN
- Local Port:
1194- TLS Configuration:
Check the Use a TLS Key box to enable TLS authentication which provides protection for the tunnel control channel.
Leave Automatically generate a TLS Key checked, so the firewall will generate a new key automatically the first time this entry is saved.
- Peer Certificate Authority:
Select the CA created at the beginning of this process (
S2SCA)- Peer Certificate Revocation List:
Select a CRL for the CA, if one exists.
- Server Certificate:
Select the server certificate created at the beginning of this process (
serverA)- IPv4 Tunnel Network:
Enter the chosen tunnel network,
10.3.101.0/24- IPv4 Local Network(s):
Enter the LAN subnets for all sites including the server:
10.3.0.0/24,
10.5.0.0/24, 10.7.0.0/24
Note
If there are more networks on the server side that clients need to reach, such as networks reachable via static routes, other VPNs, and so on, add them as additional entries in the IPv4 Local Network box.
- IPv4 Remote Network(s):
Enter only the client LAN subnets:
10.5.0.0/24, 10.7.0.0/24- Inter-client communication:
Check if the client sites will communicate between each other. Leave unchecked if the remote clients only communicate with the server network(s).
- Inactive:
0to disable disconnecting idle clients, so that site-to-site connections can stay up indefinitely.
Click Save.
Click
 to edit the new server instance
Find the TLS Key box
Select all the text inside
Copy the text to the clipboard
Save this to a file or paste it into a text editor such as Notepad temporarily
Create Client-Specific Overrides
Now add Client Specific Overrides for each client site. These tie a client subnet to a particular certificate so that OpenVPN can properly route a subnet to the correct site.
Navigate to VPN > OpenVPN, Client Specific Overrides tab
Click
to add a new overrideFill in the fields on this screen as follows:
- Description:
A name for the override, such as the common name of the client (e.g.
clientB).- Common Name:
Enter the CN of the first client site. In this example, that is
clientB.- Server List:
Select the server instance configured previously.
- IPv4 Remote Network/s:
The clientB LAN subnet,
10.5.0.0/24.Note
This field sets up the internal route (
iroute) for OpenVPN.
Click Save
Add an override for the second site, adjusting the Description. Common
Name and IPv4 Remote Network to match. In the example for site C, these
values would be clientC and 10.7.0.0/24 respectively.
Firewall Rules
External Traffic (WAN)
Next, add a firewall rule for the WAN interface which allows access to the OpenVPN server.
Navigate to Firewall > Rules, WAN tab
Click
 Add to create a new rule at the top of the list
Set the options as follows:
- Protocol:
UDP
- Source:
any (since multiple sites must connect)
Tip
For extra security, if the clients have static IP addresses, create an alias containing these addresses, then set it as the source on this rule.
- Destination:
WAN Address
- Destination port:
1194- Description:
OpenVPN Multi-Site VPN
Click Save
Click Apply Changes
Tunneled Traffic
Now add a rule to the OpenVPN tab to pass traffic over the VPN from the Client-side LAN to the Server-side LAN. This can be an “Allow all” style rule or a set of stricter rules. This example allows all traffic using this rule:
Navigate to Firewall > Rules, OpenVPN tab
Click
Add to create a new rule at the top of the listSet the options as follows:
- Protocol:
any
- Source:
any
Tip
For extra security, create an alias containing only the remote hosts or subnets which must initiate contact with hosts on the sever LAN, then use that alias as the source on this rule.
- Destination:
any
Tip
For extra security, create an alias containing only the local hosts or subnets on the server LAN which must accept connections from remote hosts across the VPN, then use that alias as the destination on this rule.
- Description:
Allow all on OpenVPN
Click Save
Click Apply Changes
That completes the server setup, next, now move on to configure the clients.
Configuring SSL/TLS Client Side
Import CA and Certificate
On the client, import the CA certificate along with the client certificate and key for that site. This is the same CA and client certificate created earlier in this document.
See also
Import these items at System > Certificates.
First import the CA:
Navigate to System > Certificates, Authorities tab
Click
Add to create a new certificate authorityEnter the settings as follows:
- Descriptive Name:
S2SCA- Method:
Import an existing Certificate Authority
- Certificate Data:
Open the CA certificate file in a text editor on the client PC, select all the text, and copy it to the clipboard. Then paste it into this field.
Click Save
Next, import the client certificate:
Navigate to System > Certificates, Certificates tab
Click
Add to create a new certificateEnter the settings as follows:
- Method:
Import an existing Certificate
- Descriptive Name:
clientB VPN Certificate- Certificate Type:
X.509 (PEM)
- Certificate Data:
Open the client certificate file in a text editor on the client PC, select all the text, and copy it to the clipboard. Then paste it into this field.
- Private Key Data:
Open the client certificate private key in a text editor on the client PC, select all the text, and copy it to the clipboard. Then paste it into this field.
Click Save
Repeat these steps on each client firewall.
Configure the OpenVPN Client Instance
After importing the certificates, create the OpenVPN client:
Navigate to VPN > OpenVPN, Clients tab
Click
Add to create a new clientFill in the fields as follows, with everything else left at defaults:
See also
See Client Configuration Options for details on each of these options.
- Description:
Text to describe the connection (e.g.
Site A VPN)- Server Mode:
Peer to Peer (SSL/TLS)
- DCO (Plus Only):
Check this box to activate the OpenVPN Data Channel Offload (DCO) feature for the client if desired.
See also
See OpenVPN Data Channel Offload (DCO) for additional information.
- Device Mode:
tun
- Protocol:
UDP on IPv4 only
- Interface:
WAN
- Server host or address:
The public IP address or hostname of the OpenVPN server (
198.51.100.3in this example)- Server Port:
1194- Use a TLS Key:
Checked
- Automatically generate a TLS key:
Unchecked
- TLS Key:
Paste in the TLS key copied from the server instance
- Peer Certificate Authority:
The CA imported at the beginning of this process
- Client Certificate:
The client certificate imported at the beginning of this process
Click Save
Note
With SSL/TLS server/client configurations such as this example, routes and other configuration options are automatically pushed from the server and thus not present in the client configuration. If the client side must reach additional networks, configure them in the server settings or a client-specific override as Local Networks.
Firewall Rules
This next step is optional depending on whether hosts on the server network or other client sites need to initiate contact with hosts on the client network. If the other sites do not need to initiate contact with this client, then no action is necessary.
If the other sites will initiate contact, then this traffic requires a firewall rule on the OpenVPN tab on the client firewall to allow traffic from other VPN sites to reach the Client-side LAN. An “Allow all” style rule is OK in some cases, but a set of stricter rules is the best practice.
This example allows all traffic:
Navigate to Firewall > Rules, OpenVPN tab
Click
Add to create a new rule at the top of the listSet the options as follows:
- Protocol:
any
- Source:
any
Tip
For extra security, create an alias containing only the remote hosts or subnets which must initiate contact with hosts on the client LAN, then use that alias as the source on this rule.
- Destination:
any
Tip
For extra security, create an alias containing only the local hosts or subnets on the client LAN which must accept connections from remote hosts across the VPN, then use that alias as the destination on this rule.
- Description:
Allow all on OpenVPN
Click Save
Click Apply Changes
Testing the Connection
The configuration is now complete. The OpenVPN client instance automatically starts when created, so it should already be attempting to connect at this point and if the configuration is correct, it will be connected.
Try to ping across to the remote end LAN to verify connectivity.
See also