Configuring the Snort Package
Snort is an intrusion detection and prevention system. It can be configured to simply log detected network events to both log and block them. Thanks to OpenAppID detectors and rules, Snort package enables application detection and filtering. The package is available to install in the pfSense® software GUI from System > Package Manager. Snort operates using detection signatures called rules. Snort rules can be custom created by the user, or any of several pre-packaged rule sets can be enabled and downloaded.
The Snort package currently offers these pre-packaged rules:
Snort VRT (Vulnerability Research Team) rules
Snort GPLv2 Community Rules
Emerging Threats Open Rules
Emerging Threats Pro Rules
OpenAppID Open detectors and rules for application detection
The Snort GPLv2 Community Rules and the Emerging Threats Open Rules are both available for free with no registration required. The Snort VRT rules are offered in two forms. One is a registered-user version which is free, but requires registration at http://www.snort.org. The registered-user free version only provides access to rules that are 30-days old or more in age. A Snort VRT paid subscription can be purchased, and it offers twice-weekly (and sometimes more frequent) updates to the rules. The Emerging Threats Pro rules are offered to paid subscribers only and offer almost daily updates to address fast-changing threats.
The best practice is to obtain a paid subscription from Snort or Emerging Threats in order to download the most current rules. This is highly recommended for commercial applications.
Launching Snort configuration GUI
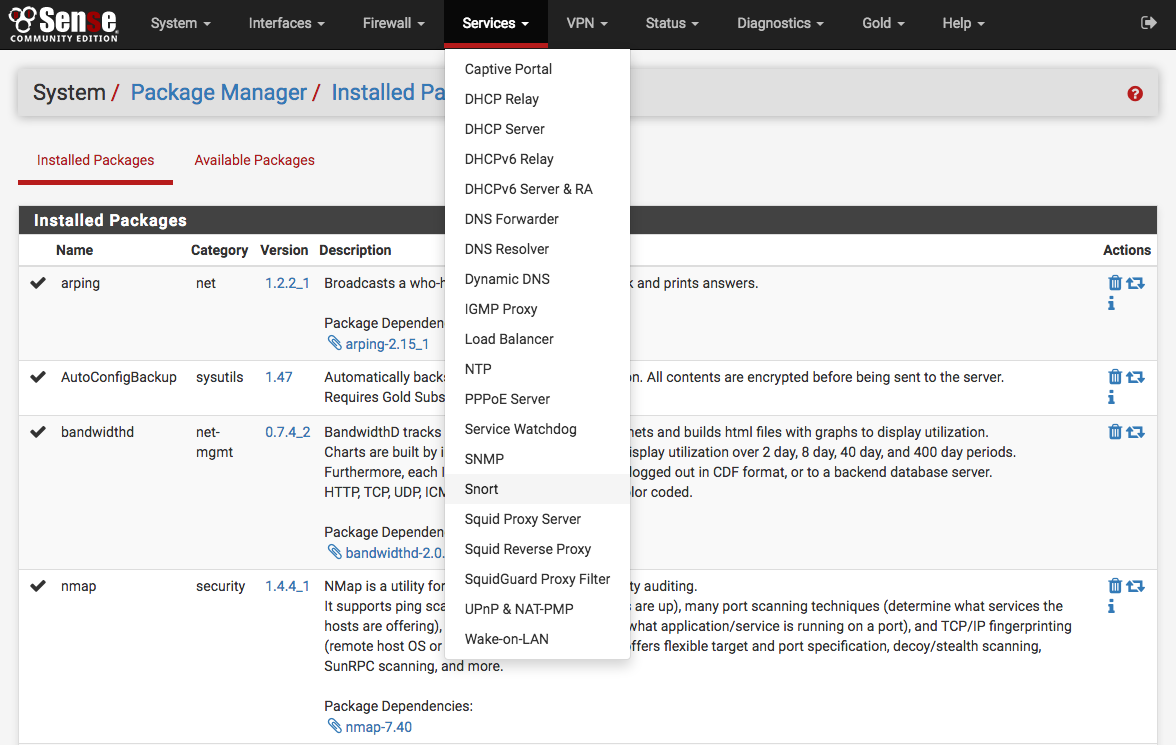
To launch the Snort configuration application, navigate to Services > Snort from the menu in the GUI.
Setting up Snort package for the first time
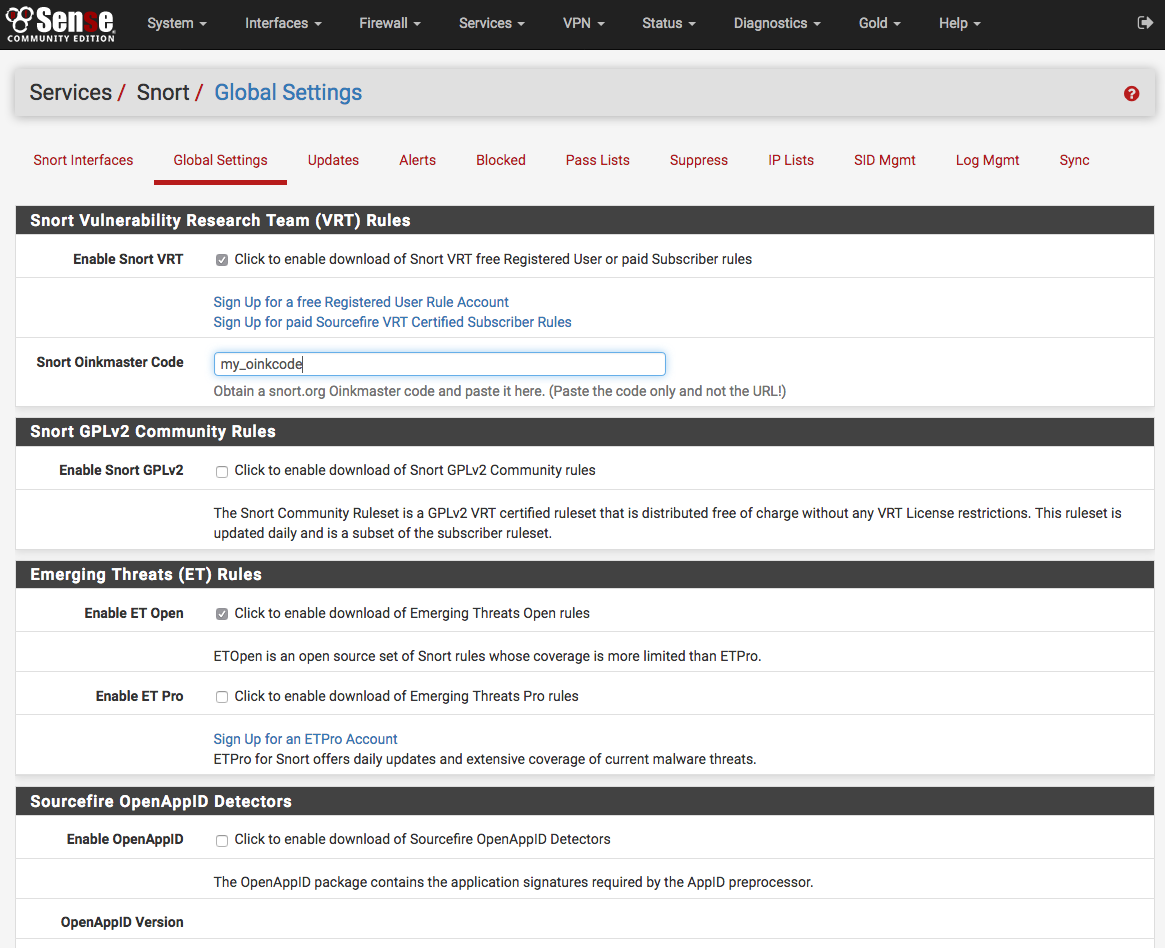
Click the Global Settings tab and enable the rule set downloads to use. If either the Snort VRT or the Emerging Threats Pro rules are checked, a text box will be displayed to enter the unique subscriber code obtained with the subscription or registration.
More than one rule set may be enabled for download, but note the following caveats. If a paid subscription is available for the Snort VRT rules, then all the Snort GPLv2 Community rules are automatically included within the file downloaded with the Snort VRT rules; therefore, do not enable the GPLv2 Community rules if a paid-subscriber account is used for the Snort VRT rules. All the Emerging Threats Open rules are included within the paid subscription for the Emerging Threats Pro rules. If the Emerging Threats Pro rules are enabled, the Emerging Threats Open rules are automatically disabled.
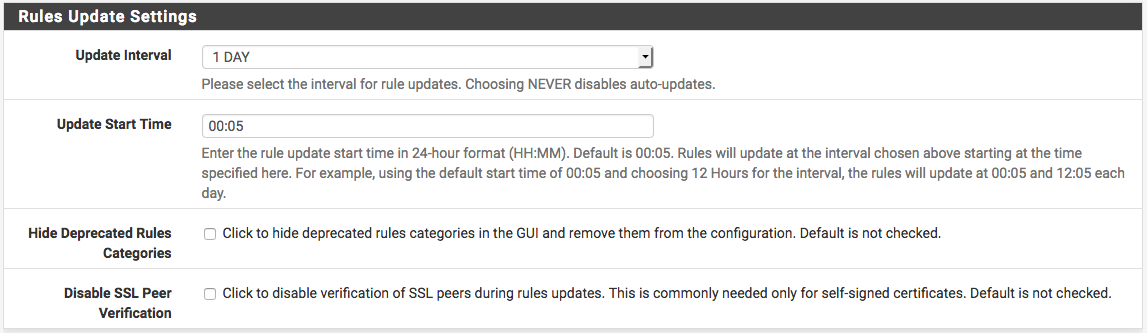
Once the desired rule sets are enabled, next set the interval for Snort to check for updates to the enabled rule packages. Use the Update Interval drop-down selector to choose a rule update interval. In most cases every 12 hours is a good choice. The update start time may be customized if desired. Enter the time as hours and minutes in 24-hour time format. The default start time is 3 minutes past midnight local time. So with a 12-hour update interval selected, Snort will check the Snort VRT or Emerging Threats websites at 3 minutes past midnight and 3 minutes past noon each day for any posted rule package updates.
Update the rules
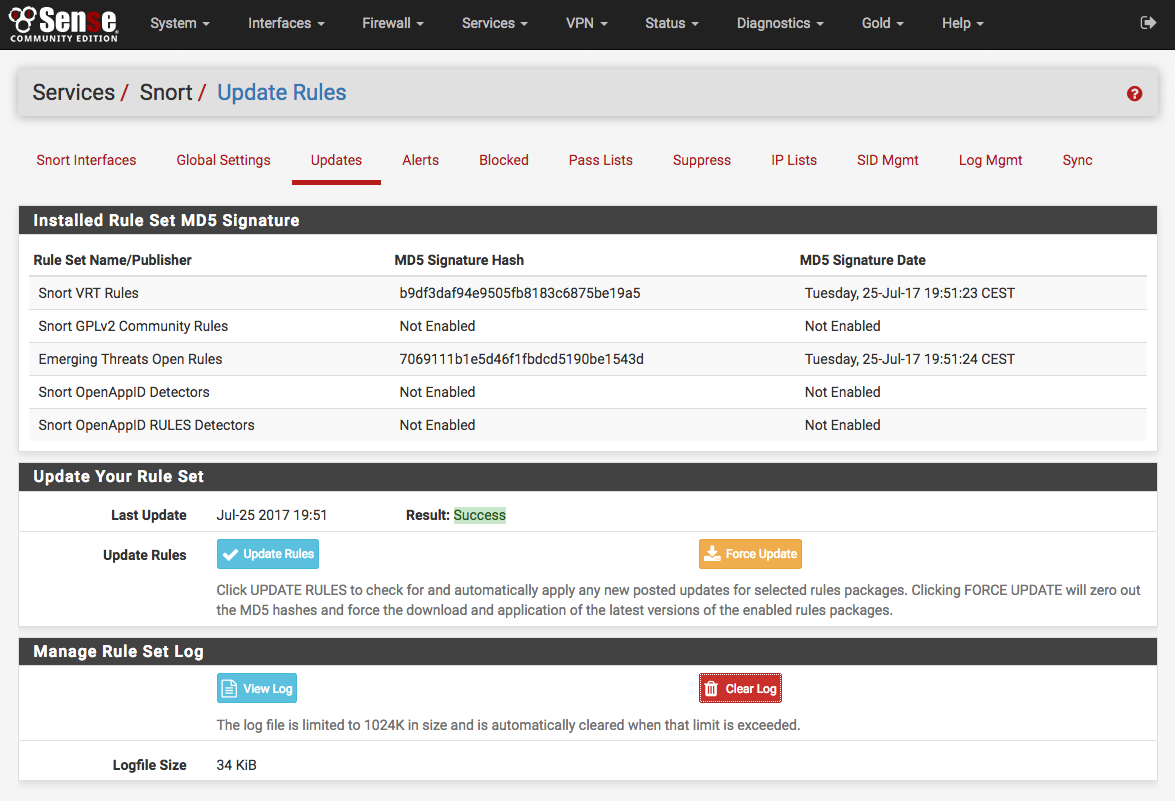
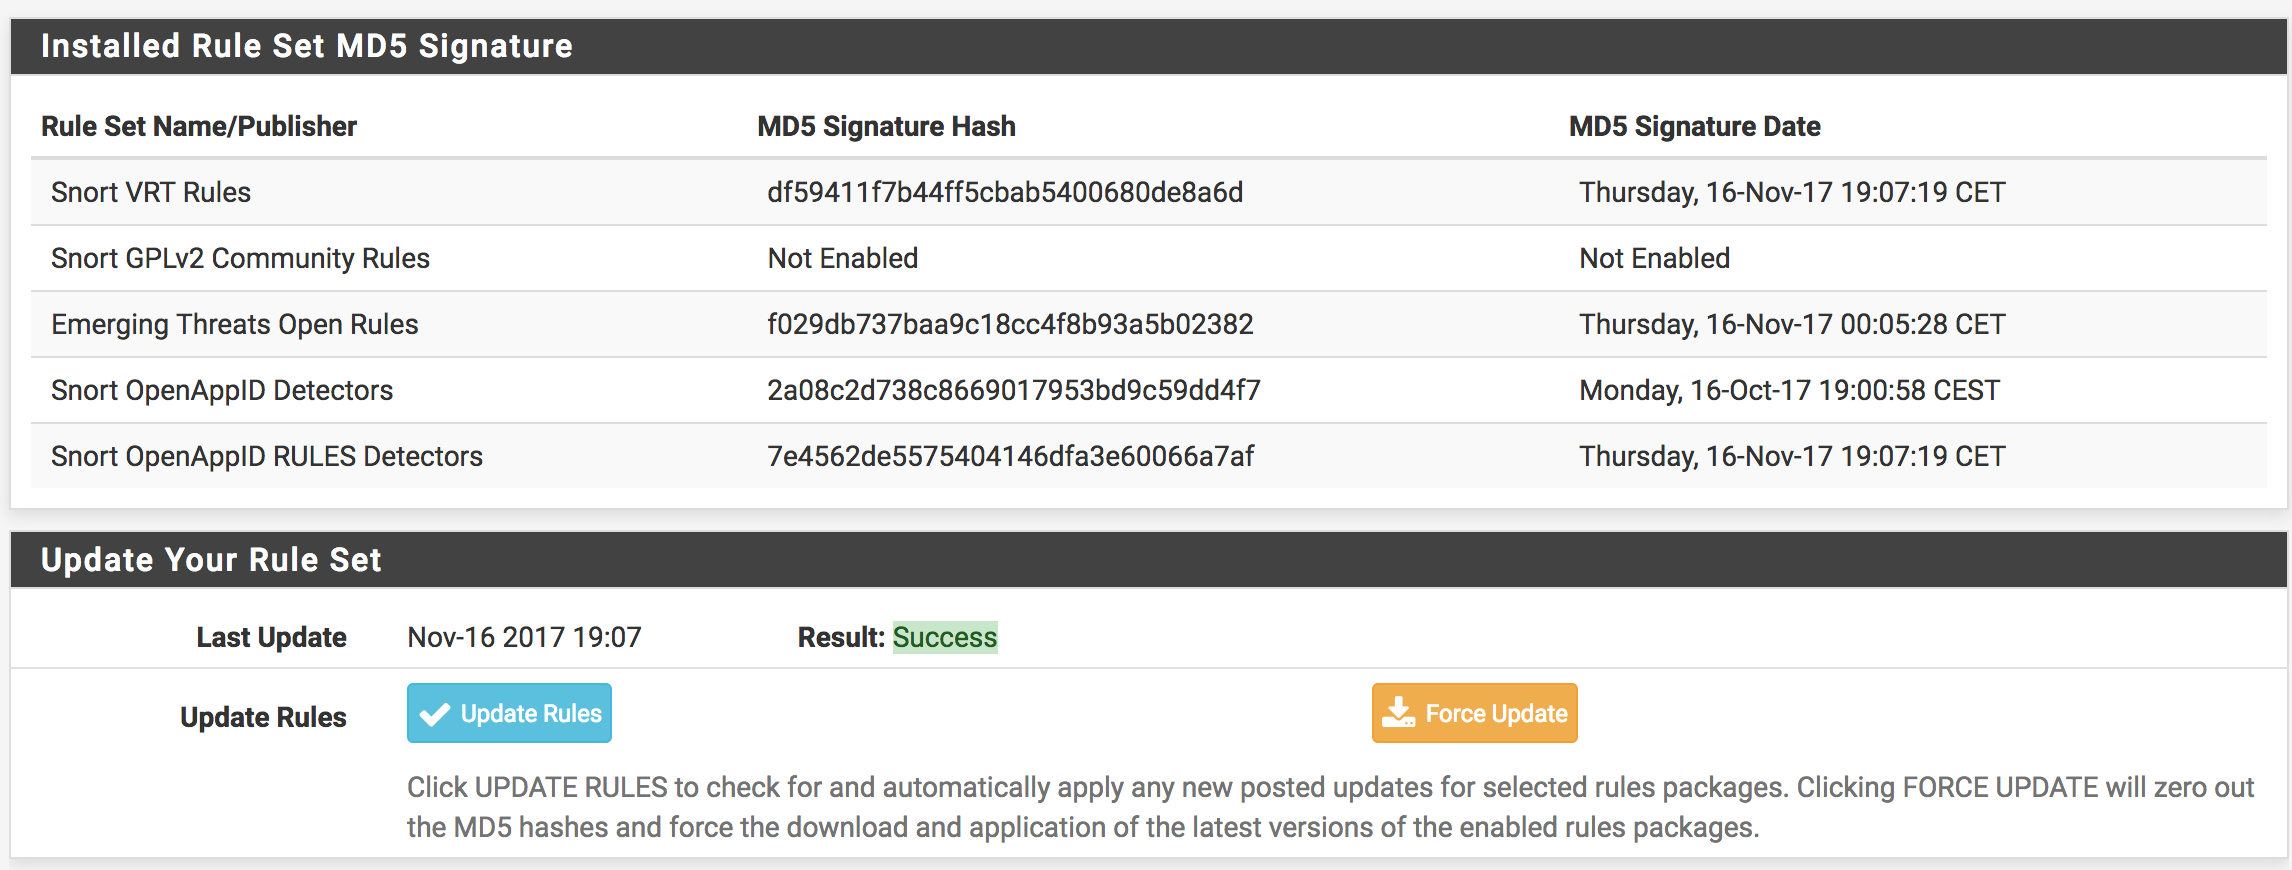
The Updates tab is used to check the status of downloaded rules packages and to download new updates. The table shows the available rule packages and their current status (not enabled, not downloaded, or a valid MD5 checksum and date).
Click on the Update Rules button to download the latest rule package updates. If there is a newer set of packaged rules on the vendor website, it will be downloaded and installed. The determination is made by comparing the MD5 of the local file with that of the remote file on the vendor website. If there is a mismatch, a new file is downloaded. The FORCE button can be used to force download of the rule packages from the vendor website no matter how the MD5 hash tests out.
In the screenshot below, the Snort VRT and Emerging Threats Open rule packages have been successfully downloaded. The calculated MD5 hash and the file download date and time are shown. Also note the last update time and result are shown in the center of the page.
Add Snort to an interface
Click the Snort Interfaces tab and then the  icon to add a new
Snort interface.
icon to add a new
Snort interface.
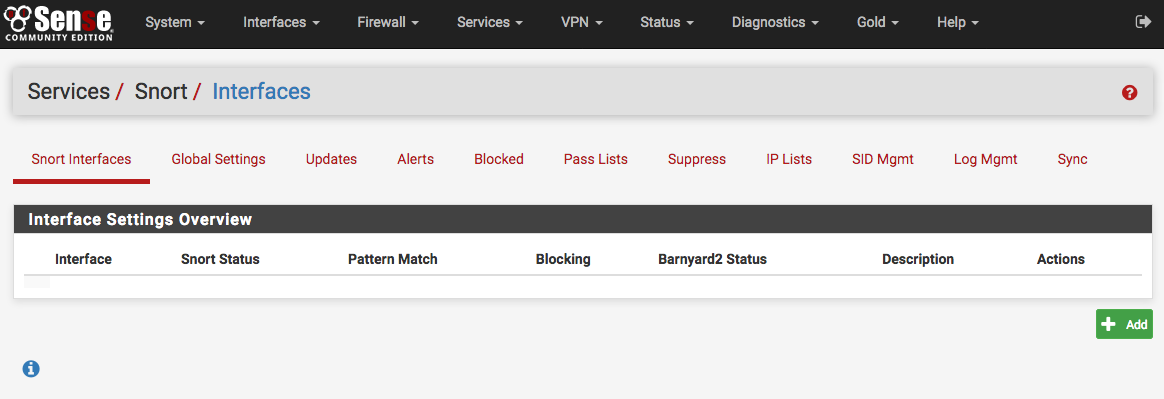
A new Interface Settings tab will open with the next available interface automatically selected. The interface selection may be changed using the Interface drop-down if desired. A descriptive name may also be provided for the interface. Other interface parameters may also be set on this page. Be sure to click the SAVE button down at the bottom of the page when finished.

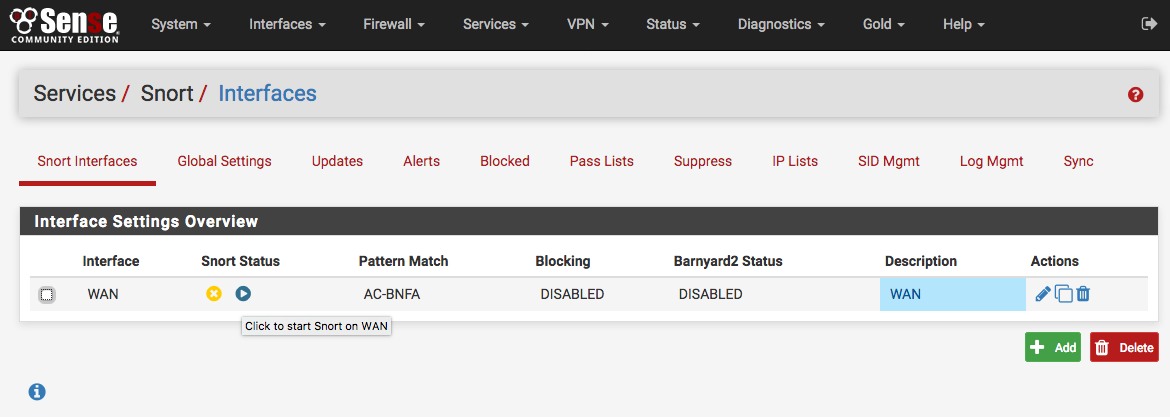
After saving, the browser will be returned to the Snort Interfaces tab. Note
the warning icons in the image below showing no rules have been selected for the
new Snort interface. Those rules will be configured next. Click the  icon (shown highlighted with a red box in the image below) to edit the new Snort
interface again.
icon (shown highlighted with a red box in the image below) to edit the new Snort
interface again.

Select which types of rules will protect the network
Click the Categories tab for the new interface.
If a Snort VRT Oinkmaster code was obtained (either free registered user or the paid subscription), enabled the Snort VRT rules, and entered the Oinkmaster code on the Global Settings tab then the option of choosing from among three pre-configured IPS policies is available. These greatly simplify the process of choosing enforcing rules for Snort to use when inspecting traffic. The IPS policies are only available when the Snort VRT rules are enabled.
The three Snort VRT IPS Policies are: (1) Connectivity, (2) Balanced and (3) Security. These are listed in order of increasing security. However, resist the temptation to immediately jump to the most secure Security policy if Snort is unfamiliar. False positives can frequently occur with the more secure policies, and careful tuning by an experienced administrator may be required.
Tip
If Snort is unfamiliar, then using the less restrictive Connectivity policy in non-blocking mode (the default setting) is recommended as a starting point to identify and whitelist false positives. Once experience with Snort has been gained in this network environment, blocking mode may be enabled (via the Block Offenders option in the Snort Interface Settings tab) and a more restrictive IPS policy may be chosen.
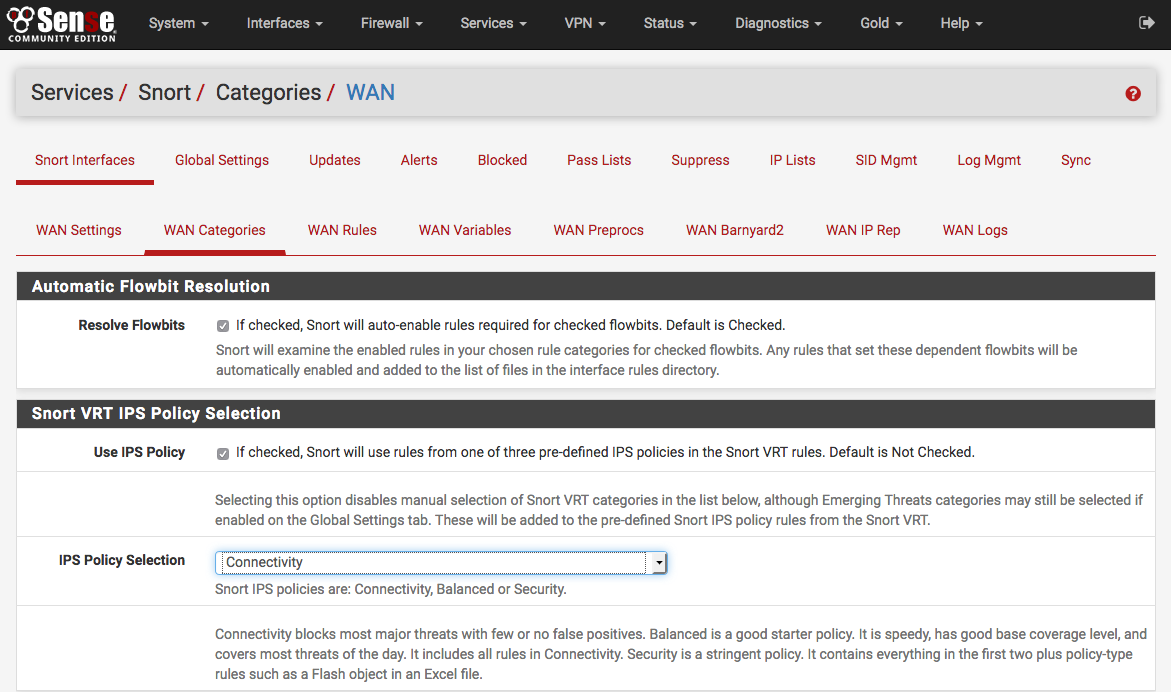
If the Snort VRT rules were not enabled, or if any of the other rule packages are to be used, then make the rule category selections by checking the checkboxes beside the rule categories to use.

Click  Save to store the current selection and build the rules file
for Snort to use.
Save to store the current selection and build the rules file
for Snort to use.
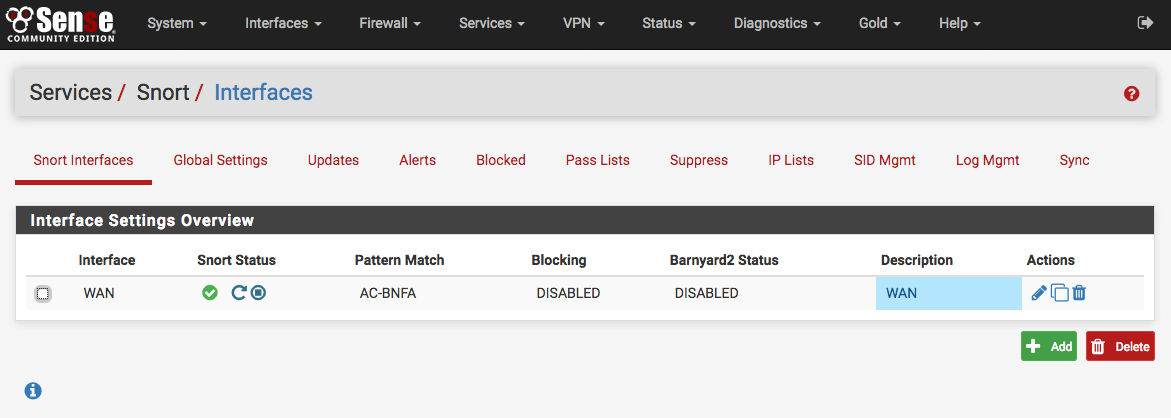
Starting Snort on an interface
Click the Snort Interfaces tab to display the configured Snort interfaces.
Click the  icon (shown highlighted with a red box in the image
below) to start Snort on an interface.
icon (shown highlighted with a red box in the image
below) to start Snort on an interface.
It will take several seconds for Snort to start. Once it has started, the icon
will change to  as shown below. To stop a running Snort
instance on an interface, click the icon.
as shown below. To stop a running Snort
instance on an interface, click the icon.
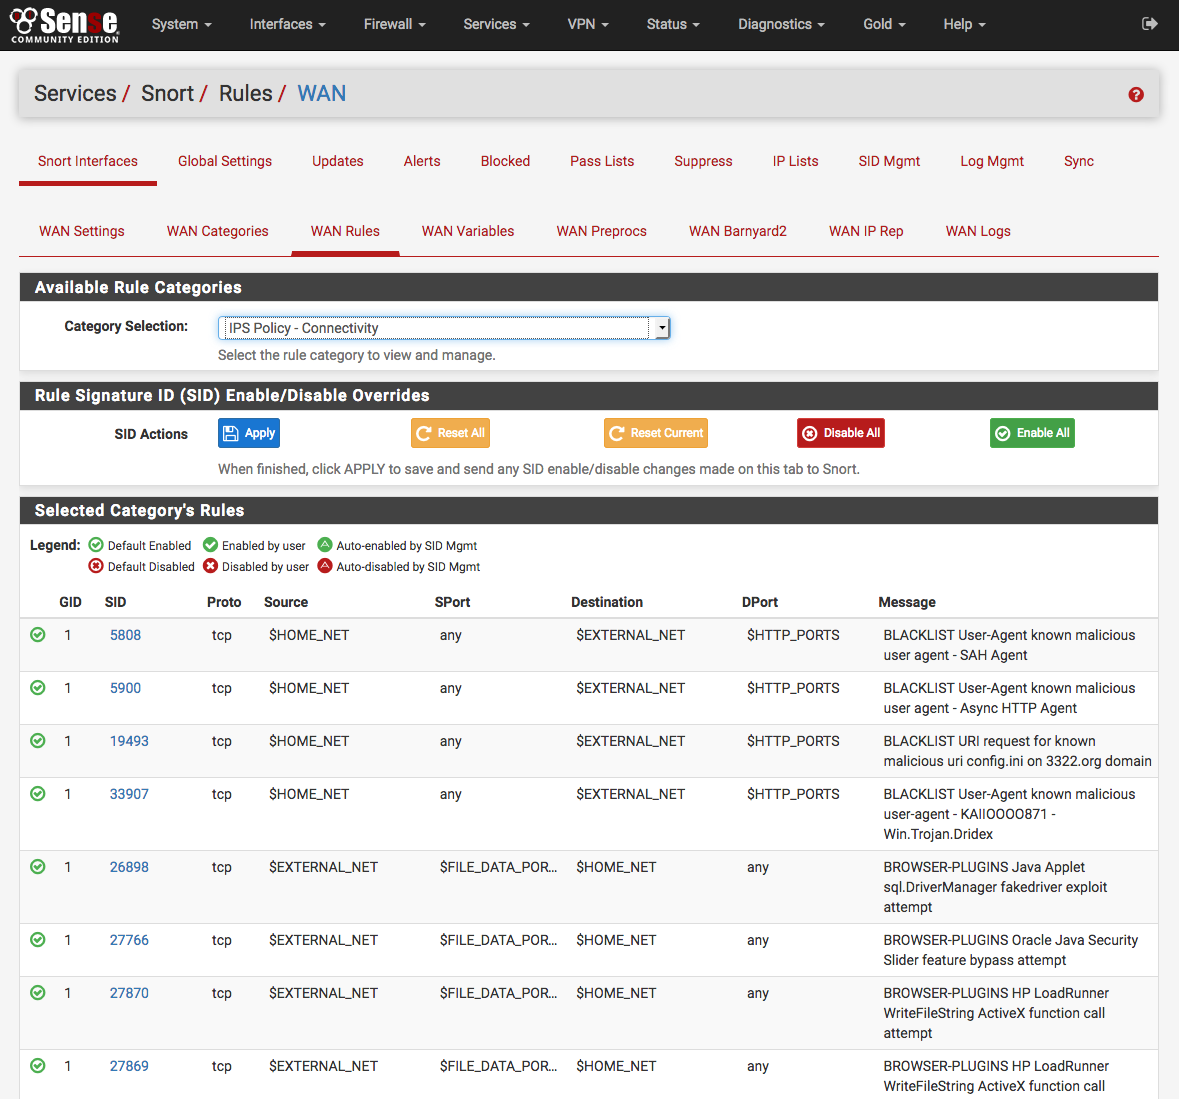
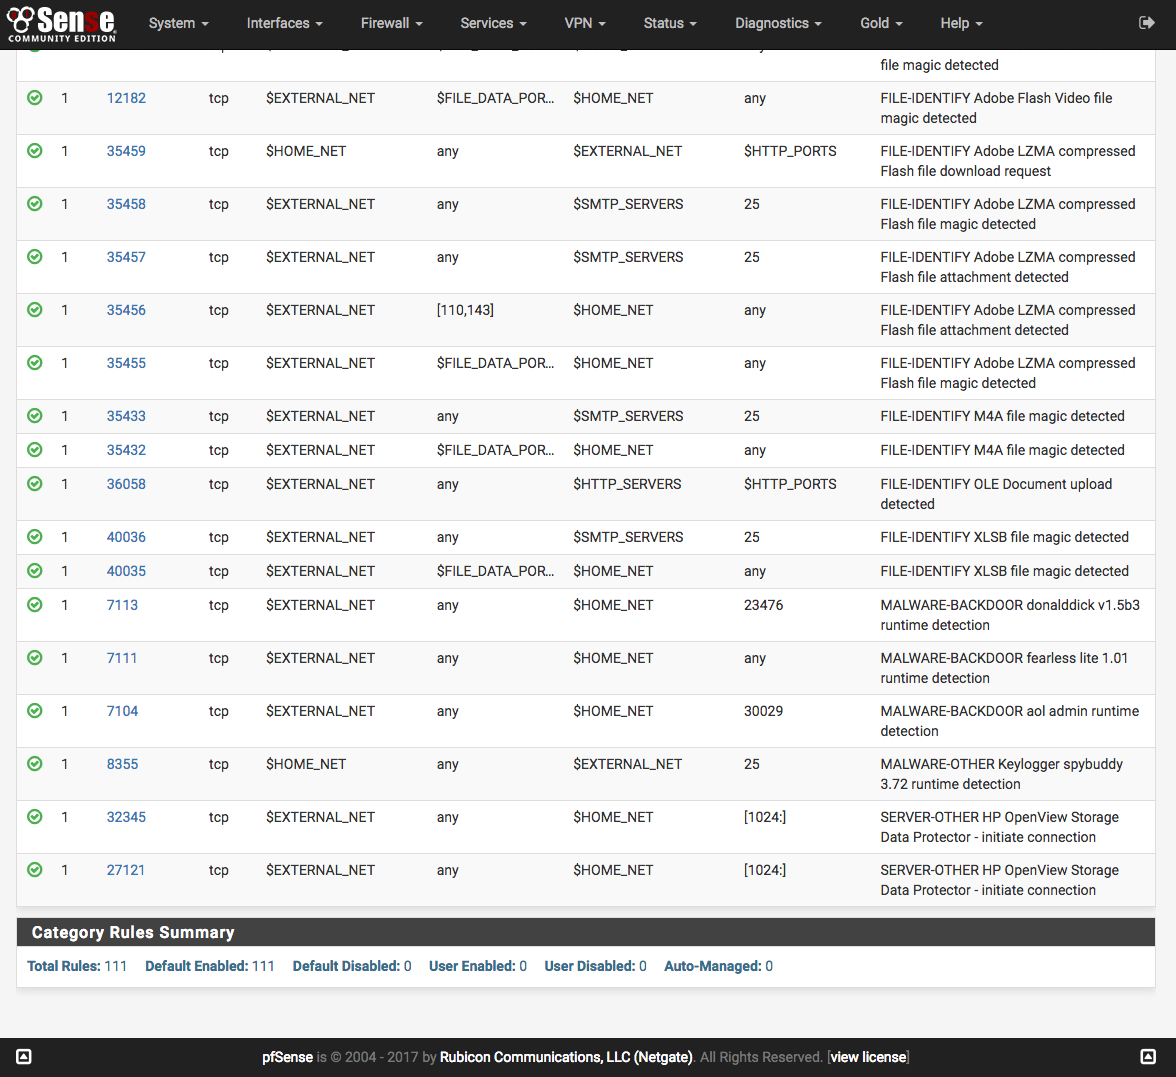
Select which types of signatures will protect the network
Click the Rules tab for the interface to configure individual rules in the enabled categories. Generally this page is only used to disable particular rules that may be generating too many false positives in a particular network environment. Be sure they are in fact truly false positives before taking the step of disabling a Snort rule!
Select a rule category from the Category drop-down to view all the assigned
rules. Click the or  icon at the
far-left of a row to toggle the rule’s state from enabled to disabled, or click
or
icon at the
far-left of a row to toggle the rule’s state from enabled to disabled, or click
or  to toggle from disabled to enabled. The
icon will change to indicate the state of the rule. At the top of the rule list
is a legend showing the icons used to indicate the current state of a rule.
to toggle from disabled to enabled. The
icon will change to indicate the state of the rule. At the top of the rule list
is a legend showing the icons used to indicate the current state of a rule.
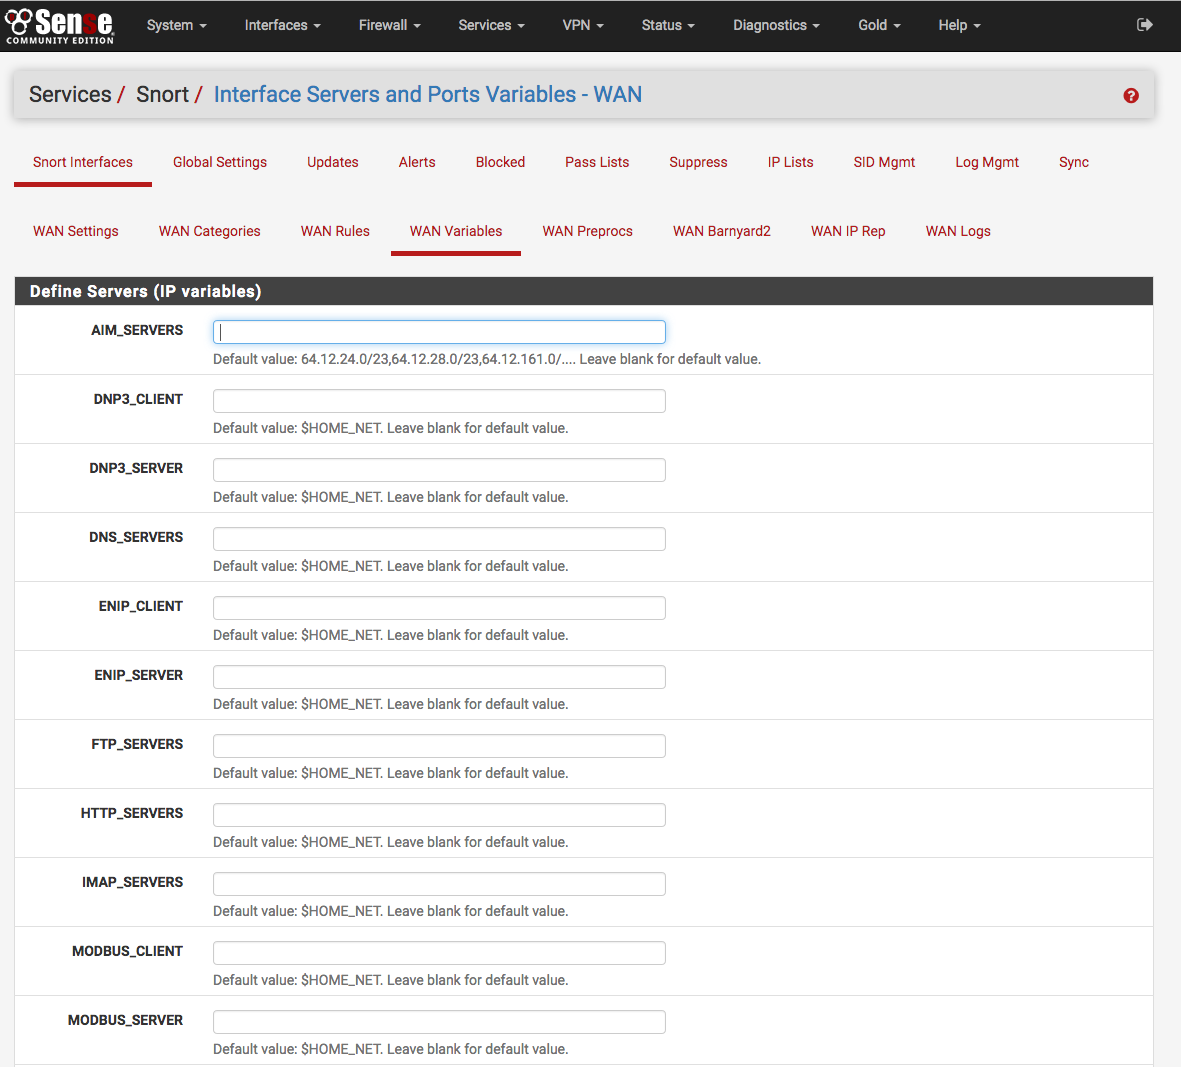
Define servers to protect and improve performance
Managing blocked hosts
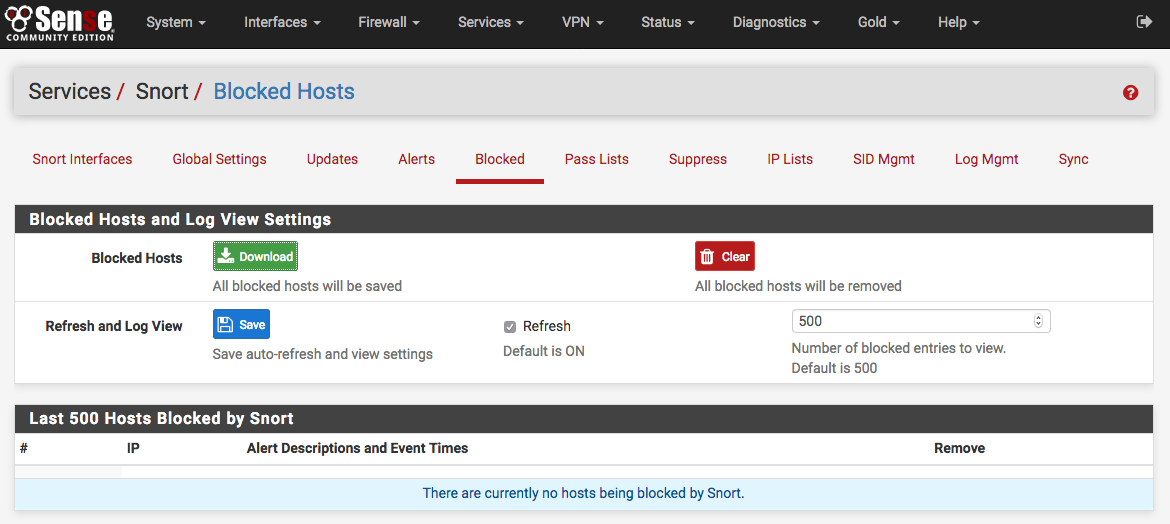
The Blocked tab shows what hosts are currently being blocked by Snort (when the block offenders option is selected on the Interface Settings tab). Blocked hosts can be automatically cleared by Snort at one of several pre-defined intervals. The blocking options for an interface are configured on the Snort Interface Settings tab for the interface.
Managing Pass lists
Pass Lists are lists of IP addresses that Snort should never block. These may be created and managed on the Pass Lists tab. When an IP address is listed on a Pass List, Snort will never insert a block on that address even when malicious traffic is detected.
To create a new Pass List, click . To edit an existing Pass List, click
the . To delete a Pass List, click  . Note that a Pass
List may not be deleted if it is currently assigned to one or more Snort
interfaces.
. Note that a Pass
List may not be deleted if it is currently assigned to one or more Snort
interfaces.
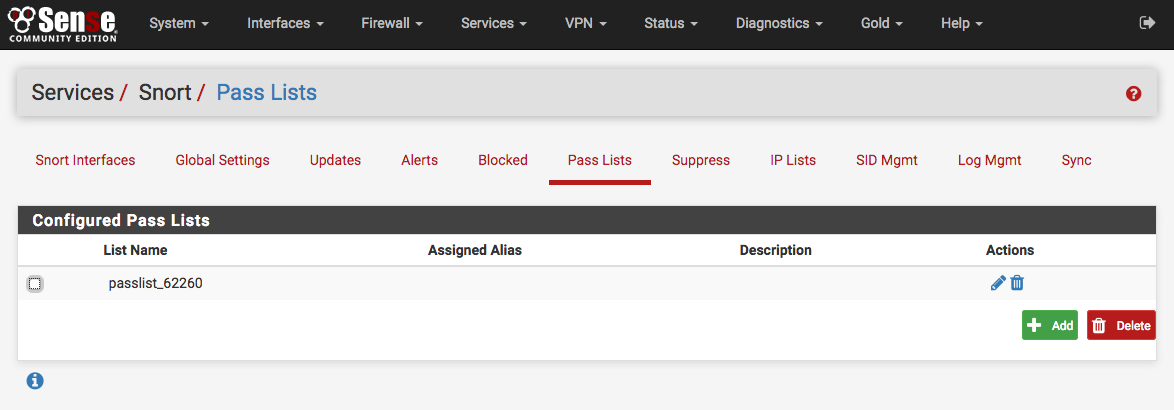
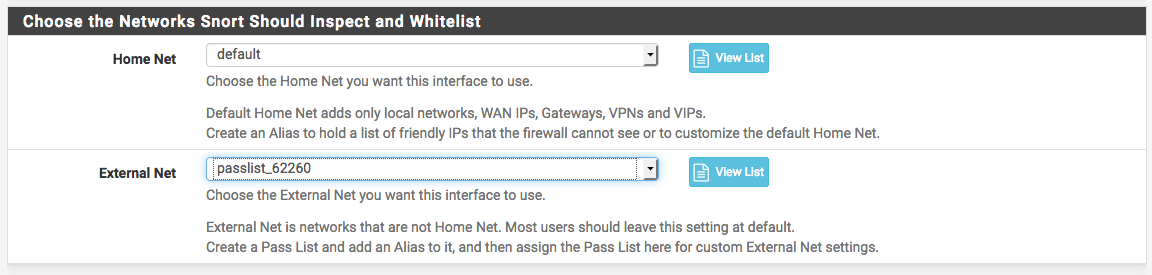
A default Pass List is automatically generated by Snort for every interface, and this default list is used when no other list is specified. Pass Lists are assigned to an interface on the Interface Settings tab.
Customized Pass List may be created and assigned to an interface. This might be done when trusted external hosts exist that are not located on networks directly connected to the firewall. To add external hosts in this manner, first create an Alias under Firewall > Aliases and then assign that alias to the Assigned Aliases field. In the example shown below, the alias “Friendly_ext_hosts” has been assigned. This alias would contain the IP addresses of the trusted external hosts.
When creating a custom Pass List, leave all the auto-generated IP addresses checked in the Add auto-generated IP addresses section. Not selecting the checkboxes in this section can lead to blocking of critical addresses including the firewall interfaces themselves. This could result in being locked out of the firewall over the network! Only uncheck boxes in this section when absolutely necessary.
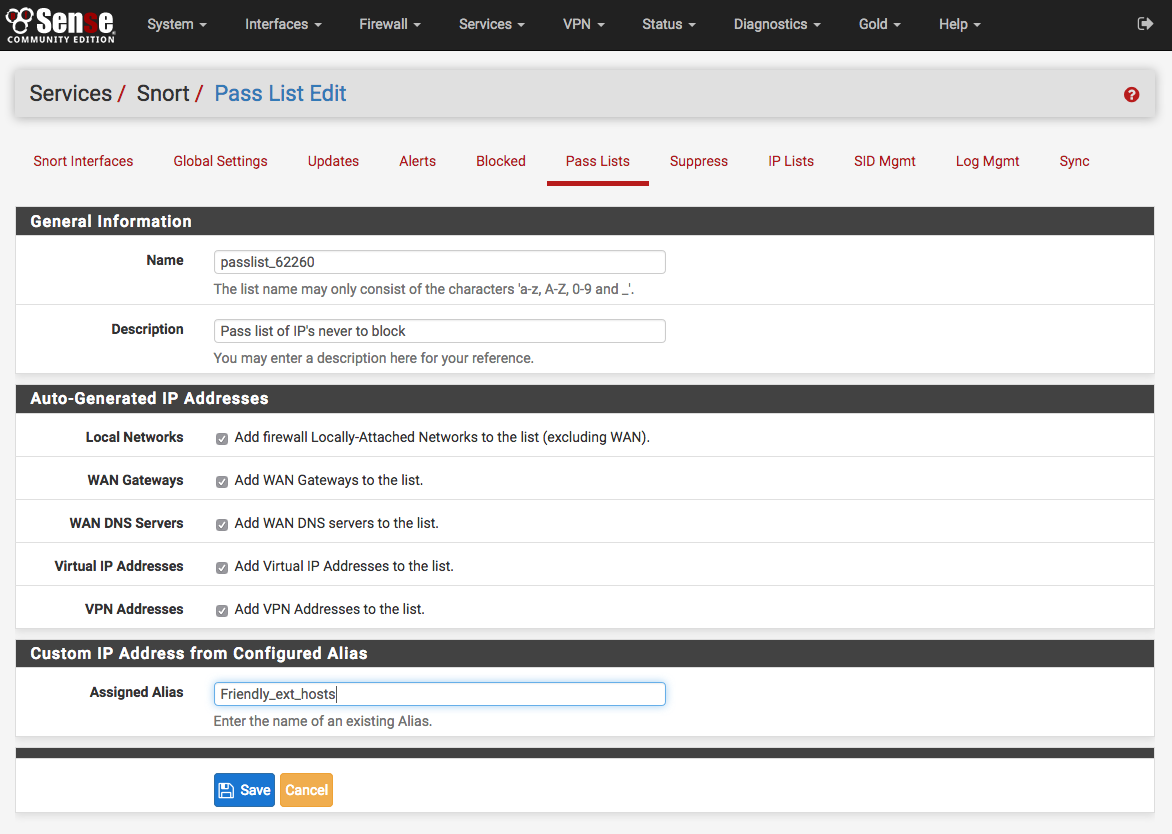
Click the ALIASES button to open a window showing previously defined aliases for selection. Remember to click SAVE to save changes.
Note
Remember that simply creating a Pass List is only the first step! It must be selected by going to the Interface Settings tab for the Snort interface and assigning the newly created Pass List as shown below. After assigning and saving the new Pass List, restart Snort on the affected interface to pick up the change.
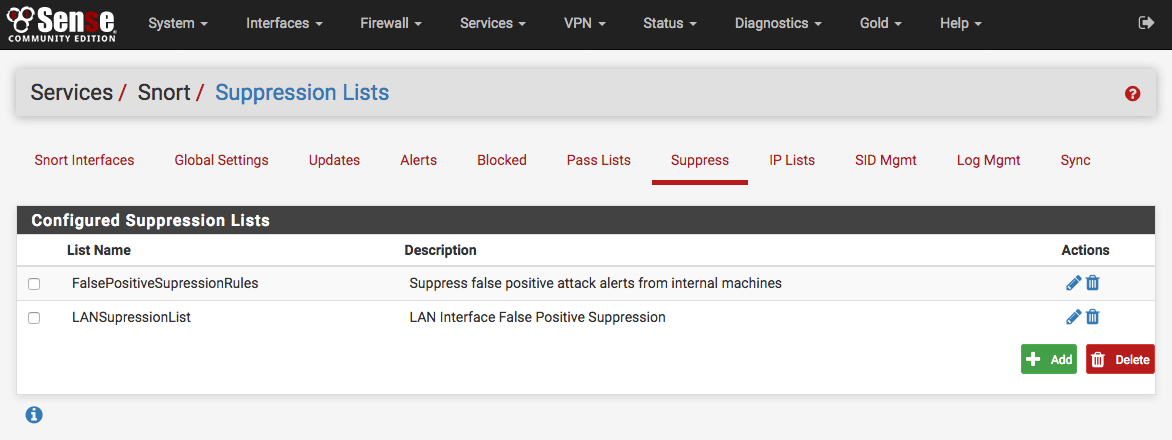
Alert Thresholding and Suppression
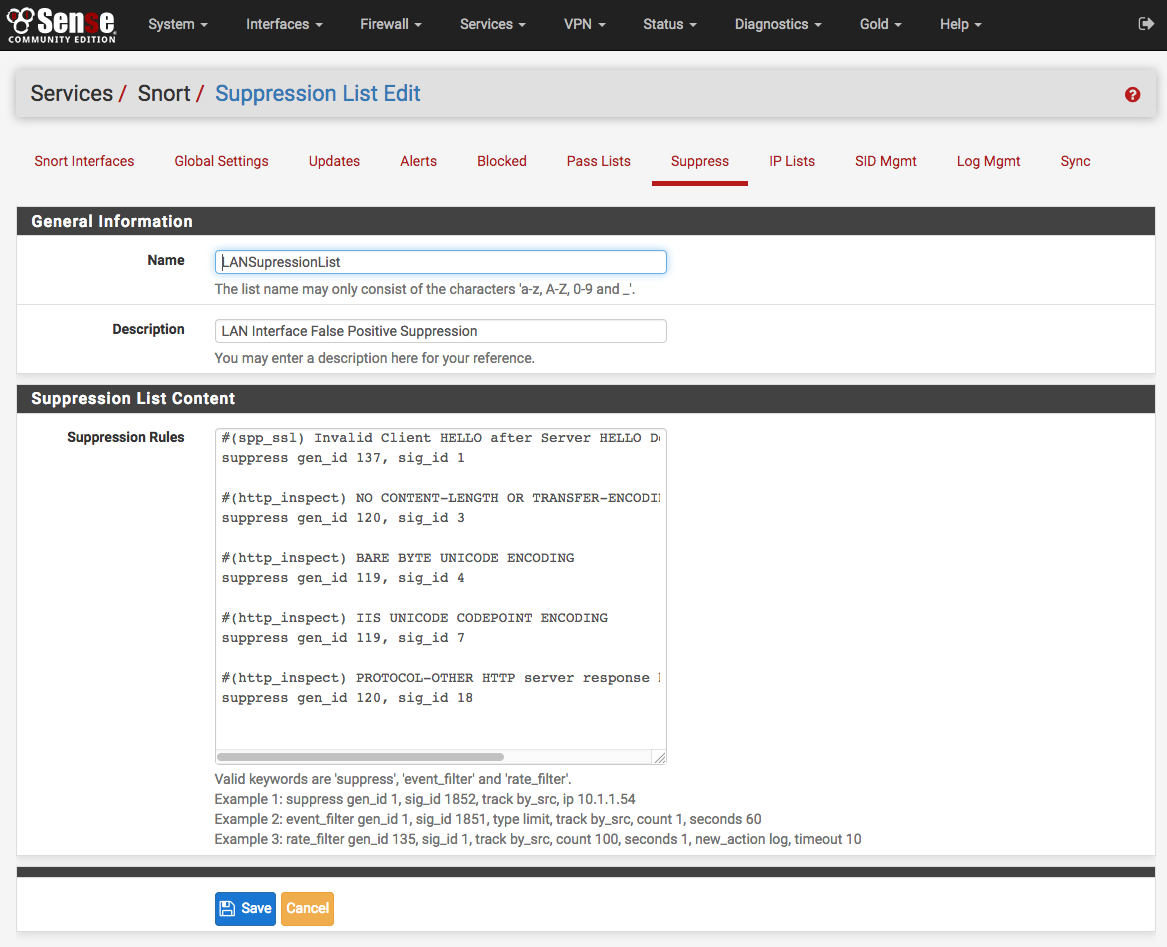
Suppression Lists allow control over the alerts generated by Snort rules. When an alert is suppressed, then Snort no longer logs an alert entry (or blocks the IP address if block offenders is enabled) when a particular rule fires. Snort still inspects all network traffic against the rule, but even when traffic matches the rule signature, no alert will be generated. This is different from disabling a rule. When a rule is disabled, Snort no longer tries to match it to any network traffic. Suppressing a rule might be done in lieu of disabling the rule when alerts should only be stopped based on either the source or destination IP. For example, to suppress the alert when traffic from a particular trusted IP address is the source. If any other IP is the source or destination of the traffic, the rule would still fire. To eliminate all alerts from the rule, then it is more efficient to simply disable the rule rather than to suppress it. Disabling the rule will remove it from Snort’s list of match rules and therefore makes for less work Snort has to do.
On the Suppress List Edit page, a new suppress list entry may be manually added
or edited. It is usually easier and faster to add suppress list entries by
clicking shown with the alert entries on the Alerts tab. Remember
to click the SAVE button to save changes when manually editing Suppress List
entries.
Getting to know the alerts
The Alerts tab is where alerts generated by Snort are viewed. If Snort is running on more than one interface, choose the interface whose alerts should be viewed in the drop-down selector.
Use the DOWNLOAD button to download an archive containing all the logged alerts to a local machine. The CLEAR button is used to erase the current alerts log. Destination IP addresses have been redacted from the screenshot.
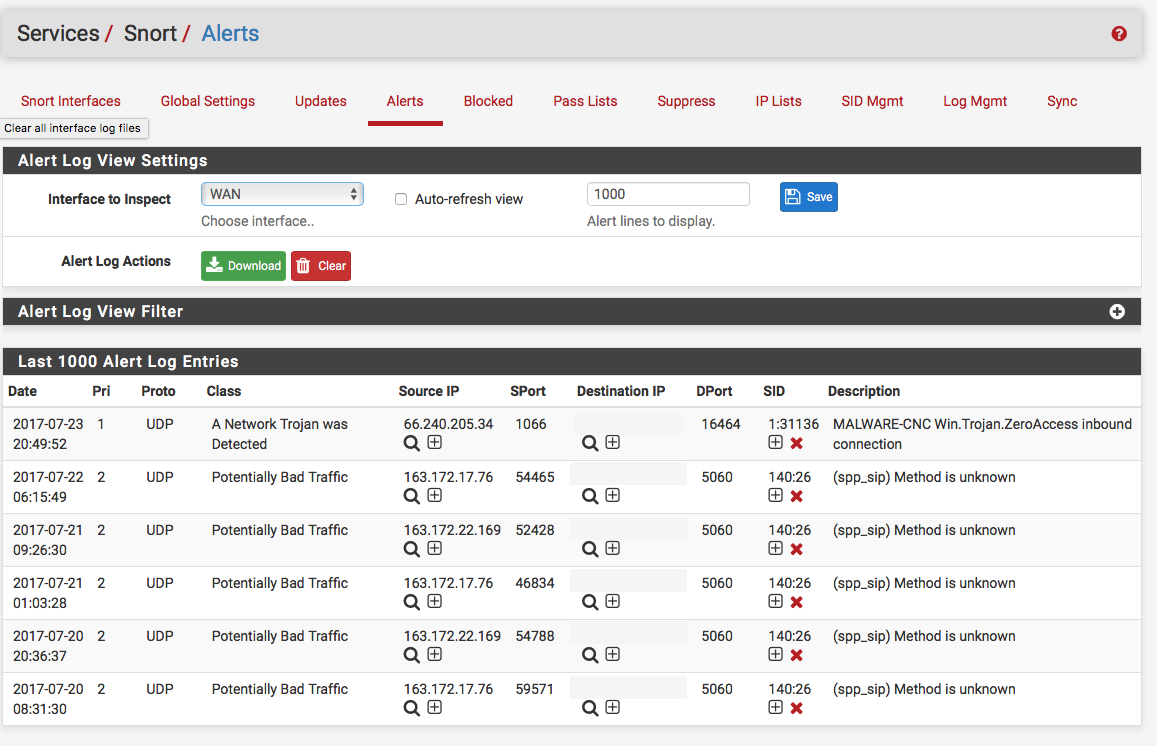
Alert Details

The Date column shows the date and time the alert was generated. The remaining columns show data from the rule that generated the alert.
In the Source, Destination columns are  icons for performing
reverse DNS lookups on the IP addresses as well as a icon used to add
an automatic Suppress List entry for the
alert using the IP address and SID (signature ID). This will prevent future
alerts from being generated by the rule for that specific IP address only. If
either of the Source or Destination addresses are currently being blocked by
Snort, then a icon will also be shown. Clicking that icon will
remove the block for the IP address.
icons for performing
reverse DNS lookups on the IP addresses as well as a icon used to add
an automatic Suppress List entry for the
alert using the IP address and SID (signature ID). This will prevent future
alerts from being generated by the rule for that specific IP address only. If
either of the Source or Destination addresses are currently being blocked by
Snort, then a icon will also be shown. Clicking that icon will
remove the block for the IP address.
The SID column contains two icons. The icon will automatically add
that SID to the Suppress List for the
interface and suppress future alerts from the signature for all IP addresses.
The  icon in the SID column will disable the rule and remove it from
the enforcing rule set. When a rule is manually disabled, the icon in the SID
column changes to .
icon in the SID column will disable the rule and remove it from
the enforcing rule set. When a rule is manually disabled, the icon in the SID
column changes to .
Application ID detection with OpenAppID
OpenAppID is an application-layer network security plugin for the open source intrusion detection system Snort. Learn more about it here.
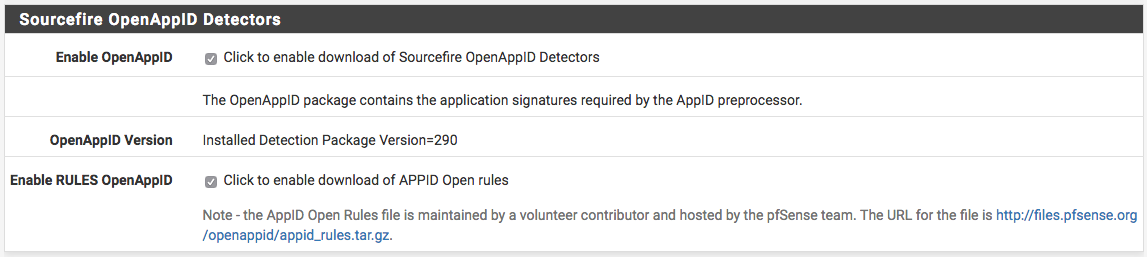
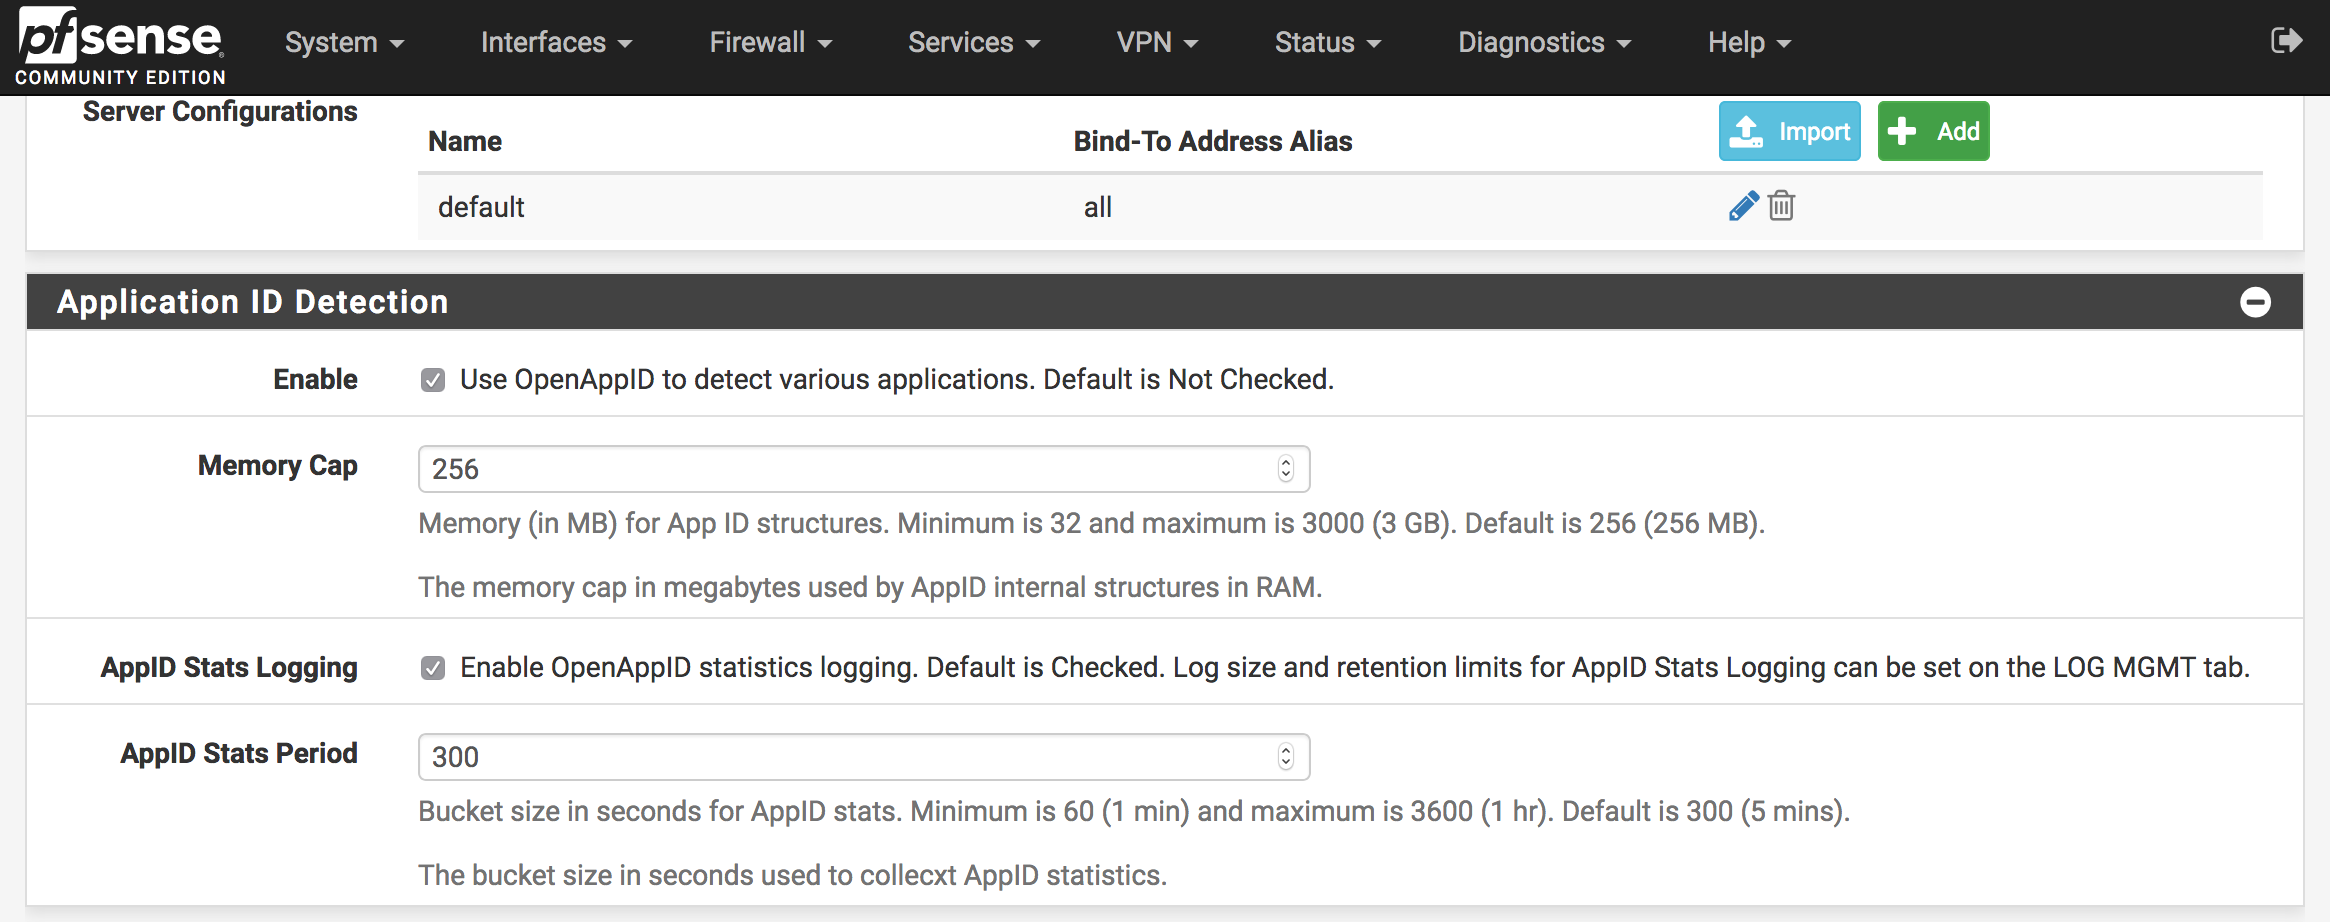
Enabling OpenAppID and its rules is done from Snort Global Settings. Select both checkboxes to enable detectors and rules download. Save the page.
After enabling the detectors and rules go to Snort Updates tab and click on Update Rules. Wait for all the rules to update. Once done, the page will show OpenAppID detectors and rules have been updated.
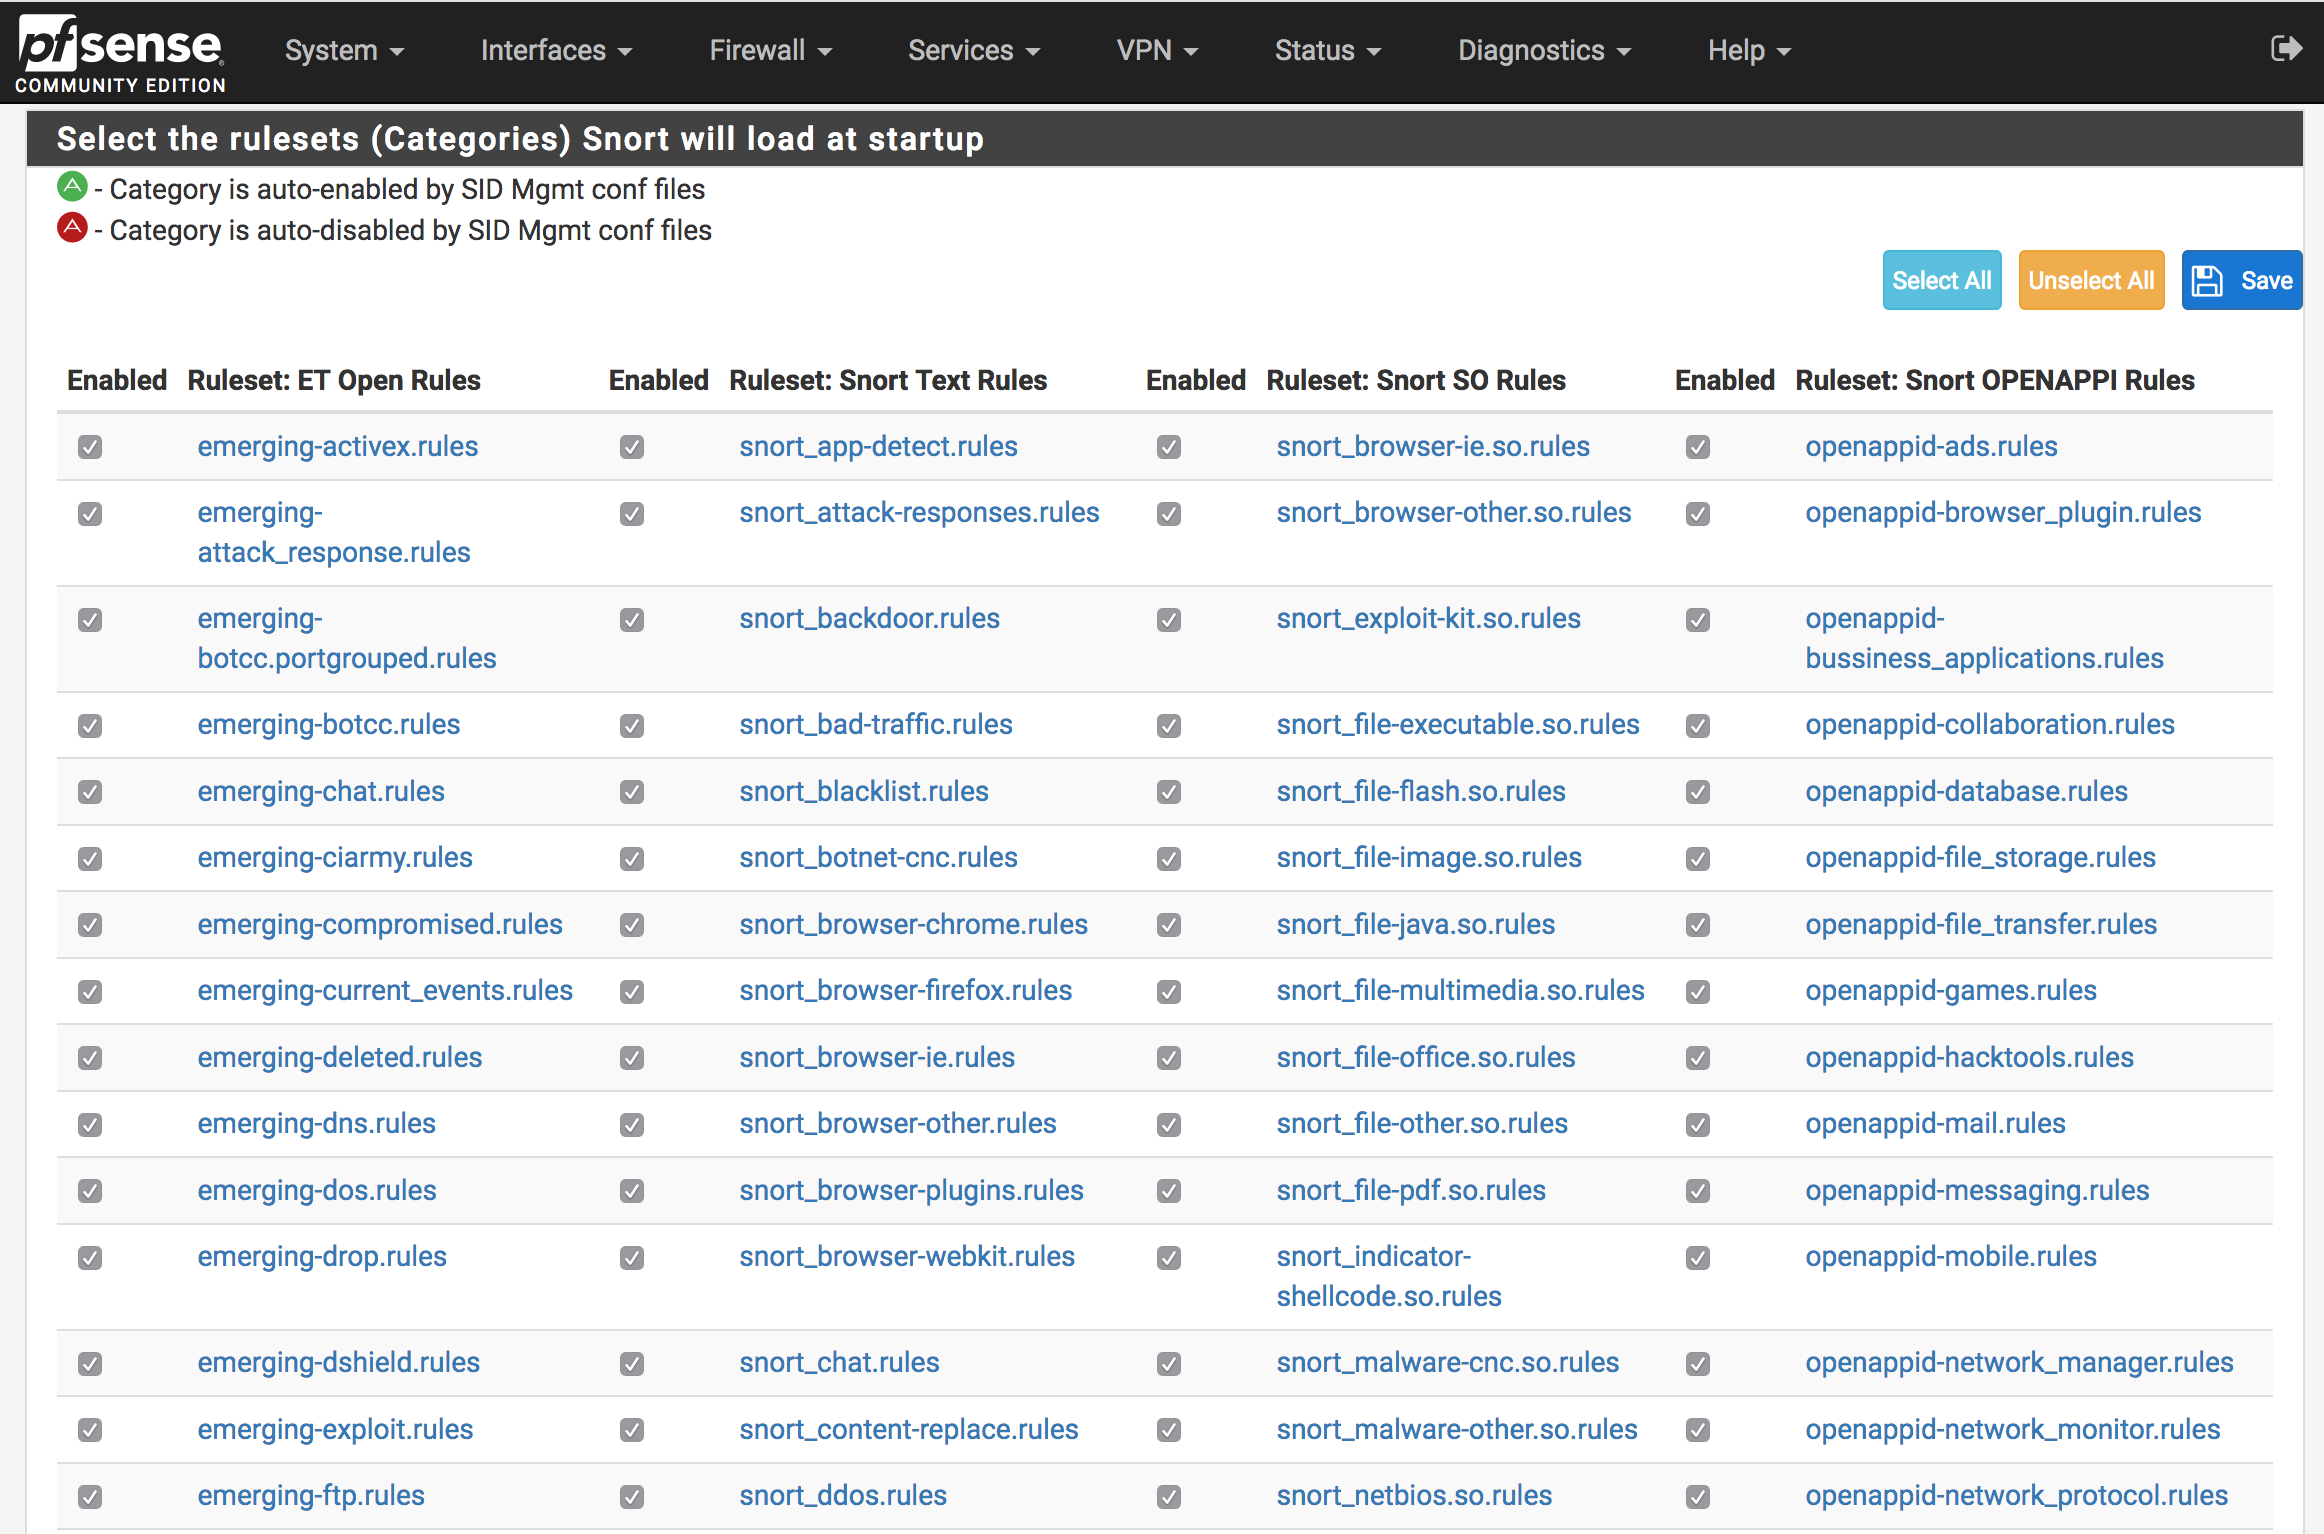
The following steps assume the firewall already has a Snort interface for LAN. Edit the LAN interface and navigate to LAN categories tab. When there, make sure the Snort OPENAPPID Rules from the right column are all selected and click Save.
Lastly, while still editing Snort interface, navigate to LAN Preprocessor tab.
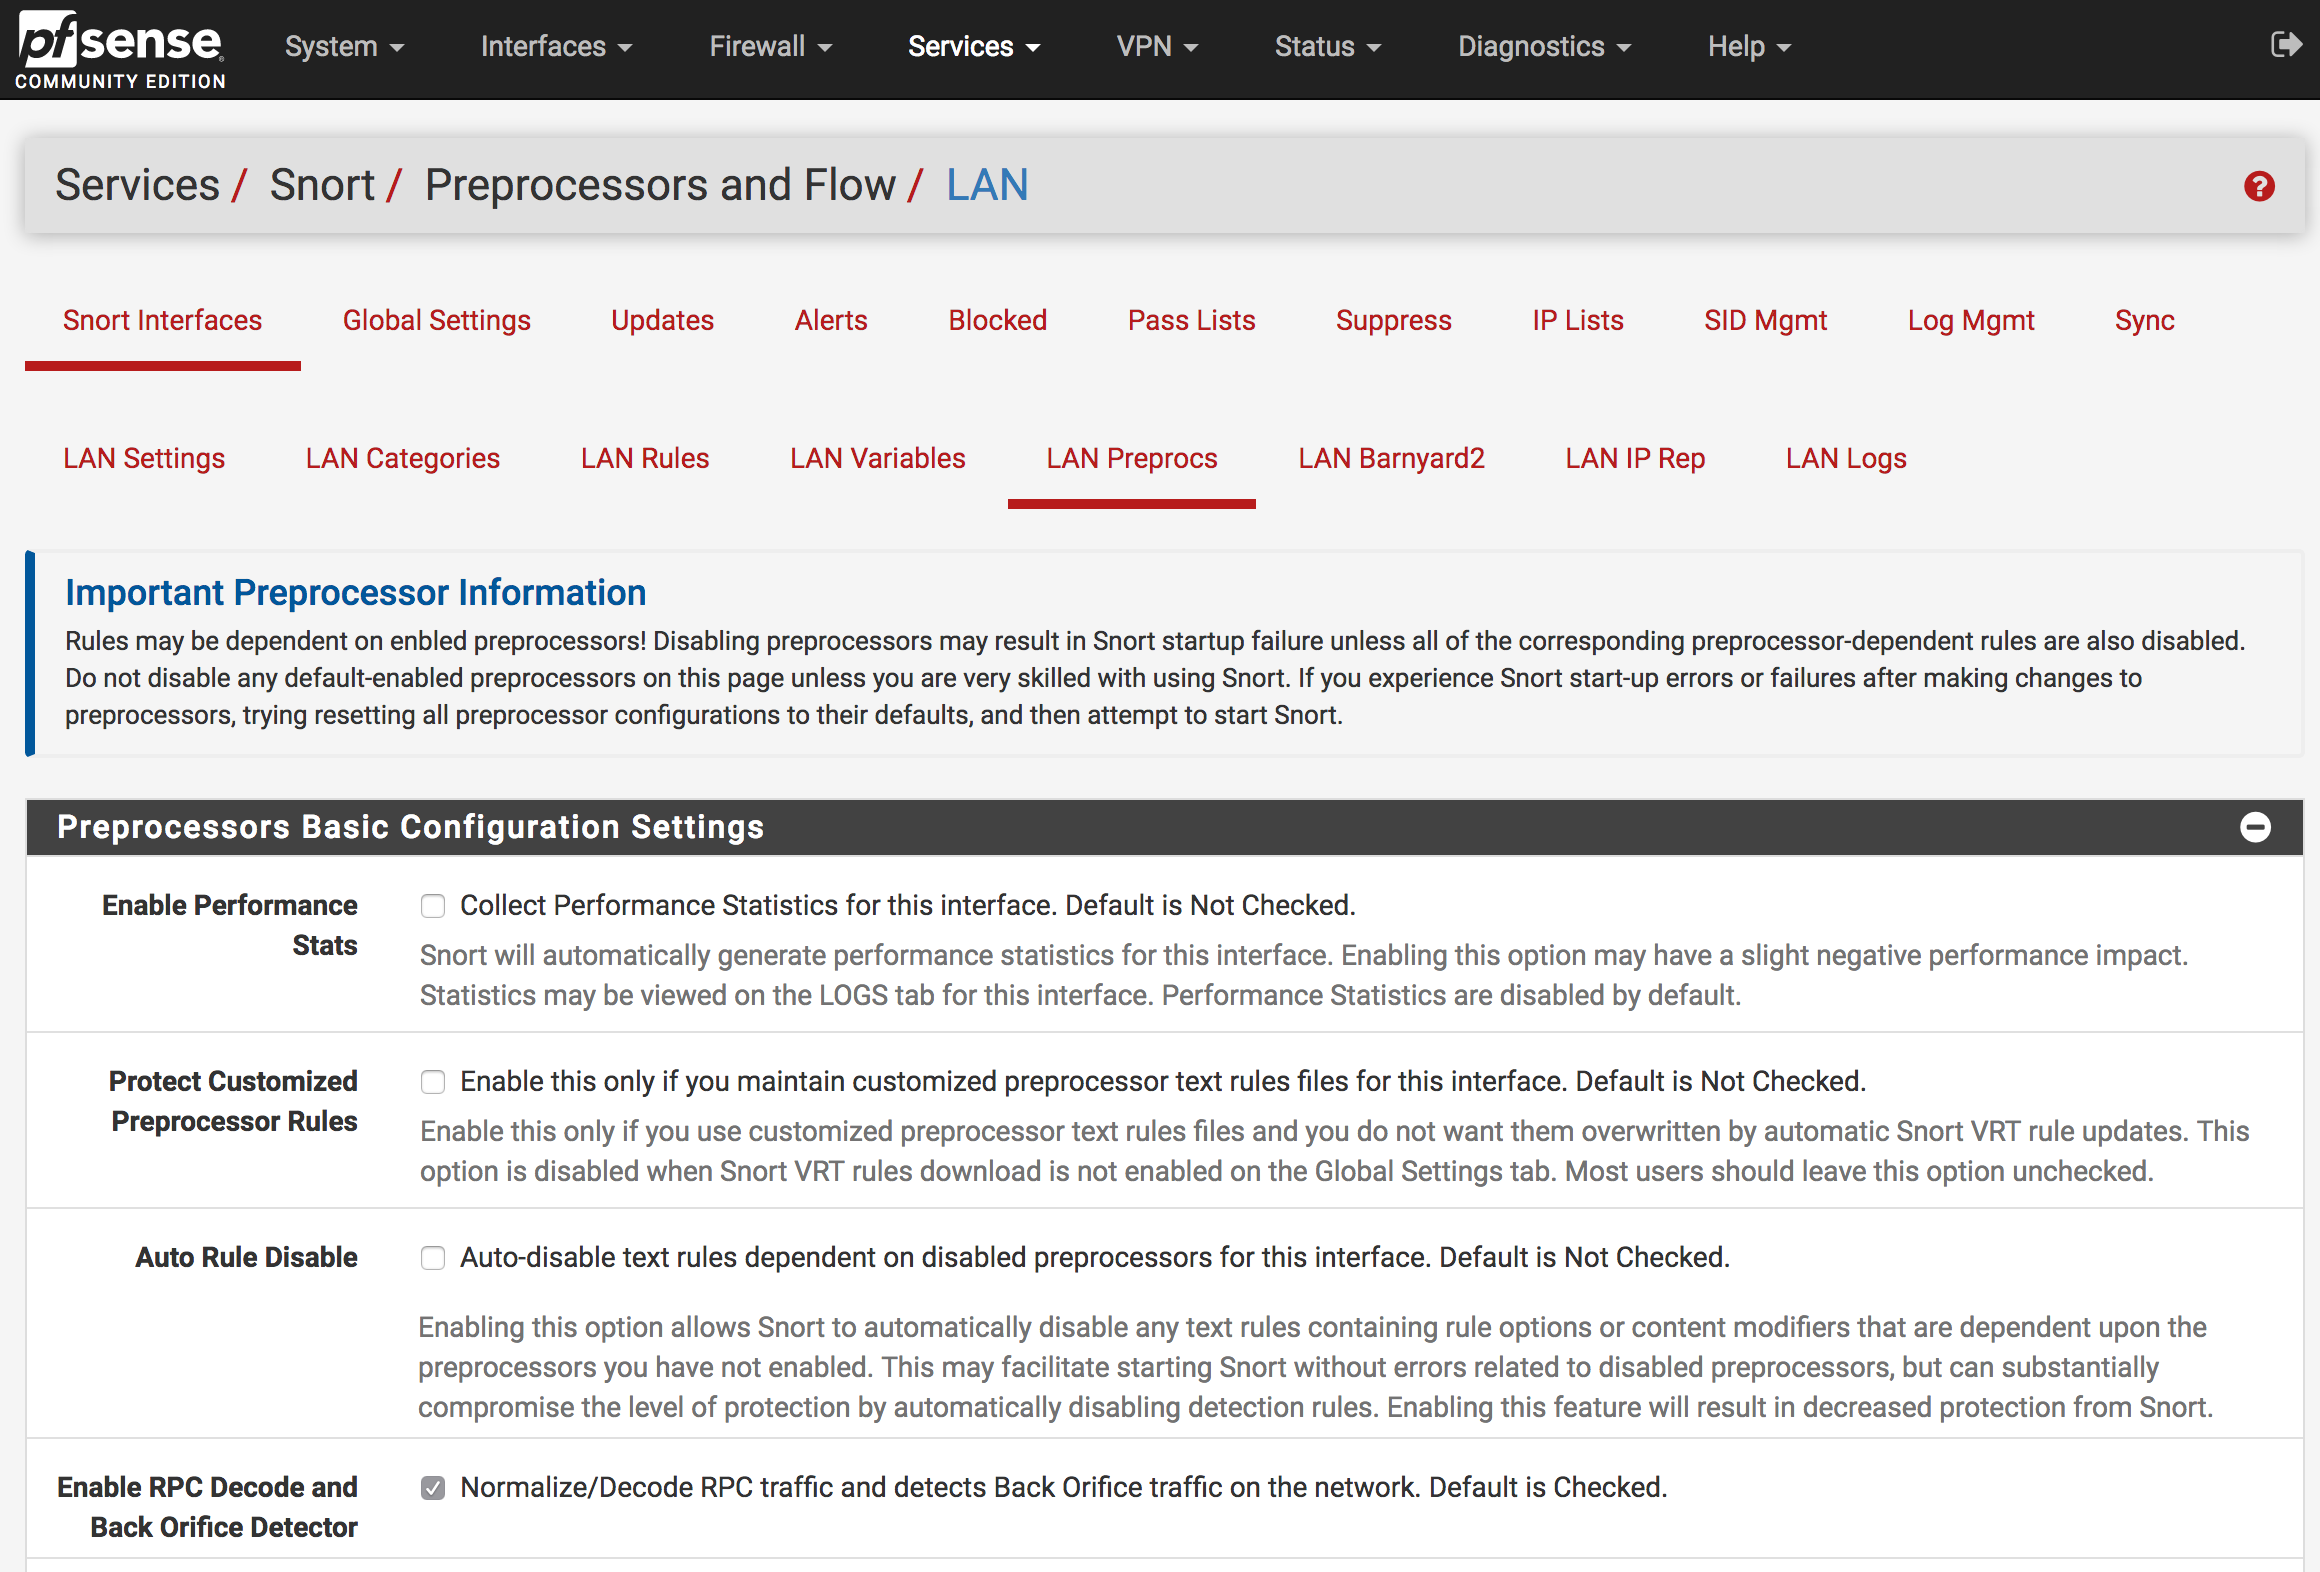
Scroll down to Application ID Detection section and select both Enable and AppID Stats Logging checkboxes. Save the page and OpenAppID will be activated on the Snort interface.
Viewing detected applications can be done from Alerts tab. The following screenshots are examples of identified services and applications:

Netflix


Amazon Web Services

iCloud


Known issues
See also
The pfSense software issue tracker contains a list of known issues with this package.
Package Assistance
Netgate TAC can only assist with the installation of this package. Netgate Professional Services can assist with custom configurations.