Installation Walkthrough
License Screen
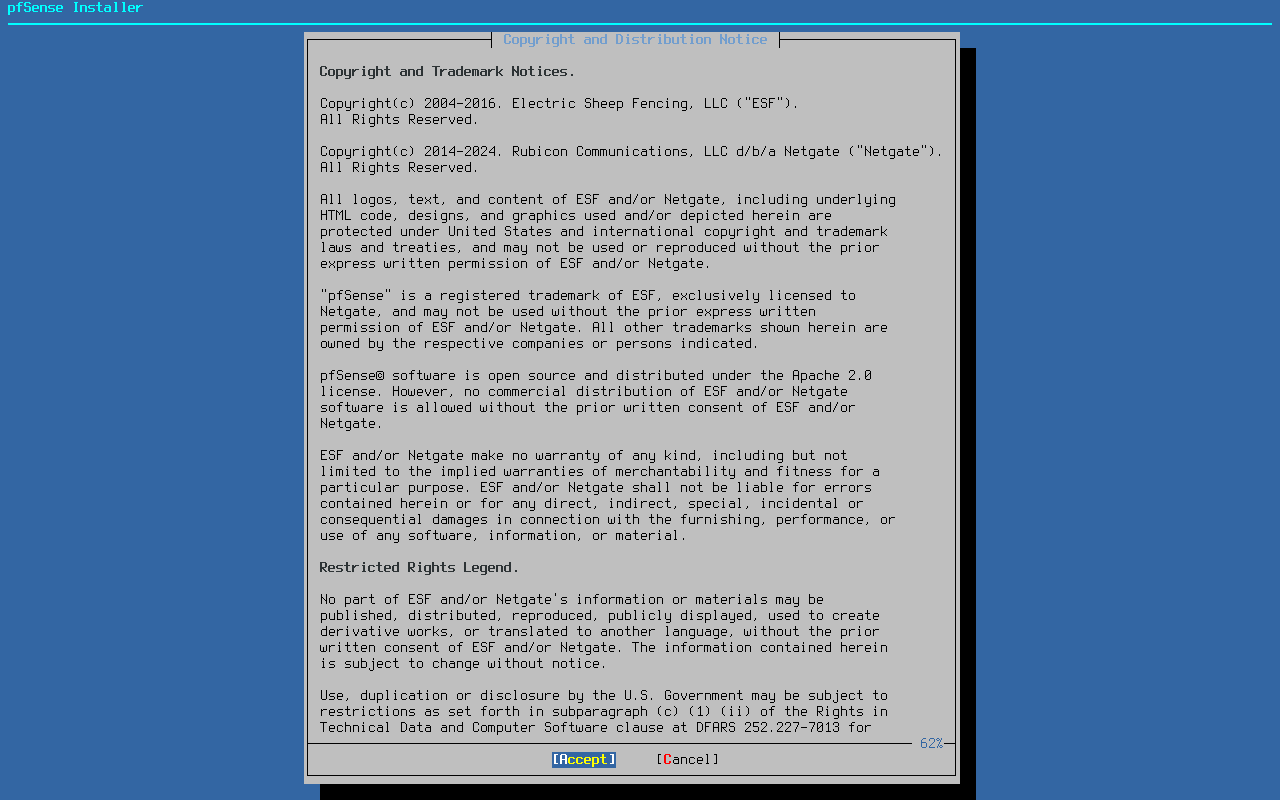
When the installer starts the first screen it presents offers license terms for pfSense® software which the user must accept before installation.
Installer License
Read the terms carefully. Use the Page Down and Page Up keys to display
additional license text. Press Enter to Accept the terms and proceed.
Welcome Menu
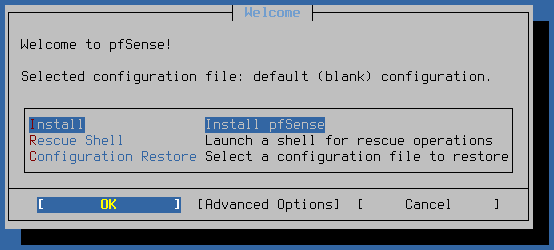
Next, the installer prompts to launch rescue options or start the Install process.
Welcome Menu
Use the arrow keys to select an option, then press Enter. The options on
this screen are:
- Install:
Continue installing pfSense software
- Rescue Shell:
Starts a basic shell prompt where advanced users can perform tasks to prepare the hardware in ways not fully supported by the installer, or to perform diagnostic tests or repairs on the firewall.
- Configuration Restore:
Attempts to restore a configuration file recovered from a prior installation or copied from other media and then use that configuration in the target installation.
The installer will hide this menu option if it cannot locate any configurations to restore.
See Configuration Restore for details.
- Advanced Options:
This option is in the bottom row of buttons. It loads another menu which contains extra options to control the behavior of the installer.
See Advanced Options for details.
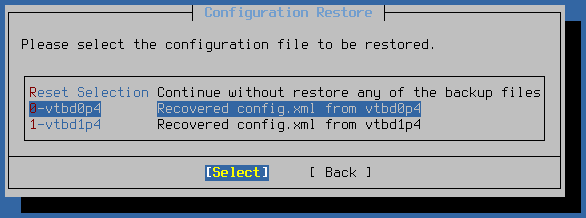
Configuration Restore
The installer searches for available configurations to recover and use for the target installation. This can be an existing prior installation of pfSense software or a configuration file on a FAT/FAT32 partition on a USB drive. The installer lists every configuration file it can locate and offers the user a choice of which to use, or to proceed without recovering a configuration.
Tip
When restoring a configuration from a prior installation, this option also searches for and copies SSH host keys and DHCP lease data to the new installation.
To recover a configuration and copy it to the target installation, use the arrow
keys to select it from the list and press the Enter key.
Configuration Restore - List of Configuration Files
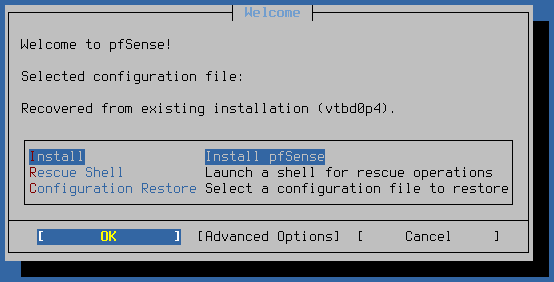
After selecting a configuration to restore, the installer displays this choice on the welcome screen:
Configuration Restore - Selected Configuration
To deselect the configuration file and proceed with a default configuration instead, enter the Configuration Restore menu again and choose Reset Selection.
Advanced Options
The options on the Advanced Options menu fine-tune the target installation.
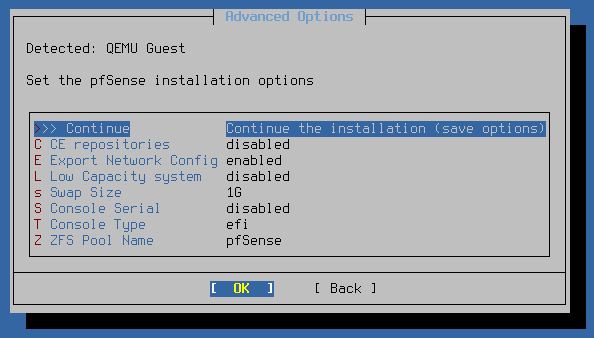
Advanced Options
Use the arrow keys to select an option, then press Enter to set or toggle
the value. The options on this screen are:
- CE Repositories:
For devices eligible to install pfSense Plus software, this option toggles the availability of CE repositories in the list of versions the installer will offer.
This allows someone with a device capable of running pfSense Plus software to install pfSense CE software instead.
- Swap Size:
Sets the size of the swap partition the installer creates on the target disk.
Swap space is used for holding crash dump data as well as for virtual memory to supplement available RAM.
Enter a value with a size suffix, such as
1Gfor 1 GiB of swap space. Use a value of0to disable swap.Note
Swap usage can cause a higher volume of disk writes, but the best practice is to at least keep a small swap partition for crash dump data.
- Console Serial:
Controls whether or not the serial console should be enabled on the target installation. Toggles between
enabledanddisabled.- Console Type:
Sets a specific type of console for the target installation.
- EFI:
EFI console, best suited for systems booting EFI with video and/or serial.
- Video:
Traditional VGA style console.
- None:
Do not set a specific console type.
After setting options on this menu, choose Continue and OK and the installer will return to the Welcome Menu.
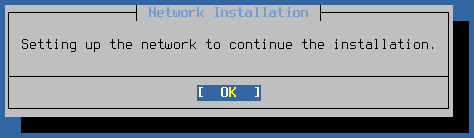
Network Setup
As this is an online installer it requires network connectivity to download installation packages from Netgate servers. To configure the network, the installer has to know at a minimum which port is a WAN with external connectivity, and configuration details to reach the Internet.
Note
The installer detects known models of Netgate hardware an automatically assigns the WAN and LAN to their default ports, skipping this manual assignment process and going right to Confirm Network Configuration.
Network Setup Prompt
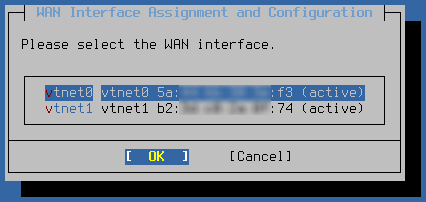
Select WAN Interface
The first interface to assign is the WAN interface. This is the interface connected to the upstream network (e.g. Internet, modem, CPE, etc.). The installer presents a list of all detected interfaces and their MAC addresses, along with their current link state.
Use the up/down arrow keys to select the WAN interface and press Enter to
continue.
Select WAN Interface
Note
When re-visiting this assignment screen later, for example to change the interface assignment or configuration, the list also includes the current assignment (e.g. WAN or LAN) at the end of each row.
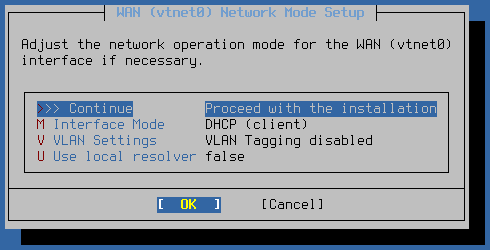
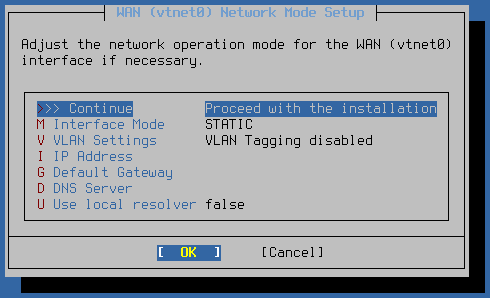
Configure WAN Interface
The next step is to configure the WAN interface. The installer supports DHCP, static IP address, and PPPoE configurations for WAN interfaces. Additionally, interfaces may be VLAN tagged if necessary.
To change the type of interface configuration, select Interface Mode and
press the Enter key. To configure a VLAN tag, select VLAN Settings and
press the Enter key. To toggle use of the local resolver, select Use local
resolver.
These options are explained in further detail in the following sections.
WAN Interface Configuration
Interface Mode
The options on this screen change depending on the selected Interface Mode as certain types require additional configuration.
DHCP Client WAN
When the WAN interface is set to DHCP (Client) there are no additional options to configure, the behavior is automatic.
Static IP Address WAN
Changing the Interface Mode to STATIC presents several additional fields to configure static IP address WAN connectivity.
Static IP Address
The available settings are:
- IP Address:
The IPv4 address and CIDR mask to use for external connectivity.
Note
The installer assumes a CIDR mask of
/24if the address is given without a CIDR mask.- Default Gateway:
The IPv4 address of the default gateway through which the installer can reach the Internet.
- DNS Server:
The IPv4 address of a DNS server, usually at the ISP or a public DNS server such as Google, CloudFlare, etc.
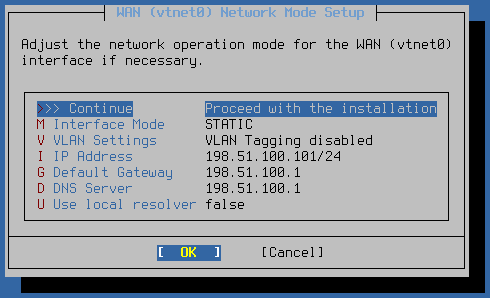
Static IP Address (Configured)
The figure above depicts a fully configured static IP address WAN.
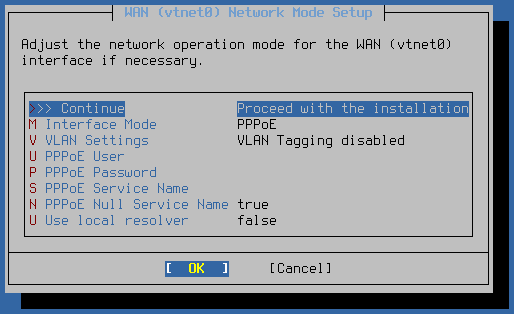
PPPoE WAN
Changing the Interface Mode to PPPoE presents several additional fields to configure PPPoE WAN connectivity.
PPPoE WAN
The available settings are:
- PPPoE User:
The username to use when logging into the upstream PPPoE service.
- PPPoE Password:
The password to use when logging into the upstream PPPoE service.
- PPPoE Service Name:
Some PPPoE providers require a specific service name to be set in authentication requests. If the provider requires such a value, set it here. Otherwise, leave it empty.
- PPPoE Null Service Name:
Configures the PPPoE client to send a null service name instead of an empty name when the PPPoE Service Name is empty. Certain providers may prefer one method or the other when they do not require a service name.
Entering a PPPoE Service Name automatically sets this to false.
Toggling this setting to true erases the PPPoE Service Name.

PPPoE WAN (Configured)
The figure above depicts a configured PPPoE WAN.
VLAN Configuration
Each interface can be optionally configured to use a VLAN tag when communicating with the rest of the network connected to that interface.
To use a VLAN tag, first select VLAN Settings from the interface configuration screen to reach the VLAN settings screen.
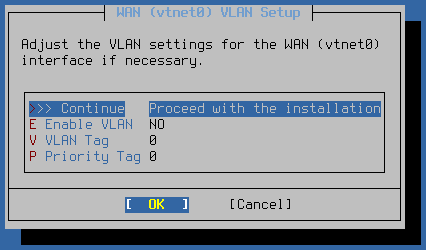
VLAN Configuration
The VLAN configuration screen controls how installer uses VLANs on an interface. The following options are available:
- Enable VLAN:
Enables or disables VLAN support for the interface.
- VLAN Tag:
Sets the VLAN tag for traffic on the interface.
- Priority Tag:
Sets a VLAN priority value.
Select OK to return to the interface configuration.
Use Local Resolver
The Use Local Resolver option is present for every WAN type. It toggles the use of a local DNS resolver (Unbound) to handle DNS resolution rather than querying upstream DNS servers directly.
Select LAN Interface
The next step is to select the LAN interface. This is used for connecting to the installer from a local network if needed. While not used in this particular walkthrough, future installer features will rely on having a working LAN configuration, and it can also make obtaining information about installation problems easier to gather for support purposes.
Selecting None will proceed without configuring a LAN, which is acceptable for installing from the console.
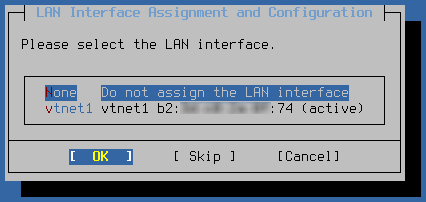
Select LAN Interface if necessary
Note
When re-visiting this assignment screen later, for example to change the interface assignment or configuration, the list also includes the current assignment (e.g. WAN or LAN) at the end of each row.
Configure LAN Interface
The options to configure the LAN are similar to a WAN but not identical.
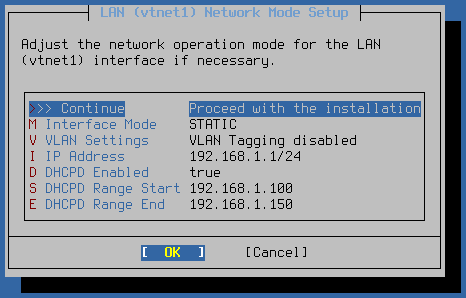
LAN Interface Configuration
The following options are available when configuring the LAN interface:
- Interface Mode:
Select between DHCP Client and Static IP Address configuration types.
- VLAN Settings:
Enter VLAN Configuration mode for this interface.
- IP Address:
Configure a static IP address and CIDR mask for the LAN. Default is
192.168.1.1/24.- DHCPD Enabled:
Toggles DHCP server behavior off/on (default: on)
Note
This option, along with the range start/end, are only available when LAN is set to a static IP address configuration.
- DHCPD Range Start:
Sets the starting address of the LAN DHCP range. Default is
192.168.1.100.- DHCPD Range End:
Sets the ending address of the LAN DHCP range. Default is
192.168.1.150.
Confirm Network Configuration
This screen lists the current interface assignments, either after manual assignment or from being assigned automatically for known models of Netgate hardware.
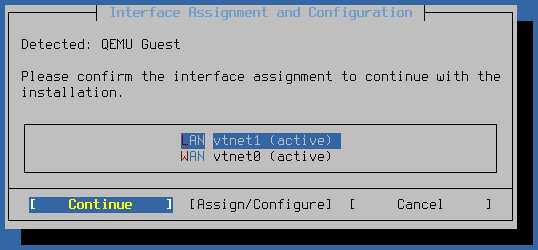
Confirm Network Configuration
If the default settings are OK, then choose to Continue from here by
selecting it with the left/right arrows and pressing the Enter key.
The default settings are a DHCP client WAN, static IP Address LAN on
192.168.1.1/24 with DHCP server enabled on LAN from 192.168.1.100 to
192.168.1.150.
To change the interface assignments or configuration, select the interface with
the up and down arrows and then use the left/right arrows to highlight
Assign/Configure then press the Enter key. Refer to the previous
sections for information on how to assign and configure each interface.
At this point the installer should have Internet connectivity.
Ineligible Device Prompt
The installer gathers information about the device and communicates with Netgate servers to determine if the device is eligible to run pfSense Plus software. If the device is eligible, it moves forward to the filesystem selection screen. If the device is not eligible, the installer displays a prompt informing the user of this fact.
Warning
If the installer is unable to contact Netgate servers it will display an error saying “Cannot verify the eligibility of this system, please try again.” For suggestions on how to correct that, see Installer Network Connectivity Problems.
If the device does not have an active subscription for pfSense Plus software, one can be purchased at this time by visiting https://www.netgate.com/purchase-plus and entering the Netgate Device ID (NDI), which is listed on this screen of the installer as well.
After subscribing, choose the Retry Validation option to allow the installer to check the subscription status again.
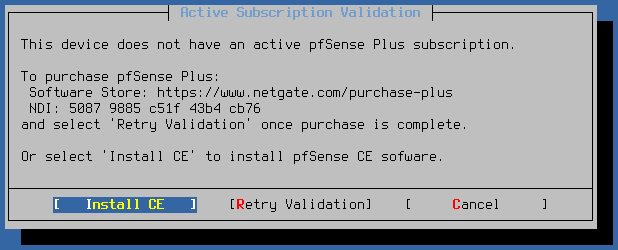
Prompt displayed on systems not yet eligible to run pfSense Plus software
Alternately, users can choose the Install CE option to install pfSense CE Software, and that installation can upgrade to pfSense Plus software later after completing the subscription process.
Filesystem and Partition Settings
After verifying the subscription, the next step is to choose the filesystem and partition type.
The available options are:
- File System:
The type of filesystem to use on the target disk.
- ZFS:
A robust modern filesystem that supports many advanced features, such as boot environments, but it uses a lot more resources. Even so, this is the default and best practice choice for nearly all cases.
- UFS:
An older filesystem that works well but can be fragile when it comes to sudden interruptions such as power loss. It uses less resources, but also doesn’t support any modern features such as boot environments.
- Partition Scheme:
The partition scheme to use on the target disk.
- GPT:
A modern partitioning method which is well supported on modern AMD64 systems but in rare cases it can have issues with older BIOS implementations. This is the default choice as there are very few systems which do not support GPT.
- MBR:
A more basic partition scheme but one which is more widely compatible. This is also used on ARM-based systems.
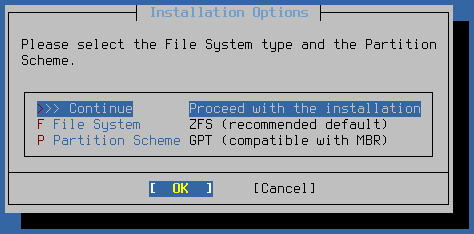
Filesystem and Partition Options
The process varies slightly depending on the selected filesystem type, so follow the section below that matches the filesystem type to be used by this firewall and then return to this document to complete the steps after.
Final Confirmation
After selecting the target disk the installer prompts for confirmation one final time before it makes destructive changes to the disk.
Danger
Choosing to continue from this point will destroy anything left on the target disk!
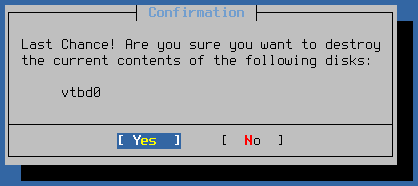
Final Confirmation before Installing
Version Selection
At this point the installer presents a list of pfSense software that this device is eligible to run. This list will typically include the current version of pfSense software and one prior release. Depending on the current status of an upcoming release cycle, the installer may also offer development snapshots.
Select the version to install from the list with the up/down arrow keys, select
OK with the left/right arrow keys, then press Enter
Tip
In most cases the correct selection will be the one labeled “Current Stable Version”.
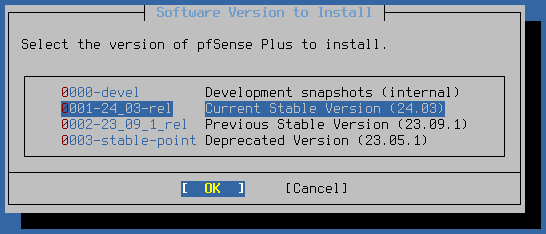
Select Software Version to Install
Installation
After picking the version, the installer proceeds to download the installation data for that version and installs it on the target disk.
Sit back, wait, and have a few sips of a refreshing beverage while the installation process formats the drive(s) and copies pfSense software files to the target disk(s).
The installer displays the output from this process as it works. When finished, the installed presents an OK button which will continue to post-installation tasks.

Output After Installation Completes
Finish Up
At this point the installation is complete. The installer will prompt one final time to either reboot into the new installation or to start a shell prompt for any manual adjustments advanced users may wish to make.
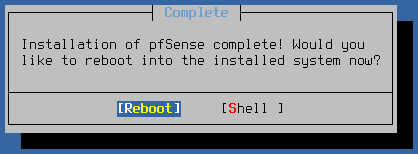
Reboot Prompt
Remove the installation media from the firewall during the reboot, when the hardware is starting back up but before it boots from the disk.
Once the device has booted from its own internal disk the device is ready for use.
Congratulations, the installation is complete!
The next step is to connect to the GUI and configure the device as described in Configuration.
See also
Alternate Remote Backup Techniques (for an example of using SCP)