ZFS
This section is a part of Installation Walkthrough and describes items specific to ZFS partitioning.
See also
For information on tuning ZFS memory usage after installation, see ZFS Tuning.
Pool Type / Disks
When installing to ZFS the installer prompt to choose the ZFS Configuration. ZFS can utilize multiple disks in various ways for redundancy and/or extra capacity. Though using multiple disks with ZFS is software RAID, it is quite reliable and better than using a single disk.
The available types are:
- stripe:
A single disk, or multiple disks added together to make one larger disk (RAID 0).
Note
For devices with a single target disk, this is the correct choice.
- mirror:
Two or more disks that all contain the same content for redundancy. Can keep operating even if one disk dies. (RAID 1)
- raid10:
RAID 1+0, n x 2-way mirrors. A combination of stripes and mirrors, which gives redundancy and extra capacity. Can lose one disk from any pair at any time.
- raidzX:
Single, Double, or Triple redundant RAID. Uses 1, 2, or 3 parity disks with a pool to give extra capacity and redundancy, so either one, two, or three disks can fail before a pool is compromised. Though similar to RAID 5 and 6, the RAIDZ design has significant differences.
Select a type and press Enter
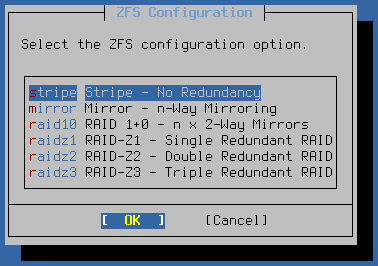
ZFS Configuration Type
Select Disks
Next, the installer prompts for which disks it will include in the selected ZFS Configuration.
Use the up and down arrow keys to highlight a disk and Space to
select disks. For mirrors or RAID types, select enough disks to fulfill the
requirements for the chosen type.
Warning
Select a disk even if there is only one in the list!
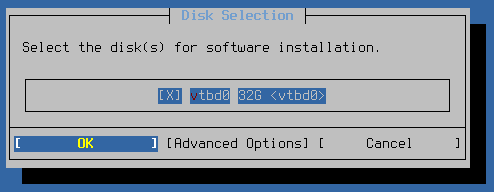
ZFS Disk Selection
Note
If installer cannot find any drives, or if it shows incorrect drives, it is possible that the desired drive is attached to an incompatible controller or a controller set for an incompatible mode in the BIOS. See Troubleshooting Installation Issues for help.
See also
The Advanced Options entry on this screen loads another menu containing additional disk operations. For information on these options, see Advanced Disk Options.
Continue Install
Proceed to Final Confirmation.