Assign Interfaces
After the installer completes and the firewall reboots, the firewall software looks for network interfaces and attempts to assign interface mappings automatically.
The automatic interface assignment profiles used by the firewall are:
- Netgate Hardware sold with pfSense® Plus Software:
pfSense Plus software for devices from the Netgate Store includes default mappings appropriate to the hardware, which varies depending upon the hardware ordered with the device. Consult the Netgate Product Manuals for specific details on each model.
- RCC-VE 4860/8860:
WAN: igb1, LAN: igb0
- RCC-VE 2220/2440:
WAN: igb0, LAN: igb1
- APU:
WAN: re1, LAN: re2
- Other Devices:
For other devices the firewall looks for common interfaces and attempts to assign them appropriately, for example:
WAN: igb0, LAN: igb1
WAN: em0, LAN: em1
WAN: re1, LAN: re2
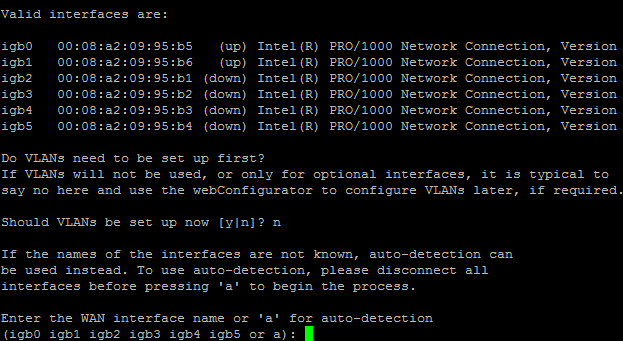
If the firewall cannot automatically determine the network interface layout, it will present a prompt for interface assignment as in Figure Interface Assignment Screen. This is where the network cards installed in the firewall are given their roles as WAN, LAN, and Optional interfaces (OPT1, OPT2 … OPTn).

Interface Assignment Screen
The firewall displays a list of detected network interfaces and their MAC (Media
Access Control) addresses, along with an indication of their link state if that
is reported by the network card. The link state is denoted by (up) appearing
after the MAC address if a link is detected on that interface.
Note
The Media Access Control (MAC) address of a network card is a unique identifier assigned to each card, and no two network cards should have the same MAC address. If a duplicate MAC address is present on a network, either by chance or by intentional spoofing, all conflicting nodes will experience connectivity problems.
After printing the network interface list, the firewall prompts for VLAN
configuration. If VLANs are desired, answer y, otherwise, type n, then
press Enter.
See also
For information about configuring VLANs, see Virtual LANs (VLANs).
The firewall prompts to set the WAN interface first. As the firewall typically contains more than one network card, a dilemma may present itself: How to tell which network card is which? If the identity of each card is already known, enter the proper device names for each interface. If the difference between network cards is unknown, the easiest way to figure it out is to use the auto-detection feature.
For automatic interface assignment, follow this procedure:
Unplug all network cables from the firewall
Type
aand pressEnterPlug a network cable into the WAN interface of the firewall
Wait a few moments for the firewall to detect the link-up event
Press
Enter
If all went well, the firewall can determine which interface to use for the WAN.
Repeat the same process for the LAN and optional interfaces, if any are necessary. If the firewall prints a message stating “No link-up detected”, see Manually Assigning Interfaces for more information on sorting out network card identities.
Once the list of interfaces for the firewall is correct, press Enter at the
prompt for additional interfaces. The firewall will ask Do you want to
proceed (y|n)? If the network interface assignment list is correct, type y
then press Enter. If the assignment is incorrect, type n and press
Enter to repeat the assignment process.
Note
In addition to the normal routing/firewall mode with multiple interfaces, a firewall may also run in Appliance Mode where it has only a single interface (WAN). The firewall places the GUI anti-lockout rule on the WAN interface, which allows clients to access the firewall web interface from that network. The usual routing and NAT functions are not active in this mode since there is no internal interface or network. This type of configuration is useful for VPN appliances, DHCP servers, and other stand-alone roles.
Manually Assigning Interfaces
If the auto-detection feature did not work, there is still hope of telling the difference between network cards prior to installation. One way is by MAC address, which the firewall prints next to the interface names on the assignment screen:
vmx0    00:0c:29:50:a4:04
vmx1    00:0c:29:50:ec:2f
The MAC address is sometimes printed on a sticker somewhere physically on the network card. For virtualized systems, the virtual machine configuration usually contains the MAC address for each network card. MAC addresses are assigned by manufacturer, and there are several online databases which offer reverse lookup functionality for MAC addresses in order to find the company which made the card: http://www.8086.net/tools/mac/, http://www.coffer.com/mac_find/, and http://aruljohn.com/mac.pl, among many others.
Network cards of different makes, models, or sometimes chipsets may be detected
with different drivers. It may be possible to tell an Intel-based card using
the igb driver apart from a Broadcom card using the bge driver by
looking at the cards themselves and comparing the names printed upon the
circuitry.
The probe order of network cards can be unpredictable, depending on how the hardware is designed. In a few cases, devices with numerous ports may use different chipsets that probe in different ways, resulting in an unexpected order. Add-on and Multi-port NICs are generally probed in bus order, but that can vary from board to board. If the hardware has onboard NICs that are the same brand as an add-in NIC, be aware that some systems will list the onboard NIC first, and others will not. In cases when the probe order makes multiple NICs of the same type ambiguous, it may take trial and error to determine the port placements and driver name/number combinations.
After the network cards have been identified, type the name of each card at the
interface assignment screen when prompted. In the above example, vmx0 will
be WAN and vmx1 will be LAN. To assign them these roles, follow this
procedure:
Type
vmx0and pressEnterwhen prompted for the WAN addressType
vmx1and pressEnterwhen prompted for the LAN addressPress
Enteragain to stop the assignment process, since this example does not contain any optional interfaces.Type
yand pressEnterto confirm the interface assignments