pfSense® Community Version
Retrieve
pfSense-CE-memstick-ADI-2.4.4-RELEASE-p1-amd64.img.gzfrom the pfSense® Download Page. On that page, Select Netgate ADI from the Architecture drop-down for the proper image.Write the downloaded image to a USB memstick.
See also
- Writing Flash Drives
Writing an OS installation image to flash media
Connect to the console port of the Netgate device using a mini-USB cable attached to another system.
See also
- Connecting to Console Port
Connecting to the console port. Cable is required.
Insert the memstick in the top USB port and boot the system.
After a minute the pfSense loader menu will be displayed that contains options to Boot Multi User, Boot Single User, Escape to loader prompt, Reboot, select a non-default kernel or configure boot options. Either allow the menu to timeout and boot on its own, or press
1to boot normally. The ADI-specific image of pfSense already has the console port options set correctly.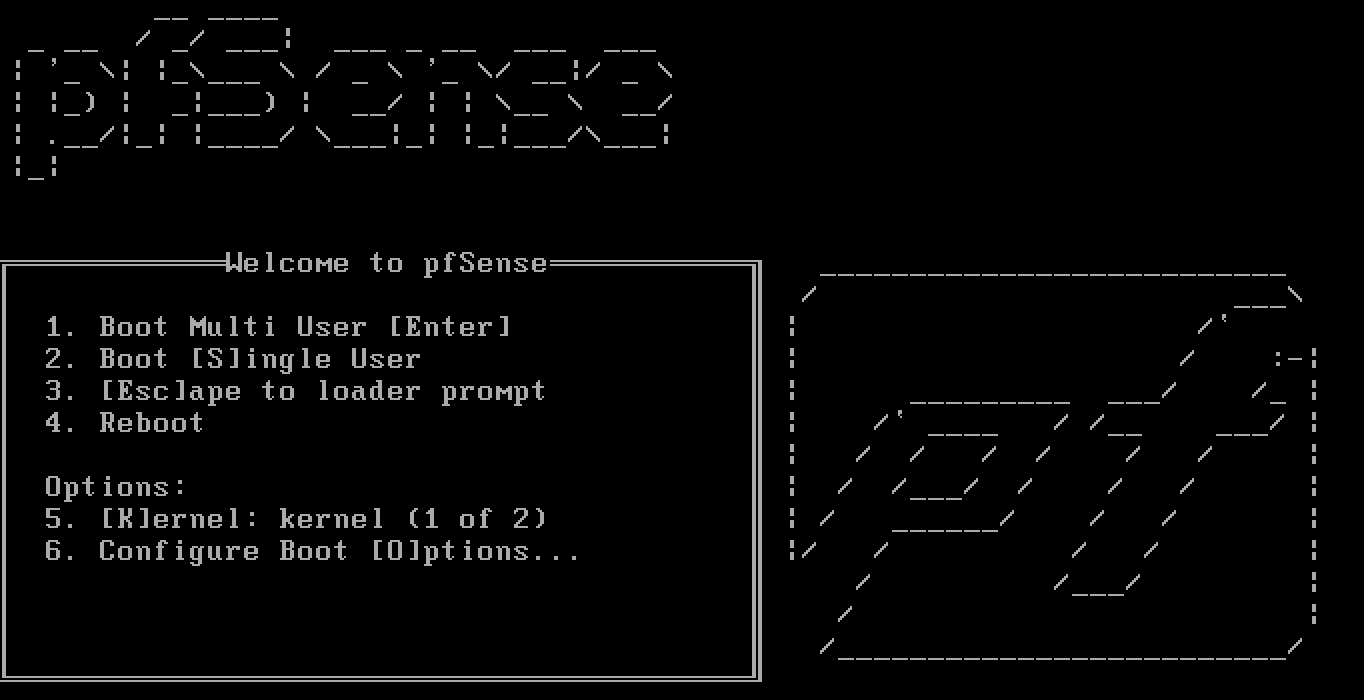
Console options are presented for serial console installation. The default option is vt100, which should work for most. Choose the correct console output for the client terminal.
Please choose the appropriate terminal type for your system.
Common console types are:
   ansi     Standard ANSI terminal
   vt100    VT100 or compatible terminal
   xterm    xterm terminal emulator (or compatible)
   cons25w  cons25w terminal
The installer will automatically launch, and several options will be presented. Press
Enterfor the default options to complete the installation process.Note
Options such as the type of disk partition can be modified through this installation. For more details on available choices through this part of the process, see The pfSense Book Installing and Upgrading section.
The final step of the installation will be a prompt to Reboot the system. Select Reboot and press
Enter. The system will shut down and reboot.Dec 21 22:41:37 Waiting (max 60 seconds) for system process `vnlru` to stop... d one Waiting (max 60 seconds) for system process `bufdaemon` to stop... done Waiting (max 60 seconds) for system process `syncer` to stop... Syncing disks, vnodes remaining... 0 0 done All buffers synced. Uptime: 5m43s umass0: detached umass1: detached uhub1: detached
Remove the USB drive from the USB port. pfSense will restart automatically. If the USB drive remains attached, the system will boot into the installer again because by default the system firmware is configured so that a device plugged into the USB port will be booted with a higher priority.