Ubuntu 12.x through 15.x PXE Install
Download
netboot.tar.gzfor the desired Ubuntu version from http://cdimage.ubuntu.com/netboot/.Set up a TFTP server somewhere on the network and extract
netboot.tar.gzinto the TFTP root.Configure the net boot files for use of the serial console. Under the TFTP root directory, enter the
ubuntu-installer/amd64/boot-screens/directory.Skip this step for Ubuntu 15.x Edit the file in
syslinux.cfgin this directory and add the following two lines to the top of the file:console 0 serial 1 115200 0
Edit the file
txt.cfgin this directory. Underlabel install, change theappend vga ...line to removevga=788andquietfrom the end and appendconsole=ttyS1,115200n8 earlyprint=serial,ttyS1,115200n8so that line resembles the following:append initrd=ubuntu-installer/amd64/initrd.gz --- console=ttyS1,115200n8 earlyprint=serial,ttyS1,115200n8
Save changes to the file and exit.
Configure the DHCP server for network booting. Configure option next-server with the IP address of the TFTP server and specify option filename as
pxelinux.0.Connect to the console port of the RCC-VE using a mini-USB cable attached to another system.
See also
- Connecting to Console Port
Connecting to the console port. Cable is required.
Connect a network cable that is attached to the local LAN to one of the ethernet ports. On 6-port models, using one of the four ports on the right side is required as they are the only ports available for PXE booting.
When prompted with “Press F12 for boot menu”, press
F12. The list of boot options will depend on the hardware installed in the system. Four NICs will be listed with an iPXE option. The left-most NIC on 4 port models will show as “iPXE (PCI 00:14.0)”, followed by 14.1, 14.2 and so on for each port left to right. On 6 port models 14.0 is the third NIC from the left, 14.1 is the fourth, 14.2 is fifth and 14.3 is the furthest right NIC:Press F12 for boot menu. Select boot device: 1. AHCI/0: INTEL SSDMCEAC030B3 ATA-9 Hard-Disk (28626 MiBytes) 2. USB MSC Drive Generic Ultra HS-COMBO 1.98 3. iPXE (PCI 00:14.0) 4. iPXE (PCI 00:14.1) 5. iPXE (PCI 00:14.2) 6. iPXE (PCI 00:14.3)
Press the number corresponding to the NIC that is plugged into the network, and the system will begin to boot.
When the boot menu appears, scroll down to Install and press
Enter.The kernel will start up and after a minute the system will launch the installer, first prompting for a Language and Country.
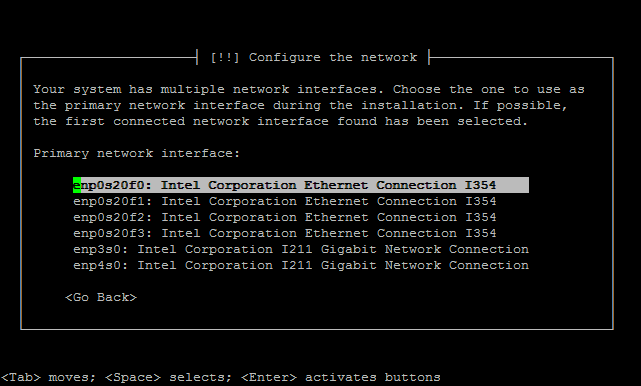
The installer will display a menu labeled Configure the Network. This menu contains options to configure the network interfaces. All RCC-VE units have four ports listed and models with six ethernet ports have two additional ports listed. Move the cursor to select the interface connected to the network and press
Enter. Consult the table below to determine which network port to use based on the name provided by Ubuntu and the number of available network ports.Ubuntu Installer NIC Mappings¶ Ubuntu 14.x Label
Ubuntu 15.x Label
4 Port
6 Port
eth0
enp0s20f0
eth0
eth2
eth1
enp0s20f1
eth1
eth3
eth2
enp0s20f2
eth2
eth4
eth3
enp0s20f3
eth3
eth5
p3p1
enp4s0
eth0
p2p1
enp3s0
eth1

The installer will then prompt for various system settings, such as the hostname, users, clock, and disks. These values must be set appropriately for to the role and environment of this system.
Note
When configuring the installation disk, the disks are listed with their capacity. The eMMC will be labeled “Ultra HS-Combo”, if an mSATA disk is installed it can be identified by its capacity and make/model.
When the installation has completed, a box labeled “Finish the installation” will be displayed with the choices Go Back or Continue. Select
Continueand pressEnter. The system will reboot.Remove any bootable USB drives from the USB ports on the system. Ubuntu will start up automatically from the target drive (mSATA SSD or internal eMMC). If the USB drive remains attached, the system will boot into the installer again because the system firmware is configured so that a device plugged into the USB port will be booted with a higher priority.