Writing an Installation Image to Flash Media
Creating bootable installation media varies by operating system and involves writing the installation image to flash media such as a USB flash drive, sometimes referred to as a “thumb drive”.
Requirements
A USB flash drive with a capacity of at least 8 GB.
Current installation images from Netgate can be larger than 4 GB in size depending on the platform, and this is likely to increase over time.
An installation media image file.
This document assumes that the installation image is already downloaded onto the client computer which will create the installation media. Refer to the platform and/or software documentation for information on how to obtain an installation image file.
A client computer from which to write the image (e.g. Windows PC, Mac, Linux).
Using Etcher
The easiest way to create bootable installation media is to use Etcher. Etcher is available on Windows, macOS, and Linux so the procedure to write an image is the same across each supported platform. Etcher is simple to use, supports compressed image files, and has several features which help prevent users from making unintentional mistakes in the process such as selecting the wrong target drive. Additionally, unlike other methods there is no need to perform other steps before writing the image to prepare the image file or disk.
Download and install Etcher from https://www.balena.io/etcher/
Insert a USB flash drive into the client computer
Start Etcher
Etcher will display its main screen as shown in the following image:
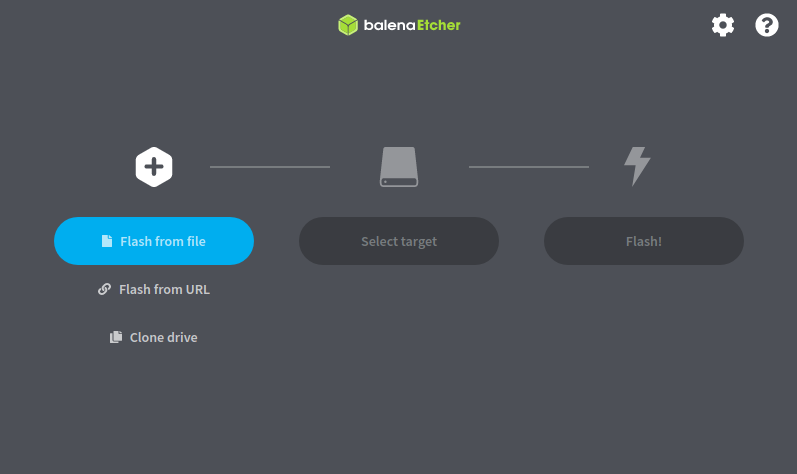
Click Flash from file
Locate and select the installation image file
Tip
Etcher can use compressed images directly, there is no need to manually decompress the image file first.
Click Select target
Click the USB flash drive to which Etcher should write the image
Note
Etcher attempts to hide and/or visibly mark potentially dangerous selections such as system drives, the drive containing the source image, and large drives. This makes it easier to identify the correct selection.
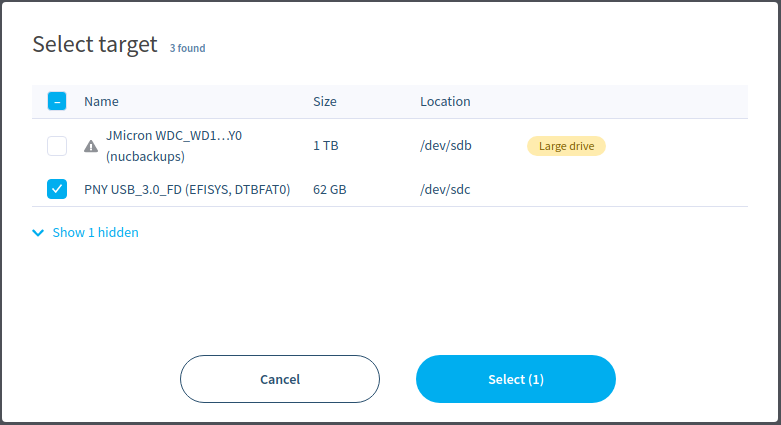
Click Select (1) to continue
Click Flash! to write the image to the target USB flash drive
At this point there may be an authentication or UAC prompt to continue.
Note
Etcher requires elevated privileges to write USB drives. In the majority of cases, Etcher will trigger an operating system prompt for additional privileges as needed. If it does not, re-run Etcher as an administrator explicitly.
Wait for the flash process to complete
If there is an error from Etcher, try another USB flash drive or follow the advice given within Etcher to resolve the problem.
Warning
After writing the drive, the installation media will contain partitions which cannot be read by most operating systems. Ignore any operating system warnings about failing to mount the drive or prompts to format the drive.
Close Etcher when complete
Remove the USB flash drive from the client system
What Next?
The installation media is now ready to use. Proceed to the installation instructions for the operating system.
Alternate Methods
If Etcher is not viable, there are other more involved methods to create installation media.
Decompress the Image
Some software used to create installation media does not support compressed image files. Before proceeding, decompress the image file to ensure compatibility.
The most common indication that a file is compressed is its extension. If the
filename ends in .gz, .bz2, .zip, or similar then it is likely
compressed. If so, decompress it using an appropriate utility:
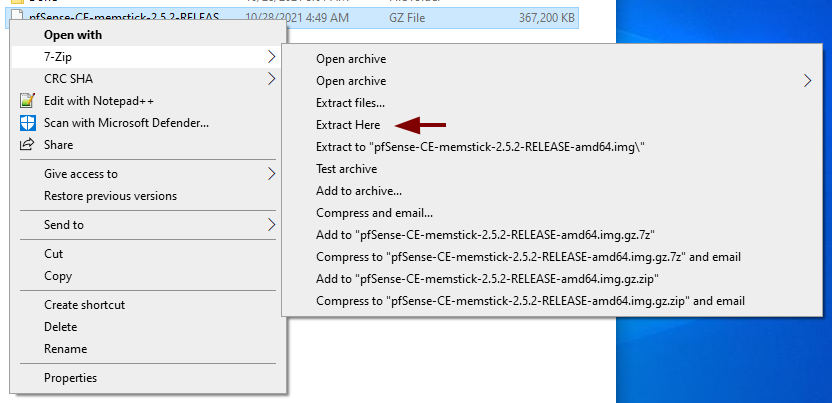
Using 7-Zip
Right-click the downloaded
img.gzfileClick 7-zip
Click Extract Here
Use the gunzip command line utility to decompress the image:
$ gunzip /path/to/file
Use the gzip command line utility to decompress the image:
$ gzip -d /path/to/file
Use the gzip command line utility to decompress the image:
$ gzip -d /path/to/file
Connect the Flash Drive to the Workstation
Next, connect the flash drive to the client computer containing the downloaded image file.
Locate the device name that the client computer designates for the drive:
The drive name will be a single uppercase letter, e.g. E. Use Windows
Explorer or examine the control panel and look at the available disks for
one matching the drive.
The device name may look like /dev/diskX where X is a decimal
digit. Run diskutil list from a command prompt or use the GUI tool
Disk Utility.
Note
If the disk is named diskX then the device to pass to the writing
utility is the raw disk device named rdiskX. Using this device is
much faster for these types of low-level operations.
The device name may look like /dev/sdX where X is a lowercase
letter. Look for messages about the drive attaching in the system log
files or by running dmesg.
Note
Make sure the device name refers to the entire disk rather than a
partition. For example, /dev/sdb1 is the first partition on the
disk, so it would be writing to a partition on the device and the drive
may not end up being bootable. In that case use /dev/sdb instead so
it writes the entire disk.
The device name may look like /dev/daX where X is a decimal digit.
Look for messages about the drive attaching in the system log files or by
running dmesg.
Cleaning The Target Disk
Cleaning the target disk removes all the partitions and data on the device. This step is optional, but a best practice as it gives the disk a blank slate with less chance that previous disk contents will cause a conflict. For example, Win32 Disk Imager on Windows has issues when writing disk images to flash drives if they contain multiple partitions.
The process to clean the disk varies by operating system:
Warning
Choosing the wrong destination could erase one of the system hard disks. Check and recheck the disk selection before making changes.
The Disk Management interface on Windows is one way to delete the
partitions from a disk, but often it has the operation disabled. The
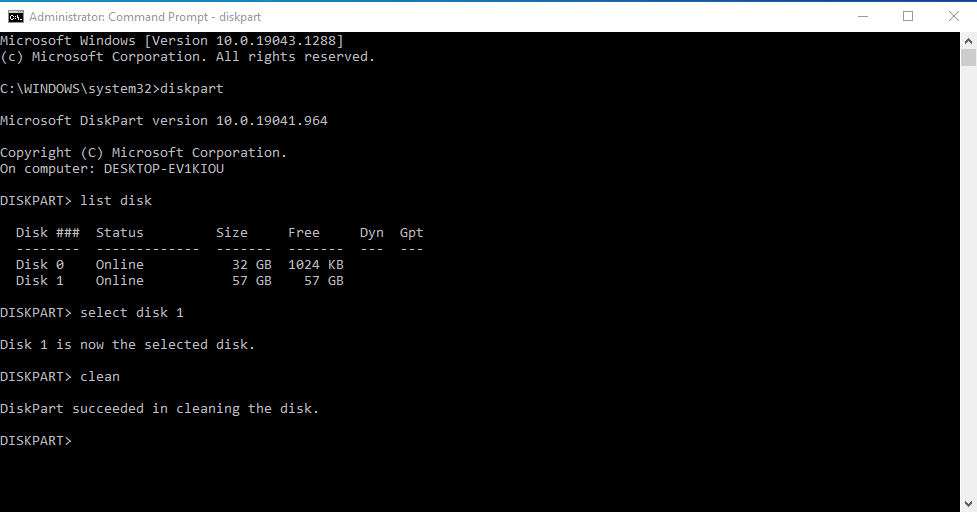
simplest and most reliable method is to use diskpart.
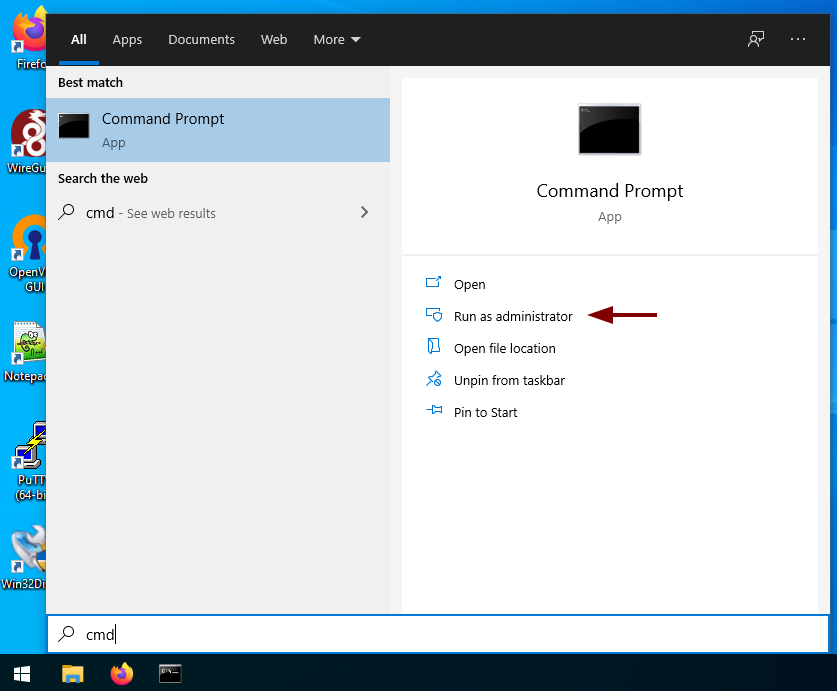
Start a command prompt as Administrator
Run
diskpartType
list diskto show the disks connected to the systemOne of these disks will be the target USB flash drive.
Type
select disk nwherenis the disk number of the target USB flash drive from the list in the previous command outputType
cleanto remove the partitions from the disk.
The full diskpart session can be seen in the following image:
Warning
Choosing the wrong destination could erase one of the system hard disks. Check and recheck the disk selection before making changes.
The dd command is by far the easiest way to erase a disk partition
table:
% sudo dd if=/dev/zero of=/dev/rdiskX bs=1m status=progress
Note
On versions of macOS prior to 12, the dd command does not support
the parameter status=progress parameter which shows the status of
the command as it writes.
Limiting the wipe to the start of the disk with count=1 or similar
will not fully wipe metadata from the disk as it only wipes the start
of the disk, not the end. There are ways to wipe the end by using
seek=<total sectors>-1024 or similar parameters, but that method is
far more complex and prone to error. The best practice is to wipe the
entire disk.
Warning
Choosing the wrong destination could erase one of the system hard disks. Check and recheck the disk selection before making changes.
The dd command is by far the easiest way to erase a disk partition
table:
$ sudo dd if=/dev/zero of=/dev/sdX bs=1M status=progress
Note
Limiting the wipe to the start of the disk with count=1 or similar
will not fully wipe metadata from the disk as it only wipes the start
of the disk, not the end. There are ways to wipe the end by using
seek=<total sectors>-1024 or similar parameters, but that method is
far more complex and prone to error. The best practice is to wipe the
entire disk.
Warning
Choosing the wrong destination could erase one of the system hard disks. Check and recheck the disk selection before making changes.
Using commands to clear the disk metadata followed by the dd command
to wipe the start of the disk is by far the fastest way to clean a disk on
FreeBSD:
$ sudo gpart destroy -F daX
$ sudo zpool labelclear -f /dev/daX
$ sudo dd if=/dev/zero of=/dev/daX bs=1M count=1 status=progress
Note
Alternately, skip the first two commands and omit the count=1 on
dd to wipe the entire target disk from start to end.
Write the Image
Now it is time to write the image to the flash drive. The exact procedure varies by operating system.
Warning
The operations in this section will completely overwrite any existing content on the flash drive so be sure that any files previously stored on the drive are backed up elsewhere.
In order to write an image to a drive from a Windows workstation, the best practice is to use a GUI tool such as Etcher as described previously, or an alternate utility such as Win32 Disk Imager.
Using Win32 Disk Imager
Win32 Disk Imager is a Free and easy-to-use program which can write disk images on Windows. It also only lists removable drives in its GUI which prevents accidentally overwriting a permanent disk.
Start Win32 Disk Imager, and ensure it is running as Administrator
Click the folder icon (1)
Navigate to the location of the downloaded image file
Select the image file
Choose the target drive (2)
Click Write (3)
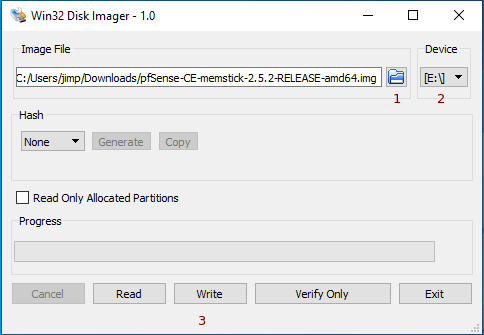
Wait for the image to finish writing, and a Write Successful dialog will appear
Warning
The operations in this section will completely overwrite any existing content on the flash drive so be sure that any files previously stored on the drive are backed up elsewhere.
Write the image to the drive using the dd command. It takes this
general form:
% sudo diskutil unmountDisk <usb_disk_device_name>
% sudo dd if=<image_file_name> of=<usb_disk_device_name> bs=4m status=progress
% sudo diskutil eject <usb_disk_device_name>
For example:
% sudo diskutil unmountDisk /dev/rdisk3
% sudo dd if=file1.img of=/dev/rdisk3 bs=4m status=progress
% sudo diskutil eject /dev/rdisk3
The bs=X is optional and tells dd to perform reads and writes on
4 MB blocks of data at a time. The default block size used by dd is
512 bytes. Specifying a larger block size can significantly increase the
writing speed which will result in faster image writing.
Note
On versions of macOS prior to 12, the dd command does not support
the parameter status=progress parameter which shows the status of
the command as it writes.
If a warning is printed about “trailing garbage” it may be safely ignored, as it is from the file’s digital signature.
Warning
The operations in this section will completely overwrite any existing content on the flash drive so be sure that any files previously stored on the drive are backed up elsewhere.
Write the image to the drive using the dd command from a shell logged
in as a user with sudo access or the root user directly. It takes this
general form:
$ sudo dd if=<image_file_name> of=<usb_disk_device_name> bs=4M status=progress
For example:
$ sudo dd if=file1.img of=/dev/sdb bs=4M status=progress
The bs=X is optional and tells dd to perform reads and writes on
4 MB blocks of data at a time. The default block size used by dd is
512 bytes. Specifying a larger block size can significantly increase the
writing speed which will result in faster image writing.
If a warning is printed about “trailing garbage” it may be safely ignored, as it is from the file’s digital signature.
Warning
The operations in this section will completely overwrite any existing content on the flash drive so be sure that any files previously stored on the drive are backed up elsewhere.
Write the image to the drive using the dd command. It takes this
general form:
$ sudo dd if=<image_file_name> of=<usb_disk_device_name> bs=4M status=progress
For example:
$ sudo dd if=file1.img of=/dev/da1 bs=4M status=progress
The bs=X is optional and tells dd to perform reads and writes on
4 MB blocks of data at a time. The default block size used by dd is
512 bytes. Specifying a larger block size can significantly increase the
writing speed which will result in faster image writing.
If a warning is printed about “trailing garbage” it may be safely ignored, as it is from the file’s digital signature.
What Next?
The installation media is now ready to use. Proceed to the installation instructions for the operating system.
For Netgate hardware, consult the product manual for specific guidance on reinstalling the operating system:
For general use reinstallation instructions, consult the appropriate documentation for the software: