Connecting to Console Port
Simple Configuration
Below are instructions for connecting to the console port on Microsoft Windows. If these steps do not work, or if the client operating system is not Windows, skip forward to Advanced Configuration.
Serial Terminal Emulation Client
A serial terminal emulation program is required to access the pfSense® appliance console through the serial interface. Microsoft Windows no longer includes HyperTerminal in Versions 7 and up. PuTTY is free and can be downloaded from:
Configuring Serial Terminal Emulator
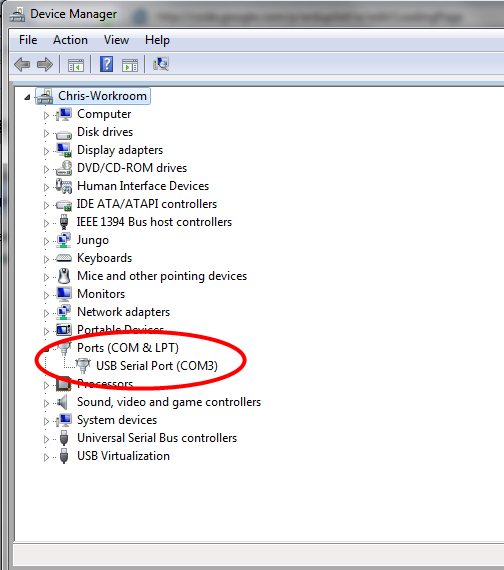
PuTTY must be configured to communicate with the appliance. To do so, first identify the COM Port which the computer has assigned to the serial port. Even if the serial port is set to COM1 in the BIOS, Windows may remap it to a different COM Port. To determine this, open Windows Device Manager and view the COM port assignment.
Open PuTTY and locate the Session display as shown. Set the COM Port to that which is displayed in Windows Device Manager and the Speed to 115200.
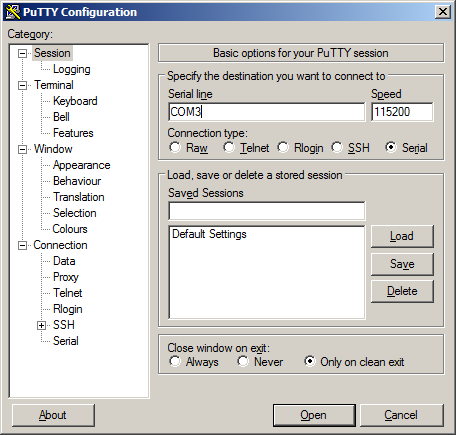
Match the COM Port with what was reported in Windows Device Manager. This example uses COM3. The pfSense appliance serial port speed is 115200 bits per second. The speed of the BIOS and the speed of the console must match so change the speed in PuTTY to 115200bps.
Select Serial as shown and configure the COM Port and Serial Speed as
displayed. Select Open and the console screen will be displayed.
Advanced Configuration
A Silicon Labs CP210x USB-to-UART bridge is used to provide access to the serial port that acts as a system console. This is exposed via a USB Mini-b (5-pin) port on the front of the case. There are several steps required to access the system console via this port.
Install the Driver
Install an appropriate CP210x USB to UART Bridge VCP (virtual COM port) driver on the workstation used to connect with the system if needed. There are drivers available for Windows, Mac OS X, and Linux available in the Download Software section of the Silicon Labs Website.
Warning
Do not download the SDK, only download the driver.
Note
Recent versions of FreeBSD and many Linux distributions include this driver and will not require manual installation.
Loading the Linux Driver
If the device does not appear automatically, the CP210x driver module may need
to be loaded manually, especially if the version of Linux being run is not
recent. If the driver was provided with the Linux distribution, run modprobe
cp210x as root or using sudo. If it had to be built manually, run insmod
./cp210x.ko assuming the module is in the current directory.
Connect a USB Cable
Next, locate an appropriate USB cable. The type of cable required for the serial console has a USB Mini-b (5-pin) connector on one end and a regular USB (Type A) plug on the other end. These cables are commonly used with smaller USB peripherals such as GPS units, cameras, and so on.
Attach the USB cable between a workstation and the system. Gently push the Mini-B plug end into the console port on the system and connect the USB type A plug into an available USB port on the workstation.
Note
Be certain to gently push in the Mini-B connector on the system side completely. With most cables there will be a tangible “click”, “snap”, or similar indication when the cable is fully engaged.
Locate the Console Port Device
The appropriate device to attach the terminal program to each platform varies by platform and must be located before attempting to connect to the console.
Windows
To locate the device name on Windows, open Device Manager and expand the section for Ports (COM & LPT). Look for an entry with a title such as Silicon Labs CP210x USB to UART Bridge. If there is a label in the name that contains “COMX” where X is a decimal digit (e.g. COM1), that value is what would be used as the port in the terminal program.

Mac OS X
The device associated with the system console is likely to show up as /dev/cu.SLAB_USBtoUART.
Linux
The device associated with the system console is likely to show up as
/dev/ttyUSB0. Look for messages about the device attaching in the
system log files or by running dmesg.
Note
If the device does not appear in /dev/, see the note above in the driver section about manually loading the Linux driver and then try again.
FreeBSD
The device associated with the system console is likely to show up as
/dev/cuaU0. Look for messages about the device attaching in the
system log files or by running dmesg.
Launch a Terminal Program
Use a terminal program to connect to the system console port. PuTTY is a popular terminal program that is available on various operating systems. Some other choices of terminal programs:
Linux: screen, PuTTY, minicom, dterm
Mac OS X: screen, ZTerm, cu
Windows: PuTTY, SecureCRT, Do not use HyperTerminal
FreeBSD: screen, cu
The settings to use within the terminal program are:
- Speed:
115200 baud
- Data bits:
8
- Parity:
none
- Stop bits:
1
- Flow Control:
Off or XON/OFF. Hardware flow control (RTS/CTS) must be disabled.
Client-Specific Examples
PuTTY
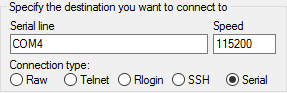
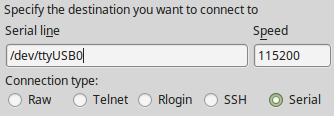
Launch PuTTY and configure it for a Serial type connection with a speed of 115200 using the port name located previously.
Windows Example:
Linux Example:
PuTTY generally handles most cases OK but can have issues with line drawing characters on certain platforms.
These settings seem to work best (tested on Windows):
- Window:
Columns x Rows = 80x24
- Window > Appearance:
Font = Courier New 10pt or Consolas 10pt
- Window > Translation:
Remote Character Set = Use font encoding or UTF-8
- Window > Translation:
Handling of line drawing characters = Use font in both ANSI and OEM modes or Use Unicode line drawing code points
- Window > Colours:
Indicate bolded text by changing = The colour
GNU screen
In many cases screen may be invoked simply by using the proper command line:
Mac OS X
sudo screen /dev/cu.SLAB_USBtoUART 115200
Linux
sudo screen /dev/ttyUSB0 115200
FreeBSD
sudo screen /dev/cuaU0 115200
If portions of the text are unreadable but appear to be properly formatted, the most likely culprit is a character encoding mismatch in the terminal. For example, on OS X this is commonly required
sudo screen -U /dev/cu.SLAB_USBtoUART 115200
Adding the -U parameter to the screen command line arguments forces it to
use UTF-8 for character encoding.
Troubleshooting
No Serial Output
If there is no output at all, check the following items:
Ensure the cable is correctly attached and fully inserted
Ensure the terminal program is using the correct port
Ensure the terminal program is configured for the correct speed. The default BIOS speed is 115200, and many other modern operating systems use that speed as well. Some older operating systems or custom configurations may use slower speeds such as 9600 or 38400.
Ensure the operating system is configured for the proper console (e.g.
ttyS1in Linux). Consult the various operating installation guides on this site for further information.
Garbled Serial Output
If the serial output appears to be garbled, binary, or random characters check the following items:
Ensure the terminal program is configured for the correct speed. (See “No Serial Output” above)
Ensure the terminal program is configured for the proper character encoding, such as UTF-8 or Latin-1, depending on the operating system. (See the previous entry under “GNU screen”)
Serial Output Stops After the BIOS
If serial output is shown for the BIOS but stops afterward, check the following items:
Ensure the terminal program is configured for the correct speed for the installed operating system. (See “No Serial Output” above)
Ensure the installed operating system is configured to activate the serial console.
Ensure the installed operating system is configured for the proper console (e.g.
ttyS1in Linux). Consult the various operating installation guides on this site for further information.If booting from a USB flash drive, ensure that the drive was written correctly and contains a bootable operating system image.