Ubuntu 14.x USB Install
The Ubuntu server installer on 14.x and before lacked full support for installing from USB. This document shows one possible workaround.
Download an Ubuntu server install image from the Ubuntu Website, such as
ubuntu-14.04.3-server-amd64.isoWrite the image to a USB memstick using Unetbootin.
Copy the
ubuntu-14.04.3-server-amd64.isofile to the root of the USB memstick.Connect to the console port of the RCC-VE using a mini-USB cable attached to another system.
See also
- Connecting to Console Port
Connecting to the console port. Cable is required.
Connect a network cable that is attached to the local LAN to one of the ethernet ports. On 6-port models, using one of the four ports on the right side is recommended.
Place the memstick in one of the USB ports and boot the system.
When the boot menu appears, scroll down to ‘Install Ubuntu Server’ and press
TabChange the boot line to remove
vga=xxxandquiet, replace with--- console=ttyS1,115200n8so it reads:/install/vmlinuz initrd=/install/initrd.gz file=/cdrom/preseed/ubuntu-server.seed --- console=ttyS1,115200n8
Press
Enterto boot. The kernel will start up and after a minute the system will launch the installer, first prompting for a Language and Country.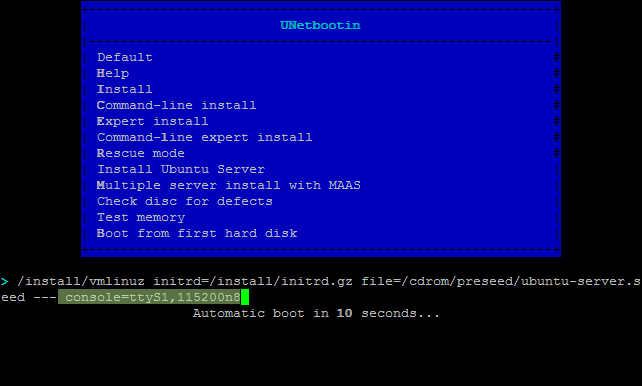
After a while an error will appear stating that the Detect and mount CD-ROM action failed. On this screen, select No, then Continue
A new menu will appear with more options, from this list, select Execute a shell, then Continue
Enter the following command (substitute the name of the ISO if different):
mount -o loop /media/ubuntu-14.04.3-server-amd64.iso /cdrom
exit
From the menu, select Detect and Mount CD-ROM and the installation will proceed again as usual.
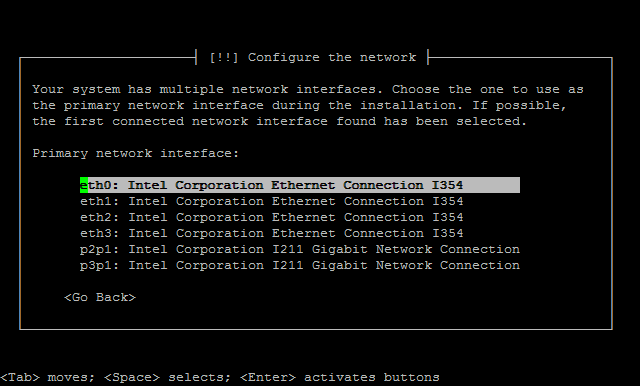
The installer will display a menu labeled Configure the Network. This menu contains options to configure the network interfaces. All RCC-VE units have four ports listed and models with six ethernet ports have two additional ports listed. Move the cursor to select the interface connected to the network and press
Enter. Consult the table below to determine which network port to use based on the name provided by Ubuntu and the number of available network ports.Ubuntu Installer NIC Mappings¶ Ubuntu Installer NIC Label
4 Port
6 Port
eth0
eth0
eth2
eth1
eth1
eth3
eth2
eth2
eth4
eth3
eth3
eth5
p3p1
eth0
p2p1
eth1
The installer will then prompt for various system settings, such as the hostname, users, clock, and disks. These values must be set appropriately for to the role and environment of this system.
Note
When configuring the installation disk, the disks are listed with their capacity. The eMMC will be labeled “Ultra HS-Combo”, if an mSATA disk is installed it can be identified by its capacity and make/model.
Warning
When selecting the installation target disk, be careful not to unmount the USB disk (
/dev/sdb) and make sure not to select it as the installation target.When the installation has completed, a box labeled “Finish the installation” will be displayed with the choices Go Back or Continue. Select
Continueand pressEnter. The system will reboot.Remove the USB drive from the USB port. Ubuntu will start up automatically from the target drive (mSATA SSD or internal eMMC). If the USB drive remains attached, the system will boot into the installer again because the system firmware is configured so that a device plugged into the USB port will be booted with a higher priority.