Troubleshooting High Availability
In the event that any of the testing fails (Testing High Availability), there are a few common things to check.
See also
The documentation for pfSense® Plus software contains additional Troubleshooting topics for HA:
Review the Configuration
Before proceeding, first review the configuration and ensure all steps were followed accurately.
Troubleshooting CARP
Check Interface Status
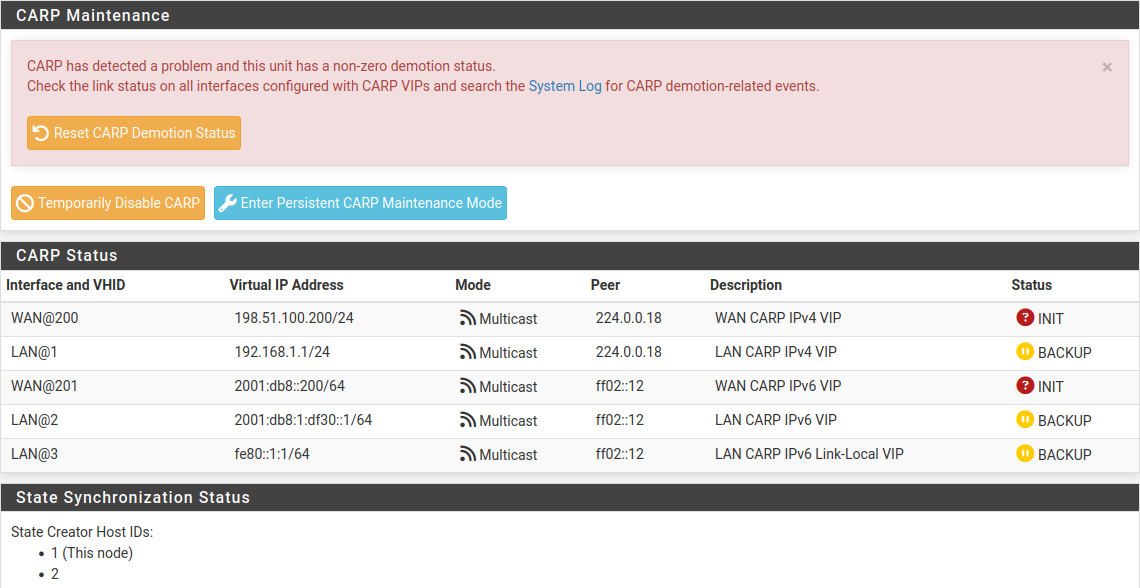
If an interface shows “INIT” for the CARP state, as shown in CARP Status on Primary with Disconnected Interface, most commonly this indicates that the interface upon which this VIP resides is not connected to anything. If there is no link to a switch or another port, the interface is down, and the VIP cannot be fully initialized. If the NIC is plugged in and appears to have a link when this occurs, edit, save, and apply changes for the VIP in question to reconfigure it.

CARP Status on Primary with Disconnected Interface
Conflicting VHIDs
The VHID determines the virtual MAC address used by that CARP IP. The input validation in pfSense® Plus will not permit using conflicting VHIDs on a single pair of systems, however if there are multiple systems on the same broadcast domain running CARP, it is possible to create a conflict. VRRP also uses the same virtual MAC address scheme, so a VRRP IP using the same VRID as a CARP IP VHID will also generate the same MAC address conflict.
When using CARP on the WAN interface, this also means VRRP or CARP used by the ISP can also conflict. Be sure to use VHIDs that are not in use by the ISP on that broadcast domain.
In addition to creating a MAC conflict which can interfere with traffic, it can also interfere with the CARP VIP status.
Incorrect CIDR/Subnet Mask
The subnet mask for a CARP VIP must match the subnet mask on the Interface IP
address for the same subnet. For example, if an interface IP address is
192.168.1.2/24, the CARP VIP must also use /24, e.g. 192.168.1.1/24.
Switch/Layer 2 Issues
Typically, a switch or layer 2 issue manifests itself as both nodes showing “MASTER” status for one or more CARP VIPs. If this happens, check the following items:
Ensure that the interfaces on both nodes (The WANs, LANs, etc.) are connected to the proper switch/VLAN/layer 2. For example, ensure that the LAN ports on both nodes are connected to the same switch/VLAN.
Verify that the two nodes can reach each other (via ICMP echo, for example) on each segment. Firewall rules may need to be added to WAN to accommodate this test.
If the nodes are plugged into separate switches, ensure that the switches are properly trunking and passing broadcast/multicast traffic.
If a switch on the back of a modem/CPE is use, try a dedicated switch instead. Switches built into routers and other similar CPE devices often do not properly handle CARP traffic. In these cases, plugging the firewalls into a proper switch and then uplinking to the CPE will eliminate problems.
Disable IGMP snooping or other multicast limiting and inspecting features. If they are already off, try enabling the feature and disabling it again.
Troubleshooting XMLRPC
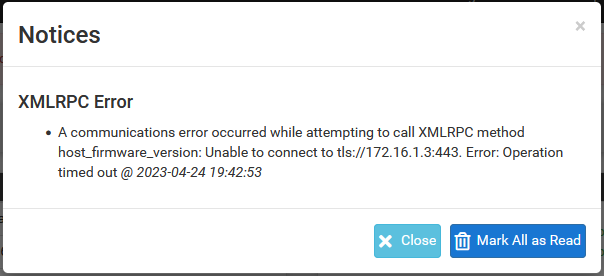
If an XMLRPC synchronization attempt fails, the pfSense software generates a notice to bring attention to the failure, as seen in XMLRPC Sync Failure Notice. The notice typically contains information about why the request failed which points to a fix, but if that is not enough, check the other items in this section.

XMLRPC Sync Failure Notice
Check the System Log
XMLRPC failure details are logged to the main system log (Status > System Logs, General tab). Usually the error is stated plainly, for example an authentication failure would indicate that the password entered for the Admin user on the synchronization settings was incorrect. As shown in XMLRPC Sync Failure Log Entry a timeout happened during the synchronization attempt. In this example it was due to a missing firewall rule.

XMLRPC Sync Failure Log Entry
Check the Firewall Log
Visit Status > System Logs, Firewall tab on the secondary node. Check the log for entries failing to reach the GUI port using the Sync interface on the secondary, as seen in XMLRPC Sync Failure Firewall Log Entry. If the traffic is shown as blocked, adjust the Sync interface firewall rules as needed.

XMLRPC Sync Failure Firewall Log Entry
Check the Admin User
Visit System > User Manager and ensure that the admin account is enabled
on both nodes and that the admin account password is the same on both nodes.
Visit System > High Availability and double check that the admin
username has been entered and that the correct password is present.
Verify Connectivity
Check Status > Interfaces and ensure the Sync interface shows a link on both nodes. If there is no link, ensure a cable is connected between the two nodes. The ports on the current devices are Auto-MDI-X so either a straight-through patch or a crossover cable will work. If a short cable is in use, try a longer cable (minimum 3ft/1m). If a link can still not be achieved, try using a small switch or VLAN between the two nodes.
Add a firewall rule to the Sync interface to allow ICMP echo requests and then attempt to ping from one firewall to the other to ensure they can reach each other at layer 3. If they cannot, double-check the interface IP address and subnet mask settings, along with the cabling.
Troubleshooting State Synchronization
If the State Creator Host IDs do not line up under Status > CARP in the State Synchronization Status section, that can indicate that the states have not been synchronized.
Check Firewall Rules
Check the firewall log at Status > System Logs, Firewall tab on both nodes. If any pfsync protocol traffic is logged as being blocked, the firewall rules on the Sync interface are probably incorrect.
Look at Firewall > Rules on the Sync interface tab. Make sure that the rules will pass pfsync protocol traffic, or traffic of any protocol, to any destination. Adjust the rules accordingly and check the logs and CARP status again to see if it starts working.
Verify Connectivity
See Verify Connectivity above to check the connection between the nodes.
Check Interfaces
If the states appear to sync but failover is still not seamless, check Interfaces > (Assign) and make sure the interfaces all line up physically as well as by name. Fix the interfaces so they are identical on both nodes.
Troubleshooting Local Services
DNS Resolution
If local clients are unable to obtain DNS responses from a CARP VIP on the cluster, check the following items:
If using either the DNS Resolver or DNS Forwarder, ensure the daemon is configured to listen on all interfaces or at least Localhost and the internal CARP VIPs.
Ensure the local interface firewall rules pass both TCP and UDP port
53to the CARP VIPs used for local DNS.Ensure the firewall itself has DNS servers configured under System > General, if using the DNS Forwarder (dnsmasq) or if using the DNS Resolver (unbound) in forwarding mode.
DHCP
If the DHCP high availability status does not reach “hot-standby”, there are a few items to check:
Ensure the time is accurate on both nodes.
Ensure both nodes are connected to the same switch/subnet on the correct interface.
Verify connectivity between the two nodes on the Sync interface.
Ensure the firewall rules on the Sync interface are passing Kea HA traffic to the HA ports configured in the Kea Settings (default
8765for DHCPv4 and8766for IPv6).Ensure the High Availability peer names and addresses have been properly configured in the Kea settings.
If the secondary does not reach a
partner-downstate while the primary is offline, check the Advanced Options in the Kea settings. The value of Max Unacked Clients should be0or1. Setting this value higher will make the secondary wait until that number of clients has failed to fetch an address before it will start handing out leases.If TLS for HA is enabled in the Kea settings, ensure the settings are enabled on both nodes (TLS settings do not synchronize) and the both nodes have the correct certificates selected.