Setup Wizard
The first time a user logs into the pfSense® software GUI, the firewall presents the Setup Wizard automatically. The first page of the wizard is shown in Figure Setup Wizard Starting Screen.
Click  Next to proceed.
Tip
Using the setup wizard is optional. Click the logo at the top left of the page to exit the wizard at any time.
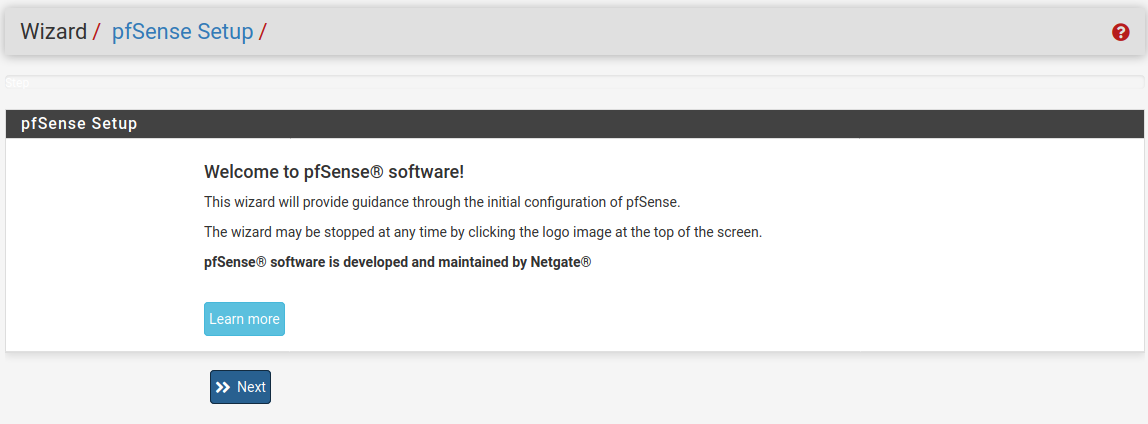
Setup Wizard Starting Screen
The next screen of the wizard explains the availability of assistance from
Netgate TAC. Click  Next again to start the
configuration process using the wizard.
General Information Screen
The next screen (Figure General Information Screen) configures the name of this firewall, the domain in which it resides, and the DNS servers for the firewall.
- Hostname:
The Hostname is a name that should uniquely identify this firewall. It can be nearly anything, but must start with a letter, and it may contain only letters, numbers, or a hyphen.
- Domain:
Enter a Domain, e.g.
example.com. If this network does not have a domain, use<something>.home.arpa, where<something>is another identifier: a company name, last name, nickname, etc. For example,company.home.arpaThe hostname and domain name are combined to make up the fully qualified domain name of this firewall.- Primary/Secondary DNS Server:
The IP address of the Primary DNS Server and Secondary DNS Server, if known.
These DNS servers may be left blank if the DNS Resolver will remain active using its default settings. The default configuration has the DNS Resolver active in resolver mode (not forwarding mode), when set this way, the DNS Resolver does not need forwarding DNS servers as it will communicate directly with Root DNS servers and other authoritative DNS servers. To force the firewall to use these configured DNS servers, enable forwarding mode in the DNS Resolver or use the DNS Forwarder.
If this firewall has a dynamic WAN type such as DHCP, PPTP or PPPoE these may be automatically assigned by the ISP and can be left blank.
Note
The firewall can have more than two DNS servers, add more under System > General Setup after completing the wizard.
- Override DNS:
When checked, a dynamic WAN ISP can supply DNS servers which override those set manually. To force the use of only the DNS servers configured manually, uncheck this option.
See also
For more information on configuring the DNS Resolver, see DNS Resolver
Click  Next to continue.
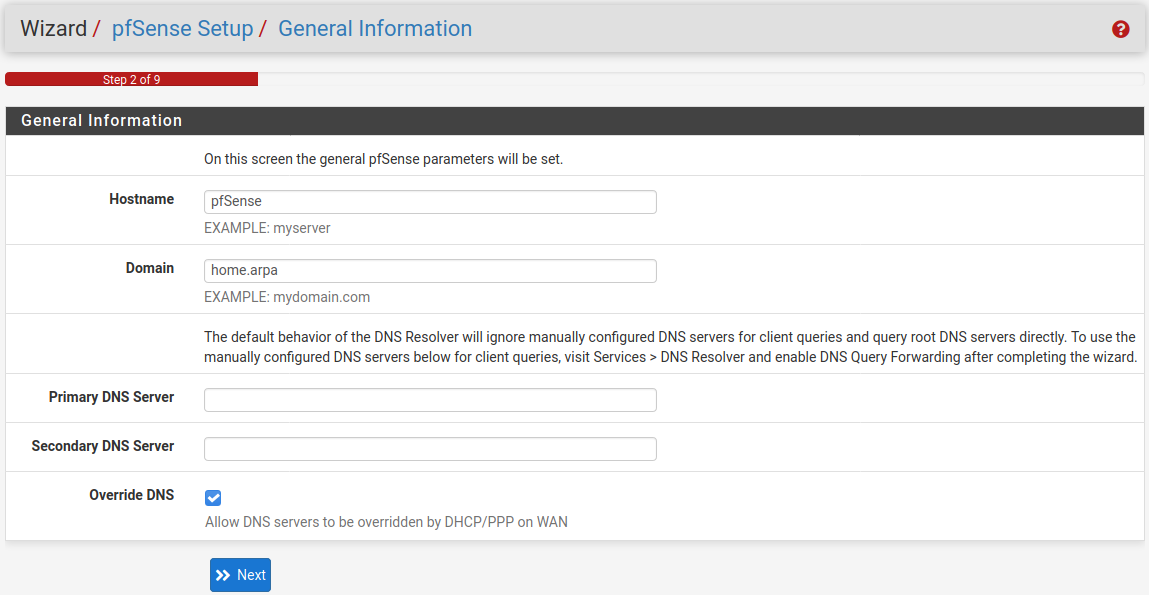
General Information Screen
NTP and Time Zone Configuration
The next screen (Figure NTP and Time Zone Setup Screen) has time-related options.
- Time server hostname:
A Network Time Protocol (NTP) server hostname or IP address. Unless a specific NTP server is required, such as one on LAN, the best practice is to leave the Time server hostname at the default
2.pfsense.pool.ntp.org. This value will pick a set of random servers from a pool of known-good NTP hosts.To utilize multiple time server pools or individual servers, add them in the same box, separating each server by a space. For example, to use three NTP servers from the pool, enter:
0.pfsense.pool.ntp.org 1.pfsense.pool.ntp.org
2.pfsense.pool.ntp.org
This numbering is specific to how
.pool.ntp.orgoperates and ensures each address is drawn from a unique pool of NTP servers, so the same server does not get used twice.- Timezone:
Choose a geographically named zone which best matches location of this firewall, or any other desired zone.
Click  Next to continue.

NTP and Time Zone Setup Screen
WAN Configuration
The next page of the wizard configures the WAN interface of the firewall, which is the external network facing the ISP or upstream router. The wizard offers configuration choices for several common types of ISP connections.
- WAN Type:
The Selected Type (Figure WAN Configuration) must match the type of WAN required by the ISP, or whatever the previous firewall or router was configured to use. Possible choices are Static, DHCP, PPPoE, and PPTP. The default choice is DHCP due to the fact that it is the most common, and for the majority of cases this setting allows a firewall to “Just Work” without additional configuration. If the WAN type is not known, or specific settings for the WAN are not known, this information must be obtained from the ISP. If the required WAN type is not available in the wizard, or to read more information about the different WAN types, see Interface Types and Configuration.
Note
If the WAN interface is wireless, additional options will be presented by the wizard which are not covered during this walkthrough of the standard Setup Wizard. Refer to Wireless, which has a section on Wireless WAN for additional information. If any of the options are unclear, skip the WAN setup for now, and then perform the wireless configuration afterward.

WAN Configuration
- MAC Address:
This field, shown in Figure General WAN Configuration, changes the MAC address used on the WAN network interface. This is also known as “spoofing” the MAC address.
Note
The problems alleviated by spoofing a MAC address are typically temporary and easily worked around. The best course of action is to maintain the original hardware MAC address, resorting to spoofing only when absolutely necessary.
Changing the MAC address can be useful when replacing an existing piece of network equipment. Certain ISPs, primarily Cable providers, will not work properly if a new MAC address is encountered. Some Internet providers require power cycling the modem, others require registering the new address over the phone. Additionally, if this WAN connection is on a network segment with other systems that locate it via ARP, changing the MAC to match and older piece of equipment may also help ease the transition, rather than having to clear ARP caches or update static ARP entries.
Warning
If this firewall will ever be used as part of a High Availability Cluster, do not spoof the MAC address.
- Maximum Transmission Unit (MTU):
The MTU field, shown in Figure General WAN Configuration, can typically be left blank, but can be changed when necessary. Some situations may call for a lower MTU to ensure packets are sized appropriately for an Internet connection. In most cases, the default assumed values for the WAN connection type will work properly.
- Maximum Segment Size (MSS):
MSS, shown in Figure General WAN Configuration can typically be left blank, but can be changed when necessary. This field enables MSS clamping, which ensures TCP packet sizes remain adequately small for a particular Internet connection.

General WAN Configuration
- Static IP Configuration:
If the “Static” choice for the WAN type is selected, the IP address, Subnet Mask, and Upstream Gateway must all be filled in (Figure Static IP Settings). This information must be obtained from the ISP or whoever controls the network on the WAN side of this firewall. The IP Address and Upstream Gateway must both reside in the same Subnet.

Static IP Settings
- DHCP Hostname:
This field (Figure DHCP Hostname Setting) is only required by a few ISPs. This value is sent along with the DHCP request to obtain a WAN IP address. If the value for this field is unknown, try leaving it blank unless directed otherwise by the ISP.

DHCP Hostname Setting
- PPPoE Configuration:
When using the PPPoE (Point-to-Point Protocol over Ethernet) WAN type (Figure PPPoE Configuration), The PPPoE Username and PPPoE Password fields are required, at a minimum. The values for these fields are determined by the ISP.
- PPPoE Username:
The login name for PPPoE authentication. The format is controlled by the ISP, but commonly uses an e-mail address style such as
myname@example.com.- PPPoE Password:
The password to log in to the account specified by the username above. The password is masked by default. To view the entered password, check Reveal password characters.
- PPPoE Service Name:
The PPPoE Service name may be required by an ISP, but is typically left blank. When in doubt, leave it blank or contact the ISP and ask if it is necessary.
- PPPoE Dial on Demand:
This option leaves the connection down/offline until data is requested that would need the connection to the Internet. PPPoE logins happen quite fast, so in most cases the delay while the connection is set up would be negligible. If public services are hosted behind this firewall, do not check this option as an online connection must be maintained as much as possible in that case. Also note that this choice will not drop an existing connection.
- PPPoE Idle Timeout:
Specifies how much time the PPPoE connection remain up without transmitting data before disconnecting. This is only useful when coupled with Dial on demand, and is typically left blank (disabled).
Note
This option also requires the deactivation of gateway monitoring, otherwise the connection will never be idle.
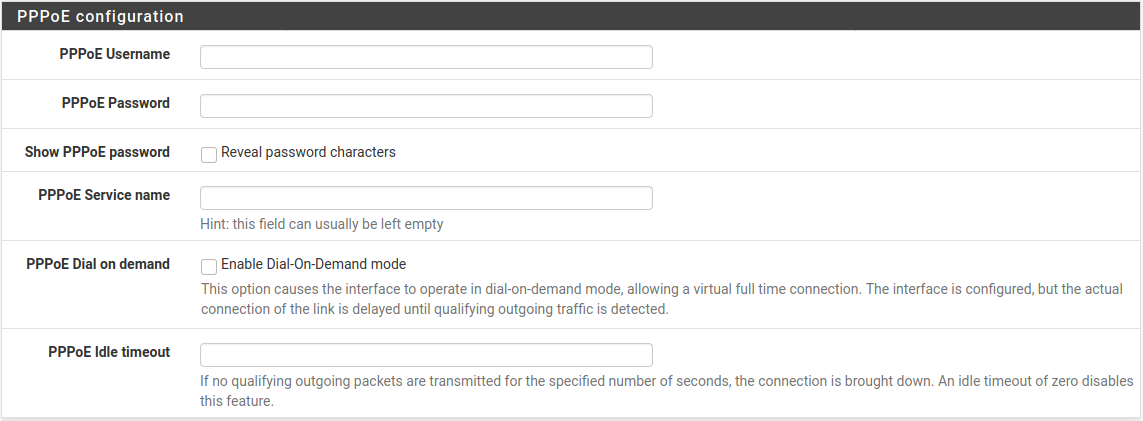
PPPoE Configuration
- PPTP Configuration:
The PPTP (Point-to-Point Tunneling Protocol) WAN type (Figure PPTP WAN Configuration) is for ISPs that require a PPTP login, not for connecting to a remote PPTP VPN. These settings, much like the PPPoE settings, will be provided by the ISP. A few additional options are required:
- Local IP Address:
The local (usually private) address used by this firewall to establish the PPTP connection.
- CIDR Subnet Mask:
The subnet mask for the local address.
- Remote IP Address:
The PPTP server address, which is usually inside the same subnet as the Local IP address.
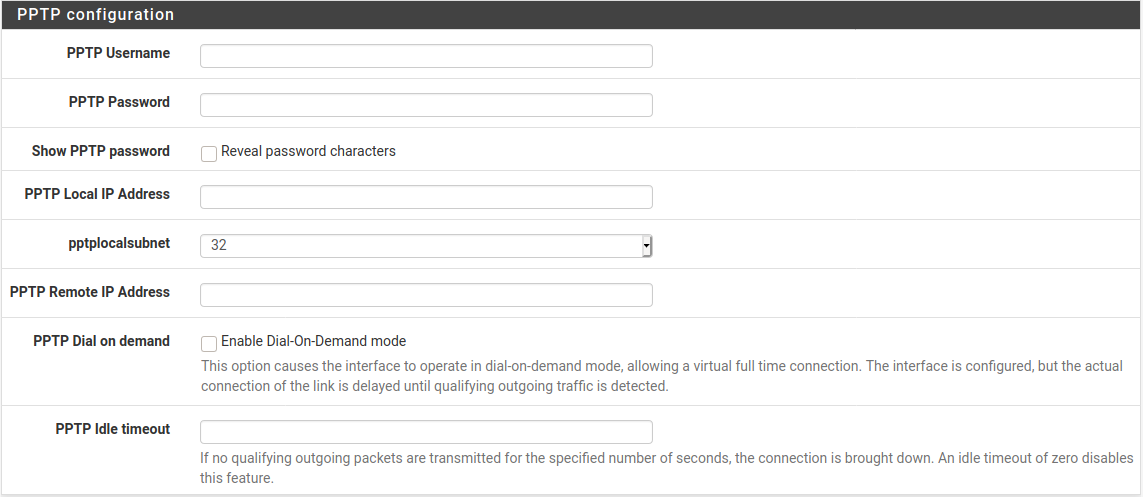
PPTP WAN Configuration
These last two options, seen in Figure Built-in Ingress Filtering Options, are useful for preventing invalid traffic from entering the network protected by this firewall, also known as “Ingress Filtering”.
- Block RFC 1918 Private Networks:
Blocks connections sourced from registered private networks such as
192.168.x.xand10.x.x.xattempting to enter the WAN interface. A full list of these networks is in Private IP Addresses.- Block Bogon Networks:
When active, the firewall blocks traffic from entering if it is sourced from reserved or unassigned IP space that should not be in use. The list of bogon networks is updated periodically in the background, and requires no manual maintenance. Bogon networks are further explained in Block Bogon Networks.
Click  Next to continue once the WAN settings have
been filled in.

Built-in Ingress Filtering Options
LAN Interface Configuration
This page of the wizard configures the LAN IP Address and Subnet Mask (Figure LAN Configuration).
If this firewall cannot connect to any other network via VPN, the default
192.168.1.0/24 network may be acceptable. If this network must be connected
to another network, including via VPN from remote locations, choose a private IP
address range much more obscure than the common default of 192.168.1.0/24.
IP space within the 172.16.0.0/12 RFC 1918 private address block is
generally the least frequently used, so choose something between 172.16.x.x
and 172.31.x.x to help avoid VPN connectivity difficulties.
If the LAN is 192.168.1.x and a remote client is at a wireless hotspot using
192.168.1.x (very common), the client will not be able to communicate across
the VPN. In that case, 192.168.1.x is the local network for the client at
the hotspot, not the remote network over the VPN.
If the LAN IP Address must be changed, enter it here along with a new Subnet Mask. If these settings are changed, the IP address of the computer used to complete the wizard must also be changed if it is connected through the LAN. Release/renew its DHCP lease, or perform a “Repair” or “Diagnose” on the network interface when finished with the setup wizard.
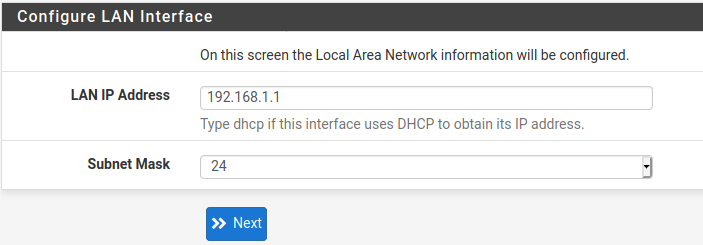
LAN Configuration
Click  Next to continue.
Set admin password
Next, change the administrative password for the GUI as shown in Figure Change Administrative Password. The best practice is to use a strong and secure password.
Warning
This password cannot be set to the same value as the username.
Additionally, on pfSense Plus software version 24.03 and later, the password cannot be set to the default value (Default Username and Password).
Enter the password in the Admin Password and confirmation box to be sure that has been entered correctly.
Warning
On pfSense Plus software version 24.03 and later changing the password is mandatory. The wizard will not proceed until the password is changed.
Click  Next to continue.
Warning
Do not leave the password set to the default pfsense. If access to
the firewall administration via GUI or SSH is exposed to the Internet,
intentionally or accidentally, the firewall could easily be compromised if it
still uses the default password.

Change Administrative Password
Completing the Setup Wizard
That completes the setup wizard configuration. Click Reload (Figure Reload the GUI) and the GUI will apply the settings from the wizard and reload services changed by the wizard.

Reload the GUI
Tip
If the LAN IP address was changed in the wizard and the wizard was run from the LAN, adjust the client computer’s IP address accordingly after clicking Reload.
When prompted to log in again, enter the new password. The username remains
admin.
After reloading, the final screen of the wizard includes convenient links to check for updates, get assistance, and other resources. Click Finish to complete and exit the wizard.
At this point the firewall will have basic connectivity to the Internet via the WAN and clients on the LAN side will be able to reach Internet sites through this firewall.
If at any time this initial configuration must be repeated, revisit the wizard at System > Setup Wizard from within the GUI.