M.2 SATA Installation
The SG-3100 has built-in onboard eMMC storage. Optionally, an M.2 SATA drive could be installed as an upgrade or to bypass the onboard eMMC flash memory.
Warning
Before proceeding:
Backup the configuration file, if possible.
Unplug the system for at least 60 seconds to ensure all phantom power has dissipated.
Anti-static protection must be used throughout this procedure.
Any hardware damage incurred during this procedure is not covered by the hardware warranty.
Note
pfSense® Plus must be reinstalled on the M.2 SATA drive. By default, the M.2 SATA drive will then be the first drive recognized by pfSense® Plus software.
Note
The SG-3100 is not compatible with NVMe drives.
The SG-3100 has two slots capable of installing M.2 SATA drives, J10 and J11.
- J10
The J10 connector is for a
2280(22mm x 80mm) M.2 SATA only.The 80mm standoff cannot be moved.
- J11
The J11 connector is for a
2242(22mm x 42mm) M.2 SATA drive, or it can be used for a cellular card in conjunction with a microSIM card.The 42mm standoff is also permanent and cannot be moved.
Note
For more information on Cellular Configuration in pfSense® Plus software, please visit the pfSense Documentation page.
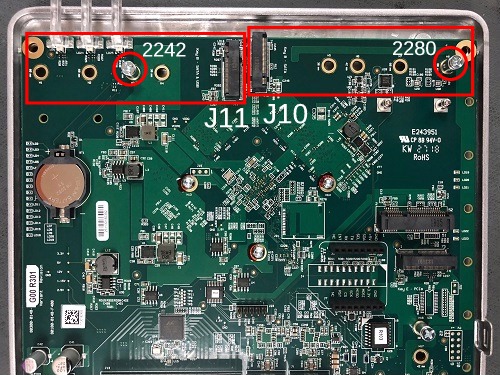
SG-3100 M.2 SATA Locations
This installation example uses the J11 M.2 SATA slot with a 2242 M.2
SATA Drive. The procedures to install a 2280 M.2 SATA Drive in the J10
slot is identical.
Turn the system over carefully to avoid scratching the top of the system. Remove the four (4) T10 Torx screws as indicated below.
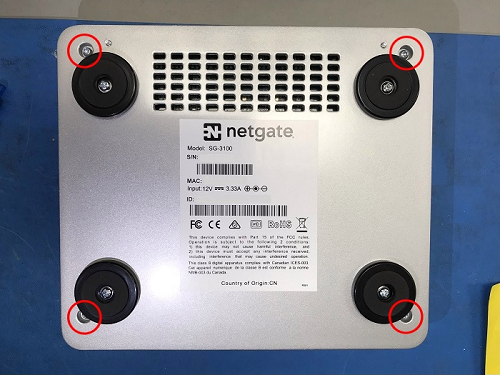
Removing the SG-3100 Case Screws
Turn system upright and carefully remove the cover. Set the cover off to the side and keep it upright, so the top is not scratched. Identify where the M.2 SATA drive slot is located and remove the screw from the standoff.
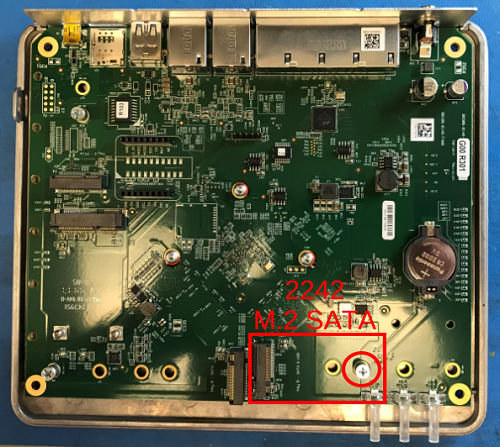
M.2 SATA Location and Screw
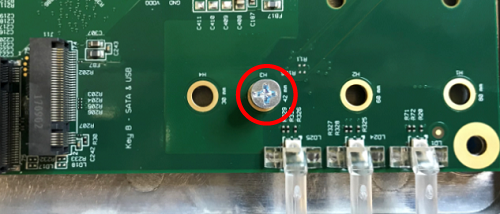
M.2 SATA Location and Screw Close-up
After the screw has been removed, insert the M.2 SATA drive into the slot at about a 30° angle.
Warning
The M.2 SATA card is keyed. Do not force it into the slot.
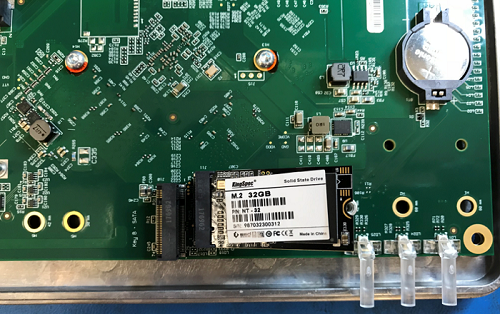
Insert the M.2 SATA Drive at about a 30° Angle
Gently push down the M.2 SATA card and replace the screw into the standoff.
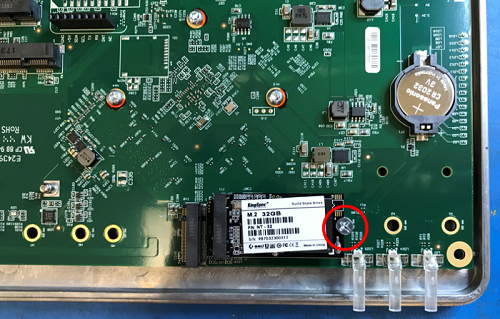
The M.2 SATA Drive Installed
Place the cover back on and turn the SG-3100 over. Replace the four (4) T10 Torx case screws. Be careful not to cross thread the screws.
Reinstall the pfSense® Plus software on the new M.2 SATA drive.
See also
Ensure the system is set to boot from the M.2 disk.
When prompted, press any key to stop the autoboot process. This will present a
Marvell>>prompt.Tip
For assistance with this configuration, open a TAC ticket.
Run
printenvand inspect the contents of the current environment for the contents of thebootcmdvariable.Marvell>> printenv [...] bootcmd=run setLED; run emmcboot; [...]
Tip
Copy/paste or save the
printenvoutput to a text file for future reference.If the
bootcmdreferencesemmcboot, it must be changed tom2bootinstead:Marvell>> setenv bootcmd 'run setLED; run m2boot;'Save the changes to the environment:
Marvell>> saveenvNow reboot the device again, and it should start from the M.2 disk:
Marvell>> reset
Restore the pfSense software configuration backup if one is available.
See also
For information on restoring from a previously saved configuration, see Backup and Restore.
Warning
When adding an SSD in this way the system will now contain multiple disks. If the eMMC still contains an active installation of an operating system, this can lead to problems. For example, the kernel could boot from one disk while the root filesystem is loaded from another.
Though the procedure above sets the device to boot from M.2, the best practice is to wipe the old disk to remove any chance of the previous installation causing boot issues or conflicts.
For information on how to wipe the old disk, see Multiple Disk Boot Issues.
Tip
If the new drive is compatible with S.M.A.R.T. it may be possible to view detailed drive status information and run tests from Diagnostics > S.M.A.R.T. Status.
See S.M.A.R.T. Hard Disk Status for details.