L2TP Server Configuration
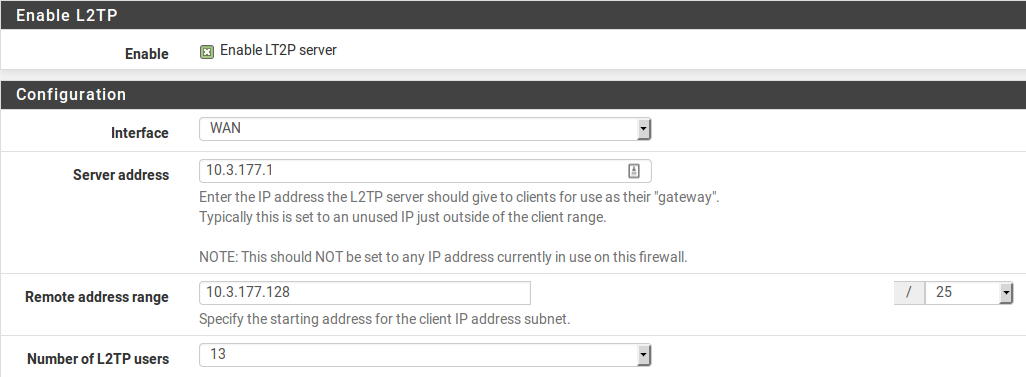
To use L2TP, first browse to VPN > L2TP. Select Enable L2TP server.
Warning
L2TP is not a secure protocol by itself; it only provides tunneling, it does not perform encryption.
See also
L2TP/IPsec is a way to secure L2TP traffic by sending it through an encrypted IPsec tunnel. This may be used in combination with a mobile IPsec setup to configure L2TP+IPsec; see L2TP/IPsec Remote Access VPN Configuration Example for details.
Interface
The Interface setting controls where the L2TP daemon will bind and listen for connections. This is typically the WAN interface accepting inbound connections.
IP Addressing
Before starting, determine which IP addresses to use for the L2TP server and clients and now many concurrent clients to allow.
- Server Address:
An unused IP address outside the Remote Address Range, such as
10.3.177.1as shown in Figure L2TP IP Addressing.- Remote Address Range:
The addresses to be assigned to clients when they connect. Usually a new and unused subnet, such as
10.3.177.128/25(.128through.255).- Number of L2TP users:
Controls how many L2TP users will be allowed to connect at the same time, in this example
13has been selected.

L2TP IP Addressing
DNS servers can also be defined for end users when needed. Fill in the Primary and Secondary L2TP DNS server fields with the DNS server IP addresses for connecting clients.
Authentication
- Secret:
Required by some L2TP implementations, similar to a group password or pre-shared key. Compatibility varies from client to client. Leave the field blank unless it is known to be required. If required, enter and confirm the secret.
- Authentication Type:
Decides between PAP, CHAP, or MS-CHAPv2 authentication for users. Compatibility varies from client to client, and it may also depend on the RADIUS server. The CHAP based types are more secure, but PAP is more widely compatible.
Users may be authenticated from the local user database, or via an external RADIUS server. This can be used to authenticate L2TP users from Microsoft Active Directory (see Authenticating from Active Directory using RADIUS/NPS) as well as numerous other RADIUS capable servers.
If using RADIUS, check the Use a RADIUS server for authentication box and fill in the RADIUS server and shared secret. For authentication using the local user database, leave that box unchecked. Users must be added manually on the Users tab of the VPN > L2TP screen unless using RADIUS. See Adding Users below for more details on the built-in authentication system.
Save changes to start L2TP server
After filling in the aforementioned items, click Save. This will save the configuration and launch the L2TP server.
Configure firewall rules for L2TP clients
Browse to Firewall > Rules and click the L2TP VPN tab. These rules control traffic from L2TP clients. Until a firewall rule has been added to allow traffic, all traffic initiated from connected L2TP clients will be blocked. Traffic initiated from the LAN to L2TP clients is controlled using LAN firewall rules. Initially an allow all rule may be desired here for testing purposes as shown in Figure L2TP VPN Firewall Rule, and once functionality has been verified, restrict the ruleset as desired.

L2TP VPN Firewall Rule
Note
Remember that a rule must also be added to the interface receiving the L2TP
traffic, typically WAN or IPsec, to pass UDP to the firewall with a
destination port of 1701.
Adding Users
Adding users to the built-in L2TP users system is simple. To add local users:
Navigate to VPN > L2TP, Users tab. The users screen as shown in Figure L2TP Users Tab will be presented.
Click
 Add to show the form used to add users.

L2TP Users Tab
Enter the Username, Password and Confirm Password for a user, as in Figure Adding a L2TP User.
Enter a static IP assignment if desired.

Adding a L2TP User
Click Save, and then the user list will return.
Repeat the process for each user to add.
To edit an existing user, click  . Users may be deleted by clicking
 .
.