VLAN Configuration
This section covers how to configure VLANs in pfSense® software.
VLAN Configuration Options
The following options are available when creating or editing VLANs in the GUI:
- Parent Interface:
The physical interface which will carry traffic for this VLAN.
- VLAN Tag Type:
The VLAN tag protocol identifier (TPID) which specifies the type of VLAN tag in a packet. This can be one of two values:
- C-Tag:
“Customer” tag, value
0x8100. This is the default and most common value for typical 802.1Q VLAN interfaces. If there is only one layer of VLAN tagging, C-Tag will nearly always be the correct choice. When a packet has multiple tags, C-Tags are the inner tag.- S-Tag:
“Service” tag, value
0x88a8. S-tags are used for the outer tag when double tagging, such as in 802.1ad QinQ.
- VLAN Tag:
The VLAN identifier (VID), which is an integer value within the range
1-4094.- VLAN Priority:
802.1p Priority Code Point (PCP) value to use for all packets on this VLAN, as described in VLAN Priority. This value is an integer from
0-7.- Description:
Some text to identify the purpose of the VLAN, such as
DMZorStorage.
GUI VLAN Configuration
To add a VLAN in the GUI:
Navigate to Interfaces > Assignments
Click the VLANs tab
Click
 Add to add a new VLAN
Configure the VLAN as described in VLAN Configuration Options
Click Save
Afterward, assign the new VLAN as an interface and configure as any other interface.
See also
Refer to Interface Configuration for details on interface assignment and configuration.
GUI VLAN Configuration Example
In this example, WAN and LAN are assigned as igc3 and igc2 respectively.
There is also an igc1 interface that will be used as the VLAN parent
interface.
To configure these VLANs in the firewall GUI:
Navigate to Interfaces > Assignments to view the interface list
Click the VLANs tab
Click
Add to add a new VLANConfigure the VLAN as shown in Figure Edit VLAN:
- Parent Interface:
igc1- VLAN Tag Type:
C-Tag (0x8100)
- VLAN tag:
10- VLAN Priority:
Blank
- Description:
DMZ
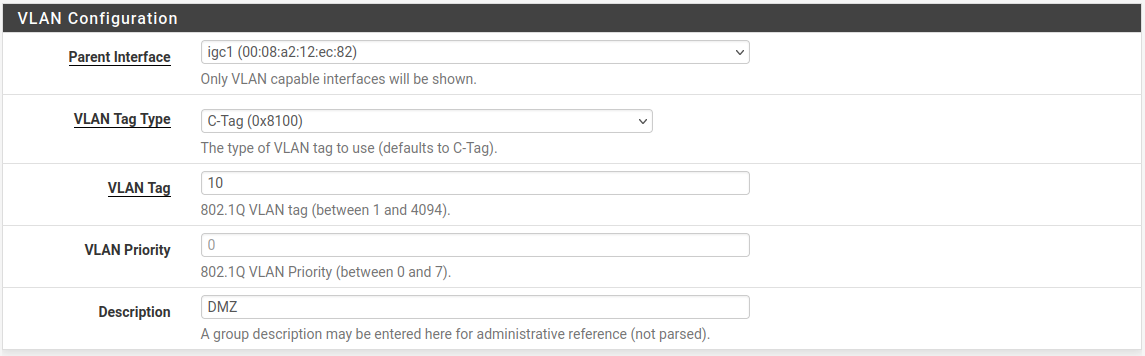
Edit VLAN
Click Save to return to the VLAN list, which now includes the newly added VLAN
10Repeat the process to add additional VLANs, such as VLAN
20These can be seen in Figure VLAN list:

VLAN list
Now assign the VLANs as interfaces:
Navigate to Interfaces > Assignments
Click the Interface Assignments tab
Select the VLAN to add from the Available Network Ports list, such as VLAN 10 on igc1 (DMZ)
Click
Add to assign the network portRepeat the last two steps to assign VLAN 20 on igc1 (Phones)
When finished, the interfaces will look like Figure Interfaces list with VLANs
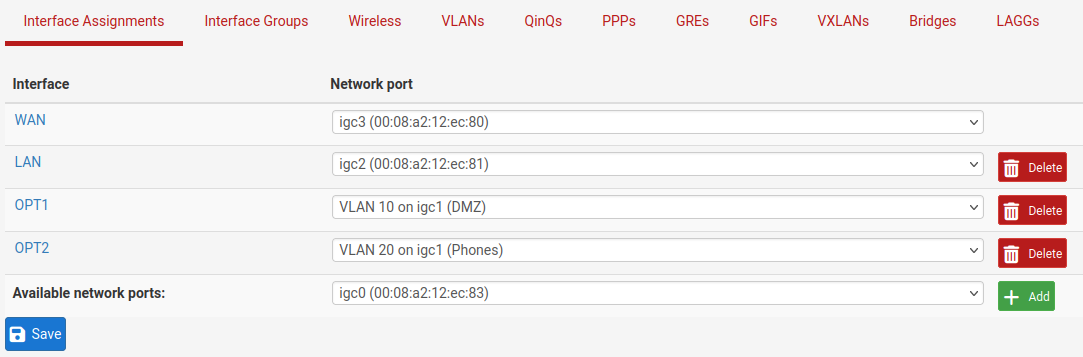
Interfaces list with VLANs
The VLAN-based OPT interfaces behave as any other OPT interfaces do, which means they must be enabled, configured, have firewall rules added, and services like the DHCP Server will need to be configured if needed. See Interface Configuration Basics for more information on configuring optional interfaces.
Console VLAN Configuration Example
VLANs can be configured at the console using the Assign Interfaces function, but this method only offers limited functionality compared to the VLAN options available in the GUI.
Tip
Visit the GUI later and edit the VLAN entries to fill in any options not possible during the console VLAN creation process.
See also
The following example shows how to configure two VLANs, ID 10 and 20,
with igc1 as the parent interface. The VLAN interfaces are assigned as
OPT1 and OPT2:
 0) Logout (SSH only)                  9) pfTop
 1) Assign Interfaces                 10) Filter Logs
 2) Set interface(s) IP address       11) Restart GUI
 3) Reset admin account and password  12) PHP shell + pfSense tools
 4) Reset to factory defaults         13) Update from console
 5) Reboot system                     14) Disable Secure Shell (sshd)
 6) Halt system                       15) Restore recent configuration
 7) Ping host                         16) Restart PHP-FPM
 8) Shell

Enter an option: 1

Valid interfaces are:

igc0    00:08:a2:xx:xx:83 (down) Intel(R) Ethernet Controller I226-V
igc1    00:08:a2:xx:xx:82 (down) Intel(R) Ethernet Controller I226-V
igc2    00:08:a2:xx:xx:81   (up)
igc3    00:08:a2:xx:xx:80   (up)

Do VLANs need to be set up first?
If VLANs will not be used, or only for optional interfaces, it is typical to
say no here and use the webConfigurator to configure VLANs later, if required.

Should VLANs be set up now [y|n]? y

WARNING: all existing VLANs will be cleared if you proceed!

Do you want to proceed [y|n]? y

VLAN Capable interfaces:

igc0    00:08:a2:xx:xx:83 (down)
igc1    00:08:a2:xx:xx:82 (down)
igc2    00:08:a2:xx:xx:81   (up)
igc3    00:08:a2:xx:xx:80   (up)

Enter the parent interface name for the new VLAN (or nothing if finished): igc1
Enter the VLAN tag (1-4094): 10

VLAN Capable interfaces:

igc0    00:08:a2:xx:xx:83 (down)
igc1    00:08:a2:xx:xx:82 (down)
igc2    00:08:a2:xx:xx:81   (up)
igc3    00:08:a2:xx:xx:80   (up)

Enter the parent interface name for the new VLAN (or nothing if finished): igc1
Enter the VLAN tag (1-4094): 20

VLAN Capable interfaces:

igc0    00:08:a2:xx:xx:83 (down)
igc1    00:08:a2:xx:xx:82 (down)
igc2    00:08:a2:xx:xx:81   (up)
igc3    00:08:a2:xx:xx:80   (up)

Enter the parent interface name for the new VLAN (or nothing if finished): <enter>

VLAN interfaces:

igc1.10     VLAN tag 10, parent interface igc1
igc1.20     VLAN tag 20, parent interface igc1

If the names of the interfaces are not known, auto-detection can
be used instead. To use auto-detection, please disconnect all
interfaces before pressing 'a' to begin the process.

Enter the WAN interface name or 'a' for auto-detection
(igc0 igc1 igc2 igc3 igc1.10 igc1.20 or a): igc3

Enter the LAN interface name or 'a' for auto-detection
NOTE: this enables full Firewall/NAT mode.
(igc0 igc1 igc2 igc1.10 igc1.20 a or nothing if finished): igc2

Enter the Optional 1 interface name or 'a' for auto-detection
(igc0 igc1 igc1.10 igc1.20 a or nothing if finished): igc1.10

Enter the Optional 2 interface name or 'a' for auto-detection
(igc0 igc1 igc1.20 a or nothing if finished): igc1.20

Enter the Optional 3 interface name or 'a' for auto-detection
(igc0 igc1 a or nothing if finished):<enter>

The interfaces will be assigned as follows:

WAN  -> igc3
LAN  -> igc2
OPT1 -> igc1.10
OPT2 -> igc1.20

Do you want to proceed [y|n]? y

Writing configuration...done.
One moment while the settings are reloading... done!
After a few seconds, the firewall settings will reload and the console menu will reload.