Connecting to the USB Console
This guide shows how to access the serial console which can be used for troubleshooting and diagnostics tasks as well as some basic configuration.
There are times when directly accessing the console is required. Perhaps GUI or SSH access has been locked out, or the password has been lost or forgotten.
USB Serial Console Device
This device uses a Prolific PL2303 USB-to-UART Bridge which provides access to the console. This device is exposed via the USB Mini-B (5-pin) port on the appliance.
Install the Driver
If needed, install an appropriate Prolific PL2303 USB to UART Bridge driver on the workstation used to connect with the device.
There are drivers available for Windows available for download.
For Windows, Click the Resources tab, then choose Windows Driver Installer Setup Program.
Note
The correct driver should install automatically for Windows 10 and above the first time the workstation is connected to the Netgate® appliance. It may take up to 3 minutes for the driver to install.
Note
A new UART chip is being used on SG-5100s shipped after December 30, 2020.
Windows 10 may "just work." The new driver update has been installed by a regular Microsoft update. There are Windows driver downloads that provide support for this part directly from the manufacturer here: https://prolificusa.com/product/pl2303gc-usb-full-uart-bridge-controller-gpio/
Technical Information for the new UART chip:
Prolific USB to Full UART Bridge Controller with GPIO
Chip Number PL2303GC Product Data Sheet
Part Number PL2303G4ZJG8P2
Chip Product ID 23a3
Part released December 4, 2019
Any operating system prior to this date will not have the driver
unless the OS has been updated.
There are drivers available for macOS available for download.
For macOS, choose Mac OS Drivers.
Apple has introduced a new feature in macOS 10.13 (High Sierra) which requires user approval before loading new third-party kernel extensions.
When installing the new driver, a prompt will appear mentioning that the extension is blocked. Click Open Security Preferences, then click the lock icon to unlock the settings, authenticate, then click Allow.
If the prompt does not appear, Navigate to System Preferences, Security & Privacy, click General, then click Allow.
Note
A new UART chip is being used on SG-5100s shipped after December 30, 2020.
Netgate TAC has received reports or problems using macOS as a serial console connection for the new Prolific UART chip. If a Mac cannot connect, please try a Microsoft Windows or Linux connection to the console port.
There are macOS driver downloads that provide support for this part directly from the manufacturer here: https://prolificusa.com/product/pl2303gc-usb-full-uart-bridge-controller-gpio/
Technical Information for the new UART chip:
Prolific USB to Full UART Bridge Controller with GPIO
Chip Number PL2303GC Product Data Sheet
Part Number PL2303G4ZJG8P2
Chip Product ID 23a3
Part released December 4, 2019
Any operating system prior to this date will not have the driver
unless the OS has been updated.
There are drivers available for Linux available for download.
Recent versions of many Linux distributions include this driver and will not require manual installation.
Note
A new UART chip is being used on SG-5100s shipped after December 30, 2020.
There are Linux driver downloads that provide support for this part directly from the manufacturer here: https://prolificusa.com/product/pl2303gc-usb-full-uart-bridge-controller-gpio/
Technical Information for the new UART chip:
Prolific USB to Full UART Bridge Controller with GPIO
Chip Number PL2303GC Product Data Sheet
Part Number PL2303G4ZJG8P2
Chip Product ID 23a3
Part released December 4, 2019
Any operating system prior to this date will not have the driver
unless the OS has been updated.
Tip:
Linux kernel 5.5 contains the appropriate driver for the newer PL2303GC USB-to-UART bridge. This kernel version is relatively new and consequently is not present on most linux systems. It's possible to upgrade the kernel to version 5.5 or higher to utilize the driver compiled with that kernel. Another option is to compile the latest driver to load separately.
The following steps to compile the latest Prolific PL2303 driver have been tested on Linux Mint 18-19.
1. Download the driver:
curl -o driver.zip https://prolificusa.com/app/uploads/2019/06/PL2303G_Linux_Driver_v1.0.4.zip
2. Extract the driver archive:
unzip driver.zip
3. Navigate to the extracted driver folder:
cd PL2303G_Linux_Driver_v1.0.4
4. Check running kernel version and cd to the directory that best matches the kernel version. Example:
uname -r

5.0.0-32-generic

cd 5.0_ok
5. Update the "PWD" string in the Makefile:
sed -i 's/PWD/shell pwd/' Makefile
6. Compile the driver:
sudo make all
7. Copy the compiled module to the appropriate kernel module library:
sudo cp -f pl2303.ko /lib/modules/$(uname -r)/kernel/drivers/usb/serial/
8. Unload the existing pl2303.ko module:
rmmod pl2303.ko
9. Load the compiled driver in it's place:
insmod pl2303.ko
10. Commit the settings to load during reboot:
echo "pl2303" >> /etc/modules
Recent versions of FreeBSD include this driver and will not require manual installation.
Note
A new UART chip is being used on SG-5100s shipped after December 30, 2020.
Netgate is not aware of any new drivers available for FreeBSD.
Connect a USB Cable
Next, connect to the console port using the cable that has a USB Mini-B (5-pin) connector on one end and a USB Type A plug on the other end.
Gently push the USB Mini-B (5-pin) plug end into the console port on the appliance and connect the USB Type A plug into an available USB port on the workstation.
Tip
Be certain to gently push in the USB Mini-B (5-pin) connector on the device side completely. With most cables there will be a tangible “click”, “snap”, or similar indication when the cable is fully engaged.
Apply Power to the Device
On some hardware, the USB serial console port may not be detected by the client operating system until the device is plugged into a power source.
If the client OS does not detect the USB serial console port, connect the power cord to the device to allow it to start booting.
If the USB serial console port appears without power applied to the device, then the best practice is to wait until the terminal is open and connected to the serial console before powering on the device. That way the client can view the entire boot output.
Locate the Console Port Device
The appropriate console port device that the workstation assigned as the serial port must be located before attempting to connect to the console.
Note
Even if the serial port was assigned in the BIOS, the workstation OS may remap it to a different COM Port.
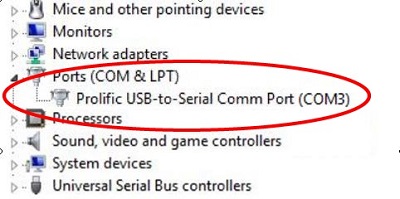
To locate the device name on Windows, open Device Manager and expand
the section for Ports (COM & LPT). Look for an entry with a title such
as Prolific USB-to-Serial Comm Port. If there is a label in the name that contains COMX
where X is a decimal digit (e.g. COM3), that value is what would
be used as the port in the terminal program.
The device associated with the system console is likely to show up as, or
start with, /dev/cu.usbserial-<id>.
Run ls -l /dev/cu.* from a Terminal prompt to see a list of available
USB serial devices and locate the appropriate one for the hardware. If
there are multiple devices, the correct device is likely the one with the
most recent timestamp or highest ID.
The device associated with the system console is likely to show up as
/dev/ttyUSB0. Look for messages about the device attaching in
the system log files or by running dmesg.
Note
If the device does not appear in /dev/, see the note above in the
driver section about manually loading the Linux driver and then try
again.
The device associated with the system console is likely to show up as
/dev/cuaU0. Look for messages about the device attaching in
the system log files or by running dmesg.
Note
If the serial device is not present, ensure the device has power and then check again.
Launch a Terminal Program
Use a terminal program to connect to the system console port. Some choices of terminal programs:
For Windows the best practice is to run PuTTY on Windows or SecureCRT. An example of how to configure PuTTY is below.
Warning
Do not use HyperTerminal.
For macOS the best practice is to run GNU screen, or cu. An
example of how to configure GNU screen is below.
For Linux the best practices are to run GNU screen, PuTTY on Linux,
minicom, or dterm. Examples of how to configure PuTTY and GNU
screen are below.
For FreeBSD the best practice is to run GNU screen or cu. An
example of how to configure GNU screen is below.
Client-Specific Examples
PuTTY on Windows
Open PuTTY and select Session under Category on the left-hand side.
Set the Connection type to Serial
Set Serial line to the console port determined previously
Set the Speed to
115200bits per second.Click the Open button
PuTTY will then display the console.
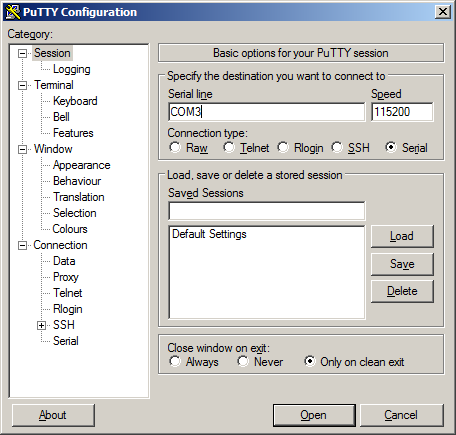
An example of using PuTTY on Windows
PuTTY on Linux
Open PuTTY from a terminal by typing
sudo puttyNote
The
sudocommand will prompt for the local workstation password of the current account.Set the Connection type to Serial
Set Serial line to
/dev/ttyUSB0Set the Speed to
115200bits per secondClick the Open button
PuTTY will then display the console.
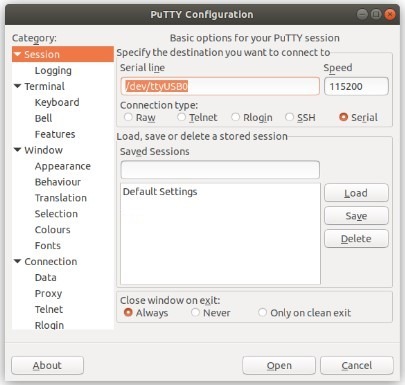
An example of using PuTTY on Linux
GNU screen
In many cases screen may be invoked simply by using the proper command line,
where <console-port> is the console port that was located above.
$ sudo screen <console-port> 115200
Note
The sudo command will prompt for the local workstation password of the
current account.
If portions of the text are unreadable but appear to be properly formatted, the
most likely culprit is a character encoding mismatch in the terminal. Adding the
-U parameter to the screen command line arguments forces it to use UTF-8
for character encoding:
$ sudo screen -U <console-port> 115200
Terminal Settings
The settings to use within the terminal program are:
- Speed:
115200baud, the speed of the BIOS- Data bits:
8- Parity:
None
- Stop bits:
1- Flow Control:
Off or XON/OFF.
Warning
Hardware flow control (RTS/CTS) must be disabled.
Terminal Optimization
Beyond the required settings there are additional options in terminal programs which will help input behavior and output rendering to ensure the best experience. These settings vary location and client, and may not be available in all clients or terminals.
These are:
- Terminal Type:
xtermThis setting may be under Terminal, Terminal Emulation, or similar areas.
- Color Support:
ANSI colors / 256 Color / ANSI with 256 Colors
This setting may be under Terminal Emulation, Window Colors, Text, Advanced Terminfo, or similar areas.
- Character Set / Character Encoding:
UTF-8This setting may be under Terminal Appearance, Window Translation, Advanced International, or similar areas. In GNU screen this is activated by passing the
-Uparameter.- Line Drawing:
Look for and enable setting such as “Draw lines graphically”, “Use Unicode graphics characters”, and/or “Use Unicode line drawing code points”.
These settings may be under Terminal Appearance, Window Translation, or similar areas.
- Function Keys / Keypad:
Xterm R6In Putty this is under Terminal > Keyboard and is labeled The Function Keys and Keypad.
- Font:
For the best experience, use a modern monospaced Unicode font such as DejaVu Sans Mono, Liberation Mono, Monaco, Consolas, Fira Code, or similar.
This setting may be under Terminal Appearance, Window Appearance, Text, or similar areas.
What’s Next?
After connecting a terminal client, it may not immediately see any output. This could be because the device has already finished booting, or it may be that the device is waiting for some other input.
If the device does not yet have power applied, plug it in and monitor the terminal output.
If the device is already powered on, try pressing Space. If there is still
no output, press Enter. If the device was booted, it may re-display the
console menu or login prompt, or produce other output indicating its status.
From the console, a variety of things are possible, such as changing interface addresses. There is a full explanation of every console menu option in the pfSense software documentation.
Troubleshooting
Serial Device Missing
With a USB serial console there are a few reasons why the serial port may not be present in the client operating system, including:
- No Power
Some models require power before the client can connect to the USB serial console.
- USB Cable Not Plugged In
For USB consoles, the USB cable may not be fully engaged on both ends. Gently, but firmly, ensure the cable has a good connection on both sides.
- Bad USB Cable
Some USB cables are not suitable for use as data cables. For example, some cables are only capable of delivering power for charging devices and not acting as data cables. Others may be of low quality or have poor or worn connectors.
The ideal cable to use is the one that came with the device. Failing that, ensure the cable is of the correct type and specifications, and try multiple cables.
- Wrong Device
In some cases there may be multiple serial devices available. Ensure the one used by the serial client is the correct one. Some devices expose multiple ports, so using the incorrect port may lead to no output or unexpected output.
- Hardware Failure
There could be a hardware failure preventing the serial console from working. Contact Netgate TAC for assistance.
No Serial Output
If there is no output at all, check the following items:
- USB Cable Not Plugged In
For USB consoles, the USB cable may not be fully engaged on both ends. Gently, but firmly, ensure the cable has a good connection on both sides.
- Wrong Device
In some cases there may be multiple serial devices available. Ensure the one used by the serial client is the correct one. Some devices expose multiple ports, so using the incorrect port may lead to no output or unexpected output.
- Wrong Terminal Settings
Ensure the terminal program is configured for the correct speed. The default BIOS speed is
115200, and many other modern operating systems use that speed as well.Some older operating systems or custom configurations may use slower speeds such as
9600or38400.- Device OS Serial Console Settings
Ensure the operating system is configured for the proper console (e.g.
ttyS1in Linux). Consult the various operating installation guides on this site for further information.
PuTTY has issues with line drawing
PuTTY generally handles most cases OK but can have issues with line drawing characters on certain platforms.
These settings seem to work best (tested on Windows):
- Window:
- Columns x Rows:
80x24
- Window > Appearance:
- Font:
Courier New 10pt or Consolas 10pt
- Window > Translation:
- Remote Character Set:
Use font encoding or UTF-8
- Handling of line drawing characters:
Use font in both ANSI and OEM modes or Use Unicode line drawing code points
- Window > Colours:
- Indicate bolded text by changing:
The colour
Garbled Serial Output
If the serial output appears to be garbled, missing characters, binary, or random characters check the following items:
- Flow Control
In some cases flow control can interfere with serial communication, causing dropped characters or other issues. Disabling flow control in the client can potentially correct this problem.
On PuTTY and other GUI clients there is typically a per-session option to disable flow control. In PuTTY, the Flow Control option is in the settings tree under Connection, then Serial.
To disable flow control in GNU Screen, add the
-ixonand/or-ixoffparameters after the serial speed as in the following example:$ sudo screen <console port> 115200,-ixon
- Terminal Speed
Ensure the terminal program is configured for the correct speed. (See No Serial Output)
- Character Encoding
Ensure the terminal program is configured for the proper character encoding, such as UTF-8 or Latin-1, depending on the operating system. (See GNU Screen)
Serial Output Stops After the BIOS
If serial output is shown for the BIOS but stops afterward, check the following items:
- Terminal Speed
Ensure the terminal program is configured for the correct speed for the installed operating system. (See No Serial Output)
- Device OS Serial Console Settings
Ensure the installed operating system is configured to activate the serial console and that it is configured for the proper console (e.g.
ttyS1in Linux). Consult the various operating installation guides on this site for further information.- Bootable Media
If booting from a USB flash drive, ensure that the drive was written correctly and contains a bootable operating system image.