Using the remote access IPsec VPN
An IPsec VPN for remote users is preconfigured on the instance when it comes up. Configure the IPsec VPN on client devices to utilize this VPN.
See also
A guide for manually configuring Android or iOS (iPhone/iPod/iPad) mobile clients to establish an IPsec VPN is located in the pfSense® Documentation.
For iOS clients, a profile can be downloaded and installed that will
automatically configure an IPsec VPN to the instance. The profile can be
downloaded by visiting the page at VPN > IPsec Export: Apple Profile or by
loading the page directly at /iphone_ipsec_profile.php on the instance. If
the instance IP address were 23.20.204.54, the correct URL to visit would be
https://23.20.204.54/iphone_ipsec_profile.php. Using this page requires
authenticating to the web interface by typing the username (admin) and
password prior to being able to download the profile.
The profile should be downloaded and saved automatically upon opening the page. If the page is visited in a web browser on an iOS device, the device should automatically launch the Settings app and attempt to install the new profile. If the profile is downloaded to another non-iOS device, it can be sent via email as an attachment. If the attachment is opened in the iOS email client, the Settings app new profile installation will also open.
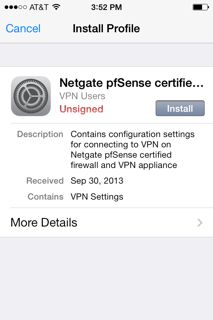
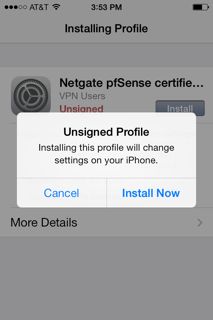
The name and description of the profile being installed will be displayed. Tap the Install button. A warning message will be displayed that indicates that the profile is unsigned. Tap on Install Now to continue.
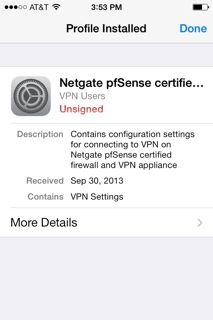
Enter the passcode for the iOS device (the one entered when waking the device from sleep) and the password to access the IPsec VPN (the one entered to get access to the GUI) when prompted and the profile will be installed. When the screen shows that the profile was installed, tap Done.
When the profile has been installed, the VPN can be enabled in the Settings app.
There will be a heading named VPN under the main Settings page. If there are
more than one VPN configured on the device, tap the VPN heading. The newly
installed profile should be selected. It will have a check mark next to it.
There will be an on/off switch at the top of the page to enable the VPN. If this
is the only VPN configured, the switch to enable the VPN will be next to the VPN
heading on the main Settings page. Tap the switch to enable the VPN. The client
will prompt for a username and password. The username (admin) should already
be filled in. Enter the password and tap OK. A welcome message should be
displayed. Tap OK and the VPN is ready to use.