Introduction to the Firewall Rules screen
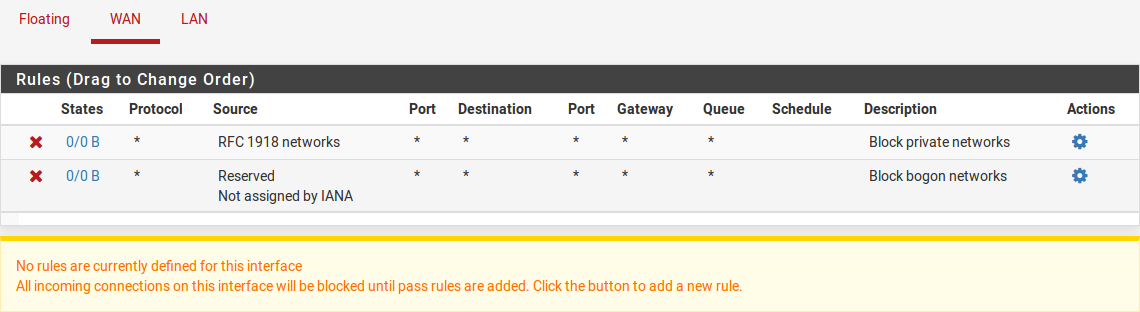
This section provides an introduction and overview of the Firewall Rules screen located at Firewall > Rules. This page lists the WAN ruleset to start with, which by default has no entries other than those for Block private networks and Block bogon networks if those options are active on the WAN interface, as shown in Figure Default WAN Rules.
Tip
Click  the to the right of the Block private networks or Block
bogon networks rules to reach the WAN interface configuration page where
these options can be enabled or disabled. See
Block Private Networks and
Block Bogon Networks for more details.
the to the right of the Block private networks or Block
bogon networks rules to reach the WAN interface configuration page where
these options can be enabled or disabled. See
Block Private Networks and
Block Bogon Networks for more details.
Default WAN Rules
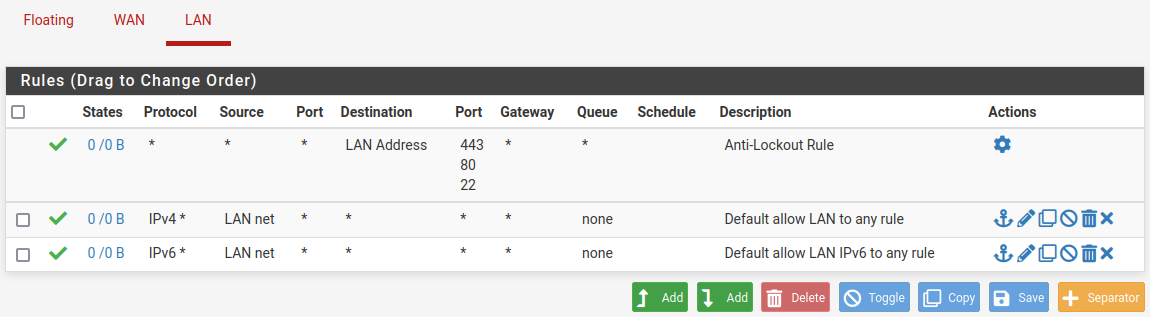
Click the LAN tab to view the LAN rules. By default, the only entries are
the Default allow LAN to any rules for IPv4 and IPv6 as seen in Figure
Default LAN Rules, and the Anti-Lockout Rule if it is active.
The anti-lockout rule is designed to prevent administrators from accidentally
locking themselves out of firewall management services. Click next to
the anti-lockout rule to reach the page where this rule can be disabled.
See also
For more information on how the Anti-Lockout Rule works and how to disable the rule, see Anti-lockout Rule and Anti-lockout.
Default LAN Rules
To display rules for other interfaces, click their respective tabs. OPT
interfaces will appear with their descriptive names, so if the OPT1 interface
was renamed DMZ, then the tab for its rules will also say DMZ.
To the left of each rule is a set of indicator icons, including:
The action of the rule: pass (
 ), block (
 ), or reject
(
), or reject
( ).
).Logging status: If logging is enabled for the rule,
 is present.
Advanced options: If the rule has any advanced options enabled, an
icon is present.
Hovering the mouse cursor over any of these icons will display text explaining their meaning. The same icons are shown for disabled rules, except the icon and the rule are a lighter shade of their original color.
Adding a firewall rule
To add a rule to the top of the list, click  Add.
Add.
To add a rule to the bottom of the list, click  Add.
Add.
Editing Firewall Rules
To edit a firewall rule, click  to the right of the rule, or double
click anywhere on the line.
to the right of the rule, or double
click anywhere on the line.
The edit page for that rule will load, and from there adjustments are possible. See Configuring Firewall Rules for more information on the options available when editing a rule.
Reordering Firewall Rules
The order of the rules on an interface can be changed in two different ways: Drag-and-drop or select-and-click.
To reorder rules using the drag-and-drop method:
Move the mouse over the firewall rule to move, the cursor will change to indicate movement is possible.
Click and hold the mouse button down
Drag the mouse to the desired location for the rule
Release the mouse button
Click
 Save to store the new rule order
Warning
Attempting to navigate away from the page after moving a rule, but before saving the order, will result in the browser presenting an error confirming whether to exit the page. If the browser navigates away from the page without saving, the rule will still be in its original location.
To move rules in the list in groups or by selecting them first, use the select-and-click method:
Select the rules to move
Note
Select rules by single clicking anywhere on their line or by checking the box at the start of the row.
Click
 on the row below where the rule should be moved.
Tip
Hold Shift before clicking the mouse on
to move the rule
below the selected rule instead of above.
When moving rules using the select-and-click method, the new order is stored automatically.
Copying Firewall Rules
To make a new rule that is similar to an existing rule, click  to the
right of the existing rule. The edit screen will appear with the existing rule’s
settings pre-filled, ready to be adjusted. When duplicating an existing rule,
the new rule will be added directly below the original rule. For more
information about how to configure the new rule, see Configuring Firewall Rules.
to the
right of the existing rule. The edit screen will appear with the existing rule’s
settings pre-filled, ready to be adjusted. When duplicating an existing rule,
the new rule will be added directly below the original rule. For more
information about how to configure the new rule, see Configuring Firewall Rules.
To copy multiple rules:
Select the rules to copy
Note
Select rules by single clicking anywhere on their line or by checking the box at the start of the row.
Click the
Copy button below the rule listThe firewall will open a new modal dialog with options to set before copying.
Select the Destination Interface
Select Convert interface definitions to automatically adjust the source of the rule to match the target interface, if necessary
Click
Paste to complete the operation
Warning
When copying rules to different interfaces, they may fall at the start or the end of the target interface rule list depending on the order of the interface rules in the configuration. Be prepared to reorder the rules on the target interface before applying changes.
Deleting Firewall Rules
To delete a single rule, click  to the right of the rule. The
firewall will present a confirmation prompt before deleting the rule.
to the right of the rule. The
firewall will present a confirmation prompt before deleting the rule.
To delete multiple rules:
Select the rows to remove
Note
Select rules by single clicking anywhere on their line or by checking the box at the start of the row.
Click the
Delete button below the rule listConfirm the action
Checking Rule Usage
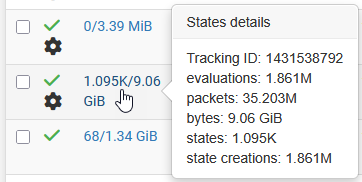
The States column contains usage counters for each rule. It shows the number of active states created by a rule and the amount of traffic consumed by those states.
Hovering the mouse over these counters shows additional detailed statistics:
Firewall Rule Usage Statistics
The statistics displayed by this view include:
- Tracking ID:
The firewall Rule Tracking ID which uniquely identifies this rule.
- Evaluations:
The number of times the firewall has evaluated this rule when processing packets.
- Packets:
The number of packets passed by this rule.
- Bytes:
The amount of traffic, in bytes, passed by this rule.
- States:
The number of active state table entries created by this rule.
- State Creations:
The total number of state table entries created by this rule.
Note
Though the firewall makes an effort to maintain these statistics, the values can reset over time depending on firewall ruleset reloads and other similar actions.
Clicking the value in this column displays a list of states created by the rule.
See also
Clearing States Created by a Rule
Click the icon to the right of a rule and then confirm the action to
clear all active states created by that rule.
Note
This only affects states on this interface created by this rule directly. It does not clear states on other interfaces where traffic may have exited the firewall.
Disabling and Enabling Firewall Rules
To disable a rule, click  at the end of its row. The appearance of the
rule will change to a lighter shade to indicate that it is disabled and the
icon changes to
at the end of its row. The appearance of the
rule will change to a lighter shade to indicate that it is disabled and the
icon changes to  .
.
To enable a rule which was previously disabled, click at the
end of its row. The appearance of the rule will return to normal and the
enable/disable icon will return to the original .
A rule may also be disabled or enabled by editing the rule and toggling the Disabled checkbox.
To disable or enable multiple rules at once:
Select the rules to disable
Note
Select rules by single clicking anywhere on their line or by checking the box at the start of the row.
Click the
Toggle button below the rule list
Rule Separators
Firewall Rule Separators are colored bars in the ruleset that contain a small bit of text, but do not take any action on traffic. They are useful for visually separating or adding notes to special parts of the ruleset. Figure Firewall Rule Separators Example shows how they can group rules and document the ruleset.
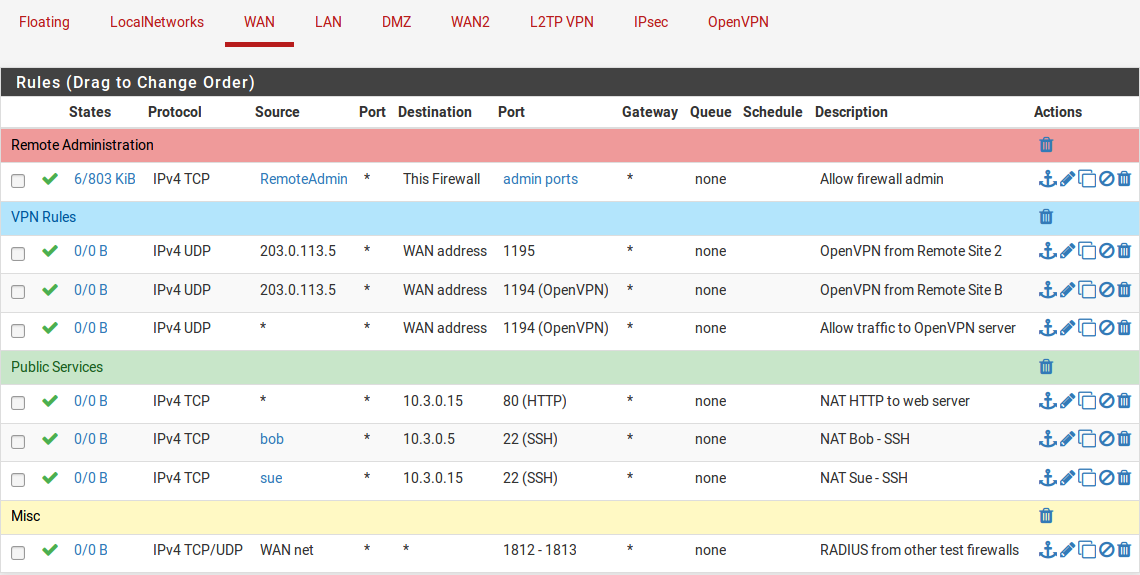
Firewall Rule Separators Example
To create a new Rule Separator:
Open the firewall rule tab where the Rule Separator will reside
Click
 Separator
Enter description text for the Rule Separator
Choose the color for the Rule Separator by clicking the
 icon of
the desired color
icon of
the desired colorClick and drag the Rule Separator to its new location
Click
Save inside the Rule Separator to store its contentsClick
Save at the bottom of the rule list
To move a Rule Separator:
Open the firewall rule tab containing the Rule Separator
Click and drag the Rule Separator to its new location
Click
Save at the bottom of the rule list
To delete a Rule Separator:
Open the firewall rule tab containing the Rule Separator
Click
inside the Rule Separator on the right sideClick
Save at the bottom of the rule list
Rule Separators cannot be edited. If a change in text or color is required, create a new Rule Separator and delete the existing entry.
Tracking Firewall Rule Changes
The firewall tracks rule creation and changes with data stored on each rule. These timestamps are visible when editing an existing rule.
See also