Tip
This is the documentation for the 22.02 version. Looking for the documentation of the latest version? Have a look here.
Installation
Use the following instructions to install TNSR 22.02 from an ISO image. Ensure that the target hardware meets the minimum specifications for a TNSR Supported Platform.
Note
These instructions have changed in TNSR 22.02 as the base OS for new installations is now Ubuntu.
Installation Process
Obtain the TNSR
.isoimage file from Netgate®.Write the
.isoimage to bootable media (DVD or USB drive) for hardware installations, or copy the.isoimage to a location readable by the hypervisor for virtual machine installations.Connect to the system or VM console.
Note
The installer supports both VGA and serial console output, with VGA as the default.
Check the TNSR Supported Platform documentation for notes about options which must be set before booting, for example in the system BIOS/UEFI, Hypervisor, or VM guest settings.
Insert or attach the boot media to the target system.
Boot the system using the TNSR image.
Note
If the optical drive or removable media is not set as the primary boot device for the hardware, then use the system boot menu to manually select the boot device.
Warning
The Netgate 5100 must boot the TNSR installation media with UEFI. Use the boot menu to select the UEFI choice for the USB installation media.
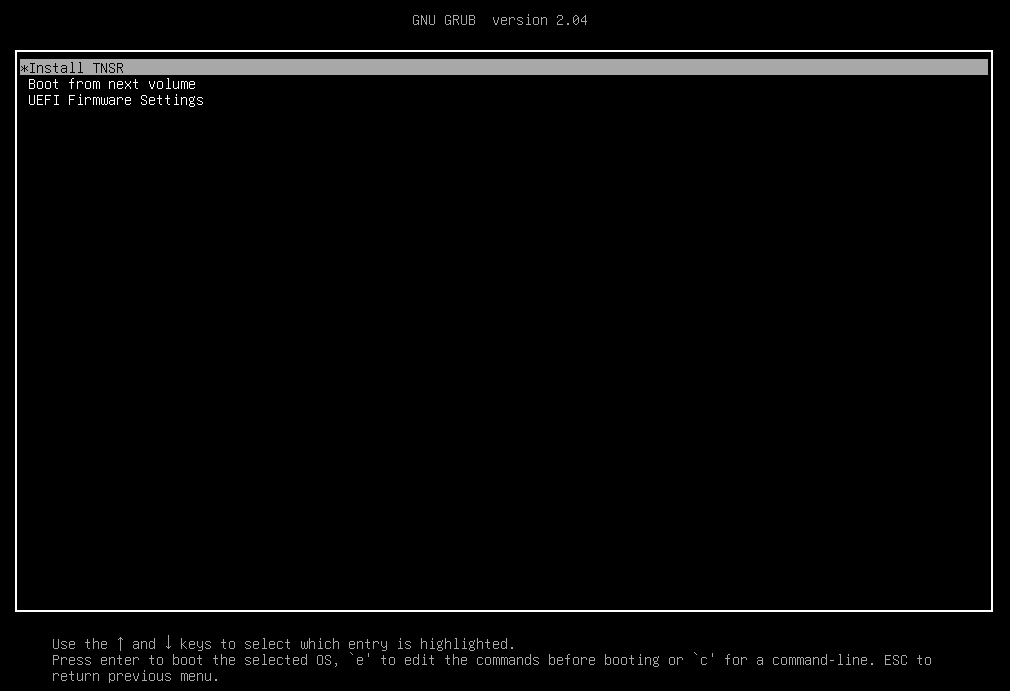
The installer may display its own boot menu depending on the boot method.
Press any key, such as
space, to stop the automatic boot timerHighlight the Install TNSR option and press
Enter
Note
If the installer does not present this menu, continue ahead to the next step.
Installation Media Boot Menu
Note
If the console does not display a visual indication of which item is selected, reboot the device and use the BIOS boot selection menu to choose UEFI as the boot method. For example, on the Netgate 5100, press
Escduring POST to access this menu, and of the two entries in the menu for the USB drive, choose the line that starts withUEFI:.Wait for the installer to launch. It may take a minute or two for the installer to load and display a selection menu.
If the system booted using a serial console, the installer will prompt to continue in either Rich or Basic mode. The exact choice depends on the serial client (e.g. GNU screen can use rich mode), but when in doubt, Basic mode is a safer choice.
Once the installer launches it displays a language selection menu
Select the language (e.g. English) and press
Enter
Set the keyboard configuration (optional)
Select a different Layout and/or Variant if the default selection is incorrect
Select Done and press
Enter
Configure network interfaces
The network setup screen defaults to having all interfaces disabled so TNSR can use them, however, using a host management interface is important so the best practice is to enable one interface for host OS control.
Pick one interface for host management and enable it for host OS control:
Select the interface
Select Edit IPv4
Set IPv4 Method to Automatic (DHCP)
Alternately, choose Manual and enter static address settings
Select Save
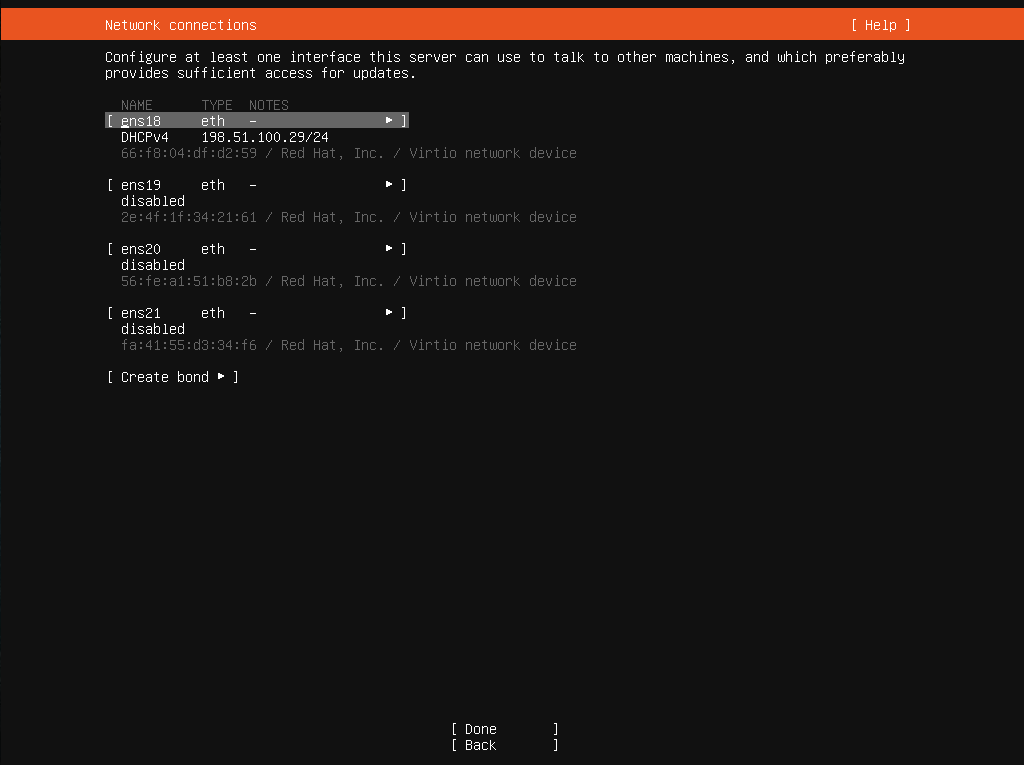
Network configuration screen with one management interface
Repeat that process for any additional interfaces which should remain under host control
Wait for the network configuration to complete (e.g. DHCP may take a few moments to obtain an address on enabled interfaces)
Select Done and press
EnterEnter proxy information if needed, otherwise select Done and press
EnterChoose an alternate mirror if desired, then select Done and press
Enter
Configure storage
By default the installer will choose to use the entire disk with Guided storage configuration, which is the best practice as it is automated and is the most likely method to result in a correct disk layout.
Select the appropriate disk (e.g. on Netgate 5100, select the M.2 disk)
Adjust other settings if needed
Select Done and press
EnterReview the filesystem layout and make changes if desired
Select Done and press
EnterSelect Continue and press
Enterto confirm overwriting the disk
See also
See Installing TNSR Using Software RAID for information on installing to multiple disks using software RAID.
Profile setup
This screen configures the first user for the system, which is also an administrator. This is used for host management and is separate from the default
tnsruser. This screen also sets the system hostname (not domain).Enter full name for the user
Enter the Hostname for this router (without domain)
Enter the username
Enter and confirm the password for the user
Select Done and press
Enter
Wait for the install to finish, which can take some time to complete as the installer attempts to download and apply any pending updates to Ubuntu along the way.
Select Reboot Now and press
EnterRemove the installation media
Press
EnterNote
Some platforms such as the Netgate 5100 will install correctly but may fail to reboot on their own at the end of the installation process. If this happens, reboot the device by holding in the power button until it turns off then press the button again to turn it back on. Alternately, remove and reapply power to the device.
After the system finishes rebooting, log in with the user and password chosen during the installation.
Note
The custom user setup in the installer does not have access to TNSR by default. Login as the
tnsruser directly or usesudo -u tnsr clixon_clito get into the TNSR CLI, then add this user to theadmingroup in NACM (NETCONF Access Control Model (NACM)).
Post-Installation Tasks
Configure Interfaces
Once the system reboots, network interfaces not configured in the installer will be disabled in the operating system. Depending on the hardware, these interfaces may automatically be enabled in TNSR. If TNSR does not see any interfaces, they will need to be manually configured in TNSR.
See also
See Setup NICs in Dataplane for details.
Check for Updates
Once the Host OS is capable of reaching the Internet, check for updates (Updating TNSR) before proceeding. This ensures the security and integrity of the router before TNSR interfaces are exposed to the Internet.
Configure the time zone
The Ubuntu installer does not offer to set the time zone, but it is easy to configure from the shell when the system is running.
Login as the user setup during the installation process and run the following command:
$ sudo dpkg-reconfigure tzdata
This starts the time zone configuration interface:
Select the geographic area in which this router resides (e.g. America)
Press
EnterSelect a city or region in the same time zone as this router (e.g. Chicago)
Press
Enter
After selecting a zone, the interface prints the new time zone as well as the current date and time in the new zone as well as UTC.
Hardware-Specific Information
Before continuing on, check the next section for hardware-specific installation guidance. Certain hardware may require additional configuration before it is usable by TNSR.