Tip
This is the documentation for the v21.03 version. Looking for the documentation of the latest version? Have a look here.
Installation
Use the following instructions to install TNSR 21.03 from an .ISO image. Ensure that the target hardware meets the minimum specifications for a TNSR Supported Platform.
Obtain the TNSR
.isoimage file from Netgate®.Write the
.isoimage to bootable media (DVD or USB drive) for hardware installations, or copy the.isoimage to a location readable by the hypervisor for virtual machine installations.Connect to the system or VM console.
Note
The installer supports both VGA and serial console output, with VGA as the default.
Check the TNSR Supported Platform documentation for notes about options which must be set before booting, for example in the system BIOS/EFI, Hypervisor, or VM guest settings.
Insert or attach the boot media to the target system.
Boot the system using the TNSR image.
Note
If the optical drive or removable media is not set as the primary boot device for the hardware, then use the system boot menu to manually select the boot device.
After a few seconds, the installer displays a TNSR 21.03 screen.
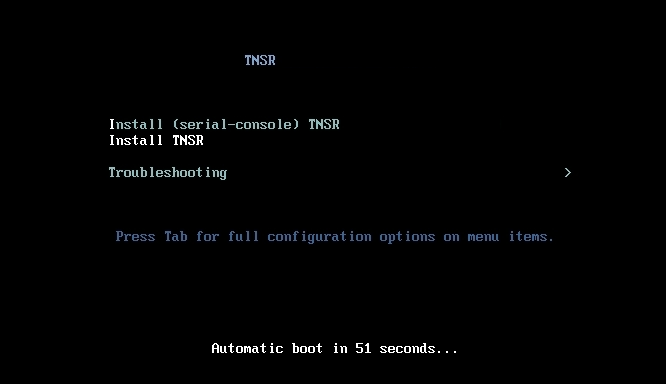
TNSR 21.03 Installation Menu
Press any key, such as
space, to stop the 60-second timer. The menu contains, at minimum, the following two choices:Install TNSR (serial-console) <version>: Select this option for hardware that uses serial port
0for its console.Install TNSR <version>: Select this option for installation via VGA console
Highlight the correct option for this hardware and press
Enterto begin the installation of TNSR. It may take a few seconds for the installer to display output to the console.Note
If the console does not display a visual indication of which item is selected, reboot the device and use the BIOS boot selection menu to choose UEFI as the boot method. For example, on the SG-5100, press
Escduring POST to access this menu, and of the two entries in the menu for the USB drive, choose the line that starts withUEFI:.Once the installer launches, it displays a menu labeled Installation with nine choices. All options marked with [!] must be configured to resolve all installation requirements.
Note
Some items marked with a ! will resolve on their own a few moments after the installer launches, such as options 3 and 4. Wait a few moments and enter
rto refresh the screen.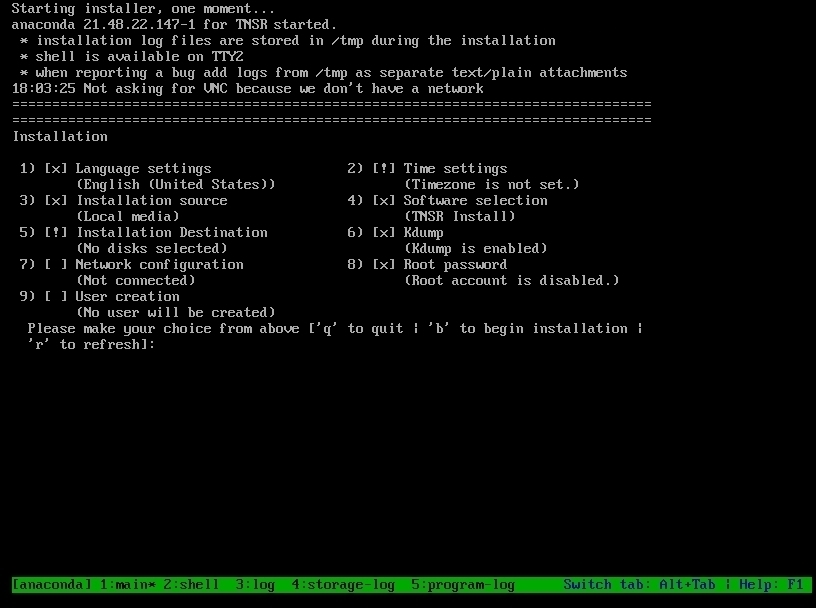
TNSR 21.03 Setup Menu
At a minimum, configure 2) Time Settings, 5) Installation Destination, and an administrator account with 9) User creation to allow the installer to proceed. These are covered next.
Configure the time zone
Enter
2to start the time zone configuration process.Enter
1to enter the time zone selection screen.Continue through the available options until the correct zone is located.
For example, Enter
3for America, then36for Chicago.Enter the number corresponding to the region and zone, or type out the zone name.
After selecting a zone, the installer will return to the main menu.
Configure the installation destination.
Enter
5to start the installation destination configuration process.Select the correct target disk on the next screen.
The installer will select the disk automatically when only one is present.
Enter
cto continue.Choose how to partition the disk.
The default Use All Space is the best practice.
Enter
cto continue.Choose the partition scheme.
The default LVM is the best practice.
Enter
cto finish and return to the main menu.
Add an administrator account.
Note
Security best practices dictate that it is best not to enable interactive logon for the
rootaccount. As such, therootaccount will be locked out after the installation. Use this process to add at least one alternate administrator account.Enter
9to start the user configuration process.Enter
1to create a new user.Enter
3to enter the username.Enter
4to configure the account to use a password.Enter
5to set and confirm the password for the user.Enter
6to mark the user as an Administrator.Enter
cto finish and return to the main menu.
Optionally configure a Host OS interface.
This will enable a network interface in the host OS for use as a management interface. This interface can then be used to access the system for troubleshooting or maintenance.
Warning
Though this is technically optional, using a management interface is the best practice.
Enter
7to start the interface configuration.Choose one of the listed network interfaces.
Configure interface parameters on this screen as needed, such as a static IP address.
Note
The default behavior is to use DHCP to obtain the interface address. If this is the desired behavior, then leave the address options as-is.
Enter
7to enable Connect automatically after reboot.Enter
8to enable Apply configuration in installer.Enter
cto complete the interface configuration and continue back to the interface list.Enter
cagain to exit the network configuration.
Once all options with [!] have been resolved, enter
bfrom the main menu to begin the installation. Messages are displayed indicating the progress of the installation. When the installer finishes its tasks, it displays message that says Installation complete. Press return to quit. At that point, pressEnterand the system will reboot.Note
The installer may spend several minutes displaying the message Performing post-installation setup tasks, but it will eventually continue.
When the system is restarting, remove the DVD or USB drive while the system reboots. CentOS 7 will start up automatically from the disk to which it was installed. If the installation media remains inserted, the system may boot into the installer again.
Note
The boot options in the system BIOS may need changed if it does not boot automatically into CentOS 7.
After the system finishes rebooting, log in with the user and password chosen during the installation.
Note
Once the system reboots, network interfaces not configured in the installer will be disabled in CentOS. Depending on the hardware, these interfaces may automatically be enabled in TNSR. If TNSR does not see any interfaces, they will need to be manually configured in TNSR. See Setup NICs in Dataplane for details.
Tip
One network interface should be enabled in the host OS as a management interface to allow access to the system for troubleshooting or maintenance. This can be configured in the installer, as mentioned above, or afterward.
Warning
Once the Host OS is capable of reaching the Internet, check for updates (Updating TNSR) before proceeding. This ensures the security and integrity of the router before TNSR interfaces are exposed to the Internet.
Before continuing on, check the next section for hardware-specific installation guidance. Certain hardware may require additional configuration before it is usable by TNSR.