Virtualizing with Proxmox® VE
This following article is about building and running pfSense® software on a virtual machine under Proxmox Virtual Environment (VE). The guide also applies to any newer Proxmox VE version. Article covers Proxmox VE networking setup and firewall virtual machine setup process. The guide does not cover how to install Proxmox VE.
A basic, working, virtual machine will exist by the end of this article.
Assumptions
Proxmox VE host is up and running
Host has at least two network interfaces available for WAN and LAN.
pfSense software ISO image is present on the Proxmox VE host
Basic Proxmox VE networking
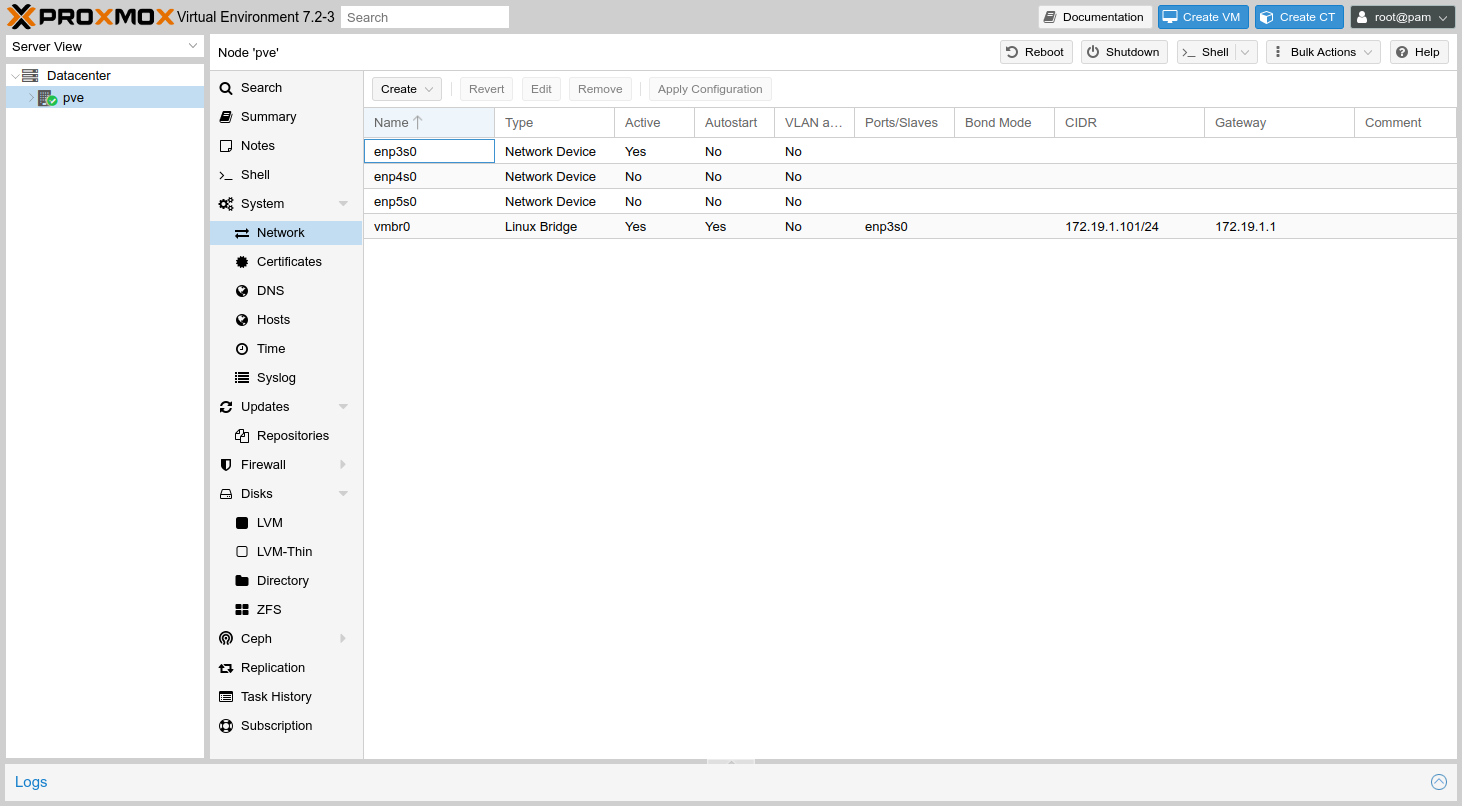
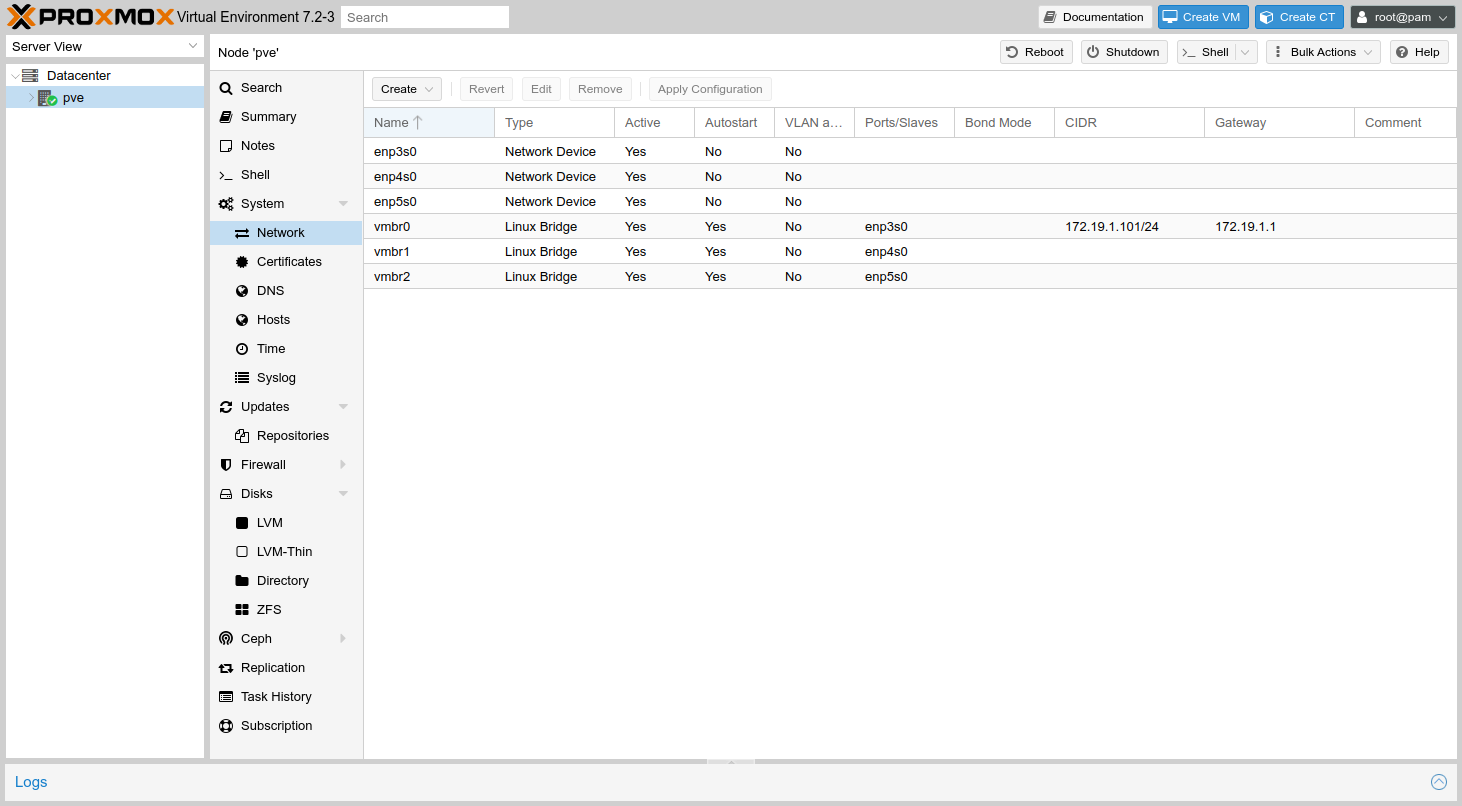
First create two Linux Bridges on Proxmox VE, which will be used for LAN and WAN on the firewall VM.
Select the host from the server view
Navigate to System > Network
This example uses enp4s0 and enp5s0 interfaces for the firewall, while
enp3s0 is for Proxmox VE management. The naming of interfaces will vary
depending on the hardware involved (interface type, bus location, etc.).
Click Create
Select Linux Bridge
Enter
enp4s0under Bridge ports

Repeat the process to add another Linux Bridge, this time add enp5s0 under
Bridge ports.

Click Apply Configuration to configure the new interfaces in the OS
Click Yes to confirm the action
Proxmox VE networking should now display two Linux bridges like on the following screenshot.
Note
If the interfaces do not show as Active, reboot the Proxmox VE host.
Creating a Virtual Machine
After creating WAN and LAN Linux bridges, now proceed to create a new virtual machine.
Click Create VM from the top right section to display the new virtual machine wizard
Navigate to the General tab
Enter a Name for the VM (e.g.
firewall)Navigate to the OS tab
Set the following options:
- Use CD/DVD disc image file:
Selected
- Storage:
local
- ISO image:
Select the previously uploaded ISO image
- Guest OS Type:
Other
Navigate to the System tab
Set the following options:
- Graphic card:
SPICE
Note
The SPICE console uses less CPU when idle and implements more advanced console features than the default console. It is compatible with the VNC Proxmox VE console as well as the more advanced virt-viewer console application.
Navigate to the Hard Disk tab
Set the following options:
- Bus/Device:
VirtIO Block
- Disk Size:
Enter an appropriate disk size, no less than
8GB.
Navigate to the CPU tab
Set the following options:
- Socket:
1- Cores:
1or more cores as needed- Type:
Host to match the CPU on the hypervisor hardware.
- Extra CPU Flags:
These settings adjust the CPU capabilities and behavior of the guest. If using Host for Type these can likely be left at the default.
When setting a CPU type other than Host, consider setting the AES flag to + (On) which allows the guest to use AES-NI (Cryptographic Accelerators).
Navigate to the Memory tab
Set the following options:
- Memory:
At least
1024MB
Navigate to the Network tab
Set the following options:
- Bridge:
vmbr1
- Model:
VirtIO (paravirtualized)
Navigate to the Confirm tab
Review the settings and make any final corrections if necessary
Click Finish
Wait for the VM creation process to finish
Now add another network adapter to the VM:
Expand the Server View list on the left to show the contents under Datacenter and the name of this hypervisor node (e.g. pve, proxmox, etc.)
Select the newly created virtual machine from list
Click Hardware in the right pane
Click Add
Click Network Device
Set the following options:
- Bridge:
vmbr2
- Model:
VirtIO (paravirtualized)
Click Add
Review the hardware list for the VM and confirm it now contains two network interfaces.
Starting and configuring the virtual machine
After creating a new virtual machine and adding network interfaces, it is time to start the virtual machine.
Expand the Server View list on the left to show the contents under Datacenter and the name of this hypervisor node (e.g. pve, proxmox, etc.)
Select the newly created virtual machine from list
Click Start
Click Console on the left, under Summary
Note
The Console button at the top will launch the console in a new window, which depending on the settings may require an additional client installation such as virt-viewer.
When the VM starts it will boot into the installer automatically. From there, follow the installation steps as usual, and reboot when finished.
See also
See Installation Walkthrough for a detailed walkthrough of the installation process.
After the virtual machine reboots, the console will stop at a prompt to assign interfaces.
Type
nand pressEnterto skip VLAN configurationEnter
vtnet0for WANEnter
vtnet1for LANPress
Enterif prompted for additional interfacesType
yand pressEnterto complete the interface assignment
After interfaces have been assigned, the VM will complete the boot process.
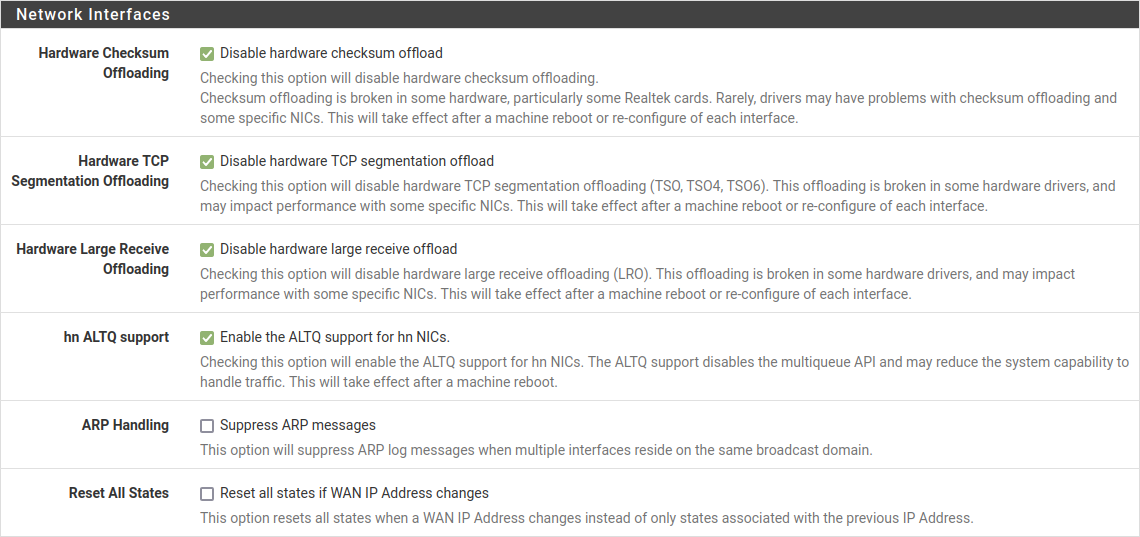
Disable Hardware Checksums with Proxmox VE VirtIO
When using VirtIO interfaces in Proxmox VE, network interface hardware checksum
offloading must be disabled. Current versions of pfSense software attempt to
disable this automatically for vtnet interfaces, but the best practice is to
double-check the setting in case changes in Proxmox VE result in the automatic
process failing.
Warning
Do not skip this step, otherwise the virtual machine will not properly pass traffic. Accessing the firewall may be sluggish at first, but changing this setting will correct that as well.
After the installation and interfaces assignment processes are complete, connect to the assigned LAN port from another computer or VM on the LAN-side bridge.
To disable hardware checksum offload:
Navigate to System > Advanced, Networking tab
Locate the Networking Interfaces section
Check Disable hardware checksum offload
Click Save
Reboot the firewall from Diagnostics > Reboot or the console menu
Congratulations, the virtual machine installation and configuration on Proxmox VE is now complete.
Booting UEFI
pfSense software can boot UEFI in a Proxmox VE guest but doing so requires a few extra steps.
When creating the VM:
Set Machine to q35
Set BIOS to OVMF (UEFI)
Add an EFI disk when prompted
Pick the storage for the EFI disk, other settings can remain at defaults
Note
An existing non-UEFI VM can be reconfigured to boot UEFI with these settings on its Hardware, but the process is more error-prone. For example, the EFI disk is a separate manual process and not semi-automated as it is when creating a VM.
After creating the VM:
Edit the VM Hardware and add a serial port device
Note
On some versions of pfSense software the EFI boot process for a Proxmox VE VM works more reliably with a serial port present in the VM hardware, even if the OS is not actively using the port.
On the first boot, go into the boot settings and disable secure boot:
Hit
Escwhile the boot splash screen is visibleSelect Device Manager
Select Secure Boot Configuration
Uncheck Attempt Secure Boot
Press
F10to savePress
Escto exitReset the VM
With secure boot disabled the VM can now boot with UEFI from the ISO as well as after installation.