OpenVPN Site-to-Site with Multi-WAN and OSPF
One way to configure a redundant OpenVPN deployment that uses multiple WAN interfaces for failover is by using a dynamic routing protocol such as OSPF.
See also
Design
The general layout of this scenario is in Figure Example OpenVPN Setup Involving OSPF Across Multiple WANs. In this example, both sites have multiple WANs.
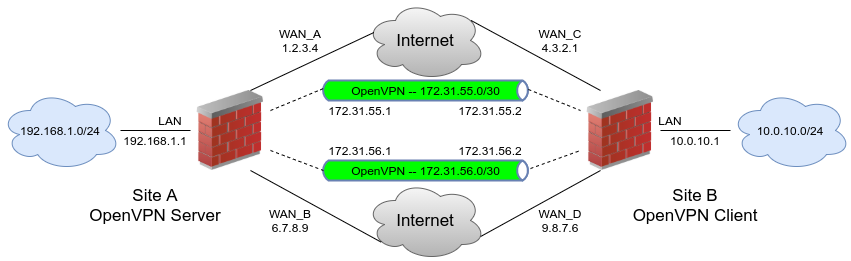
Example OpenVPN Setup Involving OSPF Across Multiple WANs
OpenVPN Configuration
First, set up a site-to-site OpenVPN instance on each WAN for the remote sites using SSL/TLS with a /30 subnet (OpenVPN Site-to-Site Configuration Example with SSL/TLS).
Do not fill in the Remote Networks fields on any of the server or client instances, only fill in Tunnel Network addresses
Setup two servers on the local side, each on a different WAN and port
Use two distinct, non-overlapping tunnel networks (e.g.
172.31.55.0/30and172.31.56.0/30.)Setup two clients on the remote firewall, each paired up with one of the above servers, matching the IP addresses and port numbers involved
Ensure the clients are set for their specific WAN
Choose the interface from the drop-down menu or a CARP VIP on one of the WANs.
Ensure these OpenVPN connections link up between client and server
The tunnel address on both sides will respond to a ping when they are working correctly and appropriate firewall rules are in place. If the tunnels do not establish, see Troubleshooting OpenVPN for suggestions on troubleshooting the connection.
Ensure the OpenVPN firewall rules allow all traffic or at least allow OSPF traffic from a source of the tunnel networks to a destination of any
The destination on the traffic will be a multicast address, which firewall rules can use to filter specifically if needed, but there isn’t much to be gained in the way of security if the source is locked down in the rules as the traffic cannot leave that segment.
FRR OSPF Configuration
Once both instances are connected, configure OSPF.
Install the FRR package from System > Packages, Available Packages tab on both firewalls
Navigate to Services > FRR OSPF, Interfaces tab
Add each OpenVPN interface
Set the cost to
10on the primary link and20on the secondary, and so on.Add the LAN and other internal interfaces as passive interfaces
Navigate to the [Global Settings] tab
Enter a Master Password
The content of the password does not matter significantly; FRR uses it internally, it is not used by administrators.
Set the Router ID to an IP-address-like value, (e.g.
10.3.0.1)The Router ID is unique on each device, which is why setting it to the LAN IP address of a router is a good practice.
Set the Area ID which is also an IP-address-like value
The Area ID is typically set to
0.0.0.0or0.0.0.1, but any properly formatted value may be used. The Area ID is the same for all routers involved in this VPNClick Save
Validation and Testing
Once OSPF is active on all routers, they will attempt to form a neighbor relationship.
The Status tab in FRR will show a full peering with each instance on each wan if they connected properly. It will also list the routes obtained via OSPF. Once that happens, try unplugging and reconnecting WANs and refreshing the status while running test traffic across the VPN, such as an ICMP ping.