Tip
This is the documentation for the 19.02 version. Looking for the documentation of the latest version? Have a look here.
- orphan:
Installation
Use the following instructions to install TNSR 19.02-1 from an .ISO image. Ensure that your selected system meets the minimum specifications for a TNSR Supported Platform.
Obtain the TNSR
.isofile image from Netgate®.Write the
.isoimage to bootable media (DVD or USB drive).Connect to the system console.
Note
The installer supports both VGA and serial console output, with VGA as the default..
Boot the system to the TNSR image on DVD or USB.
Note
If the optical drive or removable media is not set as the primary boot device for the hardware, then use the system boot menu to manually select the boot device.
After a few seconds, the installer displays a TNSR 19.02-1 screen.
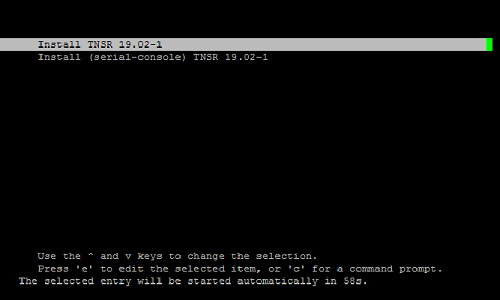
TNSR 19.02-1 Installation Menu
Press any key, such as
space, to stop the 60-second timer. The menu contains, at minimum, the following choices:Install TNSR: Select this option for installation via VGA console
Install (serial-console) TNSR: Select this option for hardware that uses serial port
0.
Highlight the correct option for your system and press
Enterto begin the installation of TNSR. It may take a few seconds for the installer to display output to the console.Once Anaconda launches, a menu labeled Installation will be displayed with nine choices. All options marked with [!] must be resolve all installation requirements.
Note
Configuring 2) Timezone settings, 5) Installation Destination, and an administrator account on 9) User creation will correct them all.
Option 7) Network configuration can enable a NIC in the host OS for use as a management interface. This interface can then be used to access the system for troubleshooting or maintenance. If an interface is connected to a network with a DHCP server during installation, the installer will automatically configure it as a management interface.
Option 8 - Root password can be used instead of option 9 above. Security best practices dictate that it is best not to enable interactive logon for the
Rootaccount.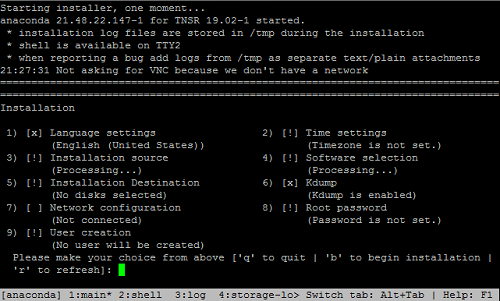
TNSR 19.02-1 Setup Menu
Once all options with [!] have been resolved, press
bfrom the main menu to begin the installation, then press theEnterkey. Messages are displayed indicating the progress of the installation. Once all installation steps have completed, a message is displayed that says “Installation complete. Press return to quit”. At that point, pressEnterand the system will reboot.Note
The installer may spend several minutes displaying the message Performing post-installation setup tasks, but it will eventually continue.
When the system is restarting, remove the DVD or USB drive while the system reboots. CentOS 7 will start up automatically from the hard drive. If the media remains inserted, the system may boot into the installer again.
Note
The boot options in the system BIOS may need changed if it does not boot automatically into CentOS 7.
After the system finishes rebooting, you can log in with the user and password you chose during the installation.
Once logged in, type
clixon_clito open the TNSR prompt.
Note
Once the system reboots, all of the network interfaces will be disabled in CentOS. The interfaces will need to be re-enabled in TNSR.
Tip
One network interface should be enabled in the host OS as a management interface to allow access to the system for troubleshooting or maintenance.