CentOS 7.1
Download
CentOS-7-x86_64-Minimal-1503-01.iso. Go to the CentOS Website and download the Minimal ISO. Click one of the mirror links to download the file.Write the image directly to a USB memstick.
See also
- Writing Flash Drives
Writing an OS installation image to flash media
Connect to the console port using a mini-USB cable attached to another system.
See also
- Connecting to Console Port
Connecting to the console port. Cable is required.
Place the memstick in one of the USB ports and boot the system.
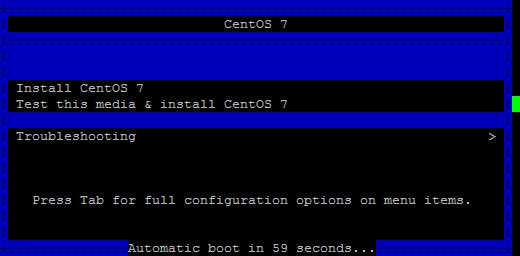
After a minute, a screen will display a menu that offers the choice to Install CentOS 7 or Test this media & install CentOS 7. Move the cursor to either of the above lines and press the Tab key.
The command line used to start the kernel will be displayed. The current installation options will be displayed, such as
vmlinuz initrd=initrd.img
inst.stage2=hd:LABEL=CentOS\x207\x20x86_64 quiet
. Move the cursor to the end of the line, press Space and then typeconsole=ttyS1,115200n8. Press the Enter key.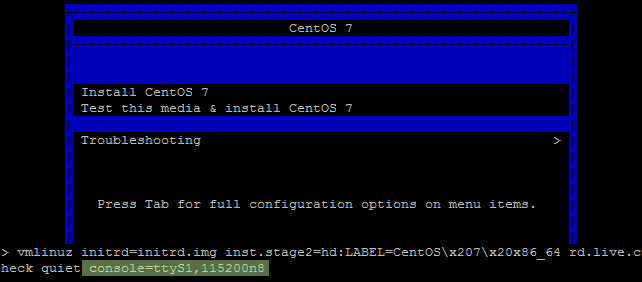
The kernel will then start. It can take a few seconds for output to be displayed on the console, but after some time the installer will appear.
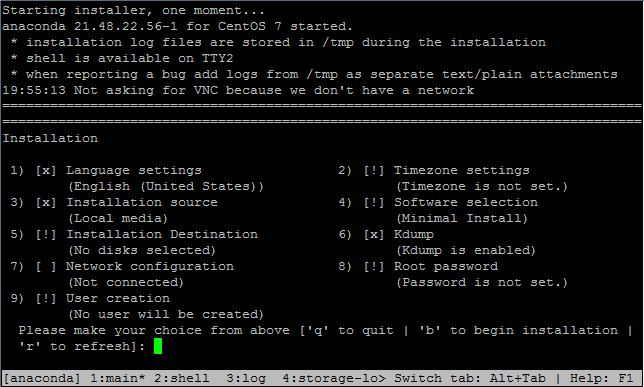
A menu labeled Installation will be displayed which has nine choices. All items with [!] must be resolved before continuing with the installation. Configuring Timezone settings, Installation Destination, and Root Password will correct them all.
Press b from the main menu to begin the installation, then press the Enter key. Messages are displayed indicating the progress of the installation as it works. Once all installation steps have completed, a message is displayed that says “Installation complete. Press return to quit”. At that point, press Enter and the system will reboot.
Note
The system will appear to hang on Performing post-installation setup tasks, but it will continue after about 1 minute.
When the console prints a message that the system is restarting, remove the USB drive from the USB port while the system reboots. CentOS 7 will start up automatically from the hard drive. If the USB drive remains attached, the system will boot into the installer again.
After the system finishes rebooting, log in with the user root and the chosen password. Refer to the I/O Ports section for physical port assignments.